User manual ver. 20250316
This document collects information on the safety, installation and use of the AURATON 2YA device.
Temperature controller (dual sensor)
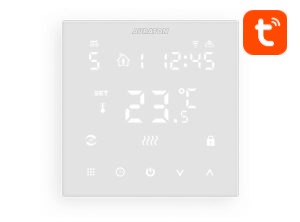
AURATON 2YA is a flush-mounted, wired temperature controller with an additional external temperature sensor, with the option of Wi-Fi control, designed to work with a gas or electric heating device.
Functions
|
æ æ
|
Two sensors: built-in and external AURATON 2YA allows the use of 2 independent temperature sensors: internal and external. |
 |
Temperature accuracy 0.5 °C Maintains the temperature at the selected level. |
|
Î
|
Child Lock The child lock can be used to prevent improper operation. |
|
]
|
Data memory Data will be remembered after power off. |
|
õ
|
Vacation Mode Lets you enjoy savings and security while away |
|
é
|
External sensor temperature Possibility to check the external sensor temperature. |
Description of AURATON 2YA
wired temperature controller
On the front of the controller housing there is an LED display and five touch-sensitive function buttons.
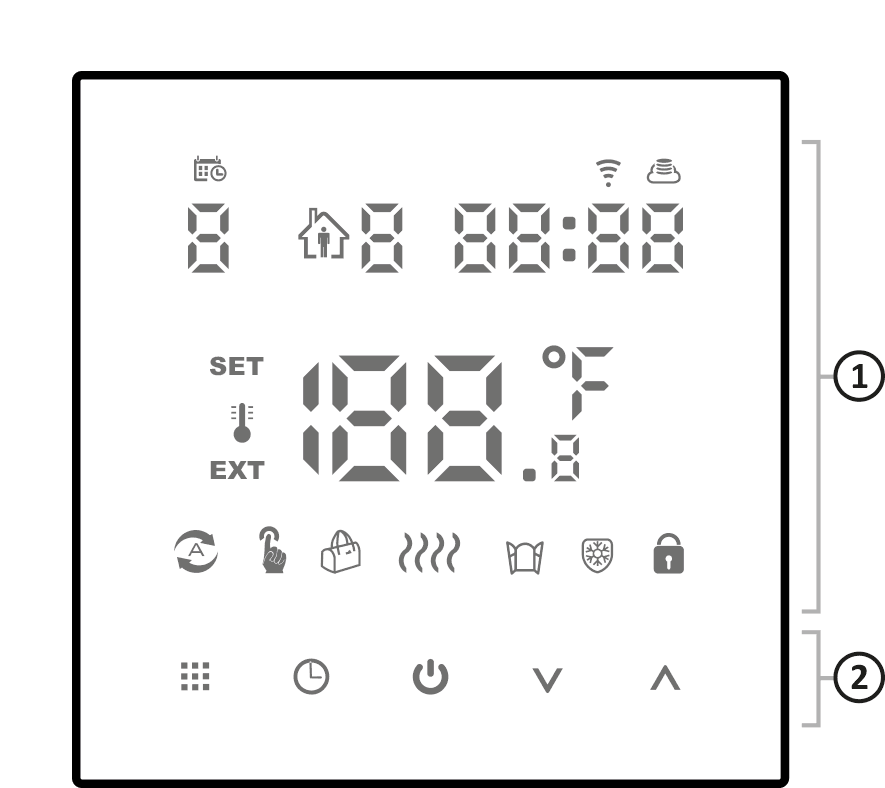
- display
- function buttons
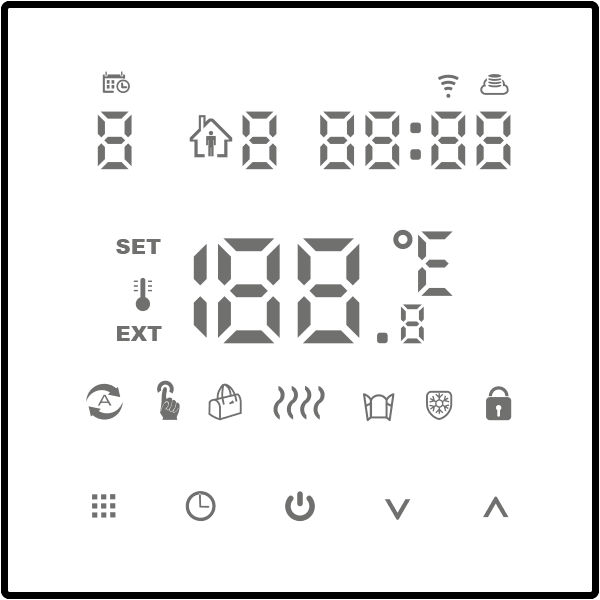
Display
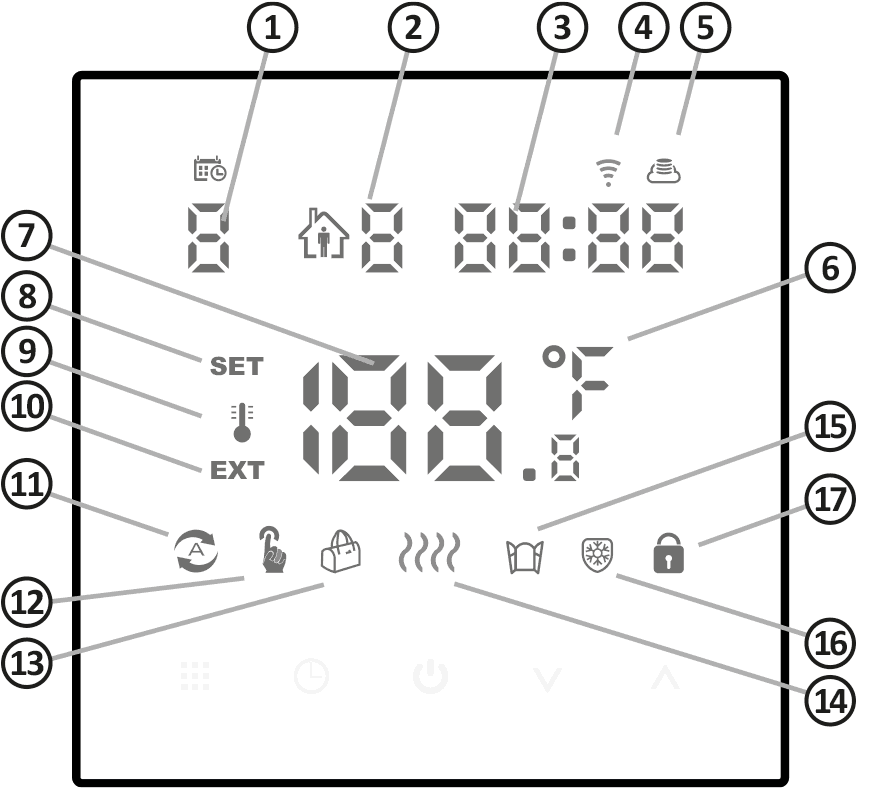
- Day of the week (1-7) – Indicates the day of the week. Each day is assigned a number. Program schedule (programming).
- Program number – Indicates the number of the program currently being run. (see chapters: "Factory programs" and "Weekly programming").
- Clock – time is displayed in 24-hour format.
- Wi-Fi connection – indicates a Wi-Fi connection.
- Cloud Icon - EZ Distribution Mode
- Temperature Unit – Indicates whether the temperature is displayed in degrees Celsius (°C).
- Temperature – In normal operation mode, AURATON 2YA displays the temperature of the room in which the external sensor is installed.
- SET – setting the temperature
- Room temperature
- External NTC sensor
- Programming mode ( Ü )
- Manual mode ( Ö ); ( Ü + Ö – temporary manual mode)
- Holiday Mode Indicator ( õ ) – Holiday mode, holidays and temp can be set to run in countdown mode
- Heating – symbol visible when the heating device is operating
- Active window function indicator (÷)
- Cooling mode – a flashing icon ( â ) indicates that the cooling device is currently operating
- Lock ( Î ) – indicator that the child lock function is enabled.
Function buttons
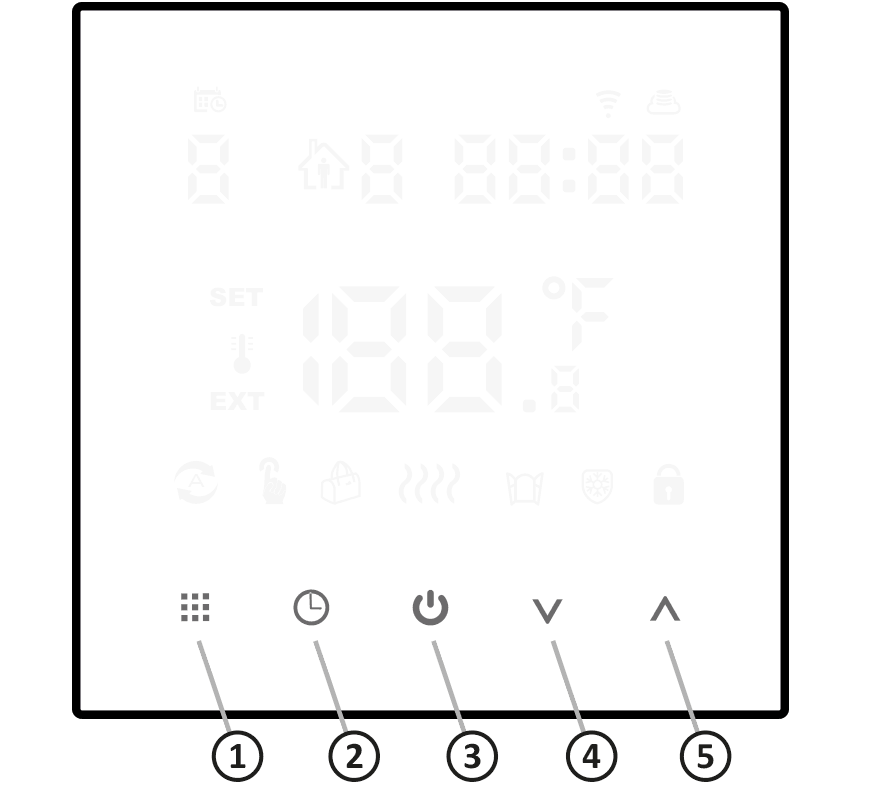
- menu (ë)
- a short press when the controller is turned on switches between manual and automatic operation
- holding for about 3-5 seconds when the controller is turned on will take you to the programming settings
- holding for about 3-5 seconds when the controller is turned off allows you to go to the advanced option A
- Confirmation button (Ê)
- to confirm, use it together with ( ë )
- clock setting short press to set the time
- Vacation mode Ê button for about 3-5 seconds OFF appears , press ( Á ) or ( Â ), change it to ON and press ( Ê ) to turn on vacation mode
- holding for about 3-5 seconds when the controller is turned off allows you to go to the advanced option B
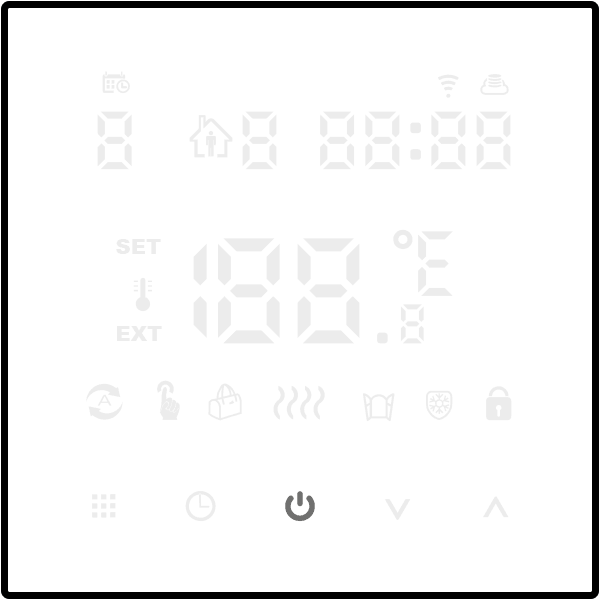
- regulator switch ( ã ) – short press to turn the regulator on/off
- decrease button ( Á ) – long press to lock/unlock
- increase button (AND)
- long press to check the temperature of the external sensor (only available for BN item, select N3 in advanced option B)
- In the program model, pressing ( Á ) or ( Â ) will switch to temporary manual mode.
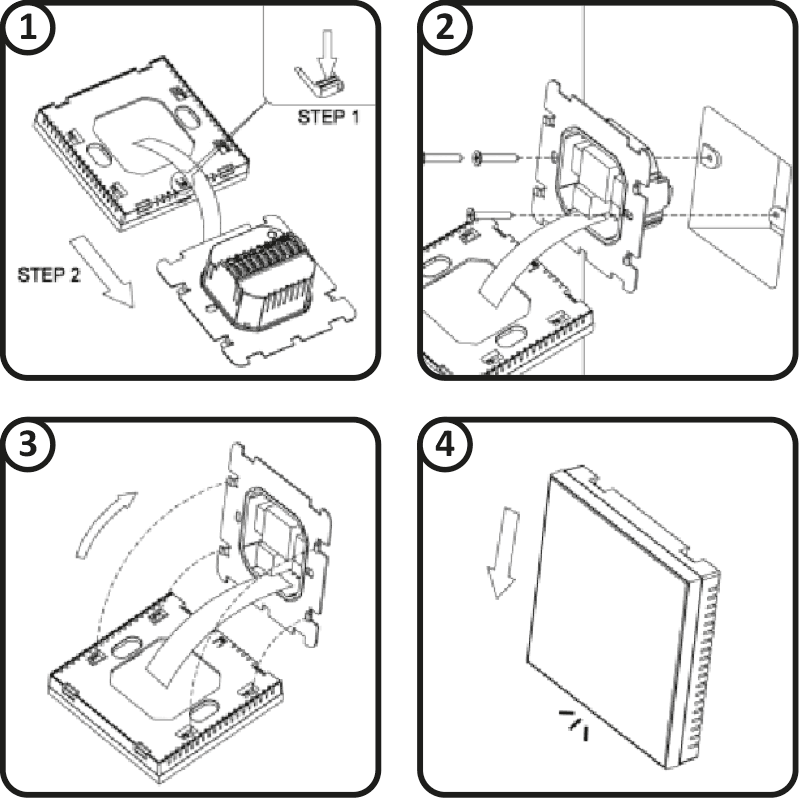
AURATON 2YA mount
weekly, wired temperature controller
- Remove the cover as shown below.
- Screw the rear part of the AURATON 2YA housing to a standard Ø 60 mm electrical box using the screws included in the kit.
- Put the casing on.
First start-up
Once the power is connected correctly, all segments will appear on the LED display for one second.
Then the controller will wait for the first start-up or time setting (off mode)
Setting the clock and day of the week
To set the clock, the controller must be in off mode.
- Press and hold ( Ê ) for 3-5 seconds. The minutes segment will flash on the display.
- the function buttons ( Á Â ) to set the desired minute and confirm with the button ( Ê ).
- the function buttons ( Á Â ) to set the correct value in the hour segment and confirm again with the button ( Ê )
- The day of the week symbol will flash in the upper left corner of the display. Use the function buttons ( Á Â ) to set the desired day of the week and confirm your selection with the ( Ê ) button.
When programming any functions, not pressing any button for 10 seconds is equivalent to confirming the entered data.
The first press of any function button always displays full information, and only then does the button function start.
Programming
Before starting programming, set one of the three program operation schedules in the controller menu.
Setting the operating schedule of the controller programs: see the Advanced Settings .
The AURATON 2YA can store up to six programs and work in three schedules. This allows for exceptionally precise planning of the building's temperature depending on the time of day.
Schedule 0 (5 + 2 days; factory setting) – allows you to set programs for Monday through Friday and Saturday and Sunday.
Schedule 1 (6 + 1 day) – allows you to set programs for Monday through Saturday and Sunday separately.
Schedule 2 (7 days) – sets six programs for the entire week.
Sample factory programs
| Ä 1 | incentive | from 6:00 | 20 °C |
| Ä 2 | away from home | from 8:00 | 15 °C |
| Ä 3 | returning home | from 11:30 | 15 °C |
| Ä 4 | away from home | from 1:30 p.m. | 15 °C |
| Ä 5 | returning home | from 5:00 p.m. | 22 °C |
| Ä 6 | night | from 10:00 p.m. | 15 °C |
To start programming you need to:
The controller must be turned on
ë button for approximately 5 seconds until the hour segment flashes on the display.

Use the ( Á Â ë ) button again

Use the ( Á Â ) buttons to select the minute of the program start and then move on to the temperature setting by pressing the ( ë ) button.
Use the ( Á Â ) buttons to select the program temperature and then move on to setting the next program by pressing the ( ë ) button.
Set the next programs, up to 6, according to the principle above.
This is how we set the programs for Monday through Friday (5 days). To set the next 6 programs for Saturday and Sunday (2 days), proceed in the same way as for weekdays. The display will show the number 2, indicating Saturday and Sunday.
After completing the program settings, the controller will automatically save the entered settings and resume normal operation.
When setting the 2nd work schedule (2:7 days), you only need to set 6 programs that will be executed every day for the entire week.
Manual control
Ö
If for any reason you want to interrupt automatic operation at a given moment and change the maintained temperature, you can do it manually.
Use the ( ë ) button to select manual mode, which is indicated on the display by the ( Ö ) symbol. Then, ÁÂ to select the desired value, which will be automatically saved. To return to the program (automatic operation), use the ( ë Ü ) symbol will then be visible on the display
You can also activate a temporary manual mode that maintains the manual temperature until the next program change.
To activate temporary manual mode, press the ( Á or  ) button while in automatic mode, then use the same buttons to set the desired value.
To cancel this mode, press the ( ë ) button until the ( Ü ) symbol appears on the display.
Vacation mode
õ
If you'd like to suspend programs for an extended period, you can use vacation mode. While this option is active, the AURATON 2YA only maintains the "vacation temperature."
Vacation mode can be used for a maximum of 30 days.
To activate the holiday mode (controller turned on):
- Ê button for approximately 5 seconds until the display shows flashing OFF .
- Use the ( Á Â ) buttons to change the text to ON , then confirm with the ( Ê ) button.
- Select the appropriate number of days using the ( Á Â Ê ) button.

- Then use the ( Á Â ) buttons to set the desired temperature.
- Confirm everything with the ( Ê ) button.
While vacation mode is in effect, the ( õ ) symbol will be displayed on the screen.
To end vacation mode more quickly, press the ( Ê ) button for approximately 5 seconds and use the ( Á Â ) buttons to change the text to OFF . Then confirm your selection with the ( Ê ) button.
When programming any functions, not pressing any button for 10 seconds is equivalent to confirming the entered data.
The optimal comfort temperature is 18℃ – 22℃.
Advanced Function A
When the AURATON 2YA controller is off, long press the ( ë ) button for 3-5 seconds to access advanced option A.
Points A1 to AE should be selected by short pressing the ( ë ) button, and changes to them can be made using the ( ÁÂ ) buttons.
You can confirm the settings with the ( ë ) button, which will save them and allow the controller to resume normal operation, or wait approximately 5 seconds for them to be automatically saved. In this case, the controller will remain off.
Advanced Settings Table A.
| No. | Description | Function | Factory setting |
| A1 | Calibration of temperature readings. | -9 °C to +9 °C (Displayed as corrected room temperature value) | -1 |
| A2 | Setting the start/stop operating temperature difference (hysteresis) | 0.5-2.5 °C | 1 °C |
| A3 | Child lock setting |
0: partial lock, only the power button can be used 1: full lock, all buttons locked |
0 |
| A4 | On/off state memory after power failure |
0: After power is restored, it remains in the pre-loss state. 1: After power is restored, the controller remains off 2: After power is restored, the controller remains on |
0 |
| A5 | Standby brightness | Brightness levels: 0 to 4 (0 = off) | 3 |
| A6 | Program work schedule |
0: 5+2 (Monday to Friday + Saturday and Sunday) 1: 6+1 (Monday to Saturday + Sunday) 2: 7 (all week) |
0 |
| A7 | Setting the minimum temperature range | 1-10 °C | 5 °C |
| A8 | Setting the maximum temperature range | 20-70 °C | 35 °C |
| A9 | Antifreeze temperature | Range: 1-10 °C. When the temperature is set to 10 °C, if the ( Â ä will be displayed and the low temperature protection will be cancelled. | 5 °C |
| AA | High temperature protection for external sensor | Range: 20-70 °C. When the temperature is set to 20 °C, if the ( Á ä will be displayed and the high temperature protection will be canceled. | 45 °C |
| AB | High temperature protection temperature difference setting | 1-9 °C | 2 °C |
| AC | Window function triggers temperature | Range: 10-20 °C. The set temperature is 10 °C, lower it, it will display ( ä ), then cancel this function. | – |
| AD | Window function operation time | 50-60 min. | 15 |
| AF | Factory reset | The Ao symbol is displayed, hold down the ( Ê ) button, the controller is reset | |
| AH | Heating/cooling mode |
0: heating 1: cooling |
0 |
| AE | Brightness after waking up | Brightness levels: 1 to 5 | 4 |
Advanced Function B
When the AURATON 2YA controller is off, long-press the ( Ê ) button for 3-5 seconds to access advanced option B.
Points BN to Bo should be selected by short-pressing the ( ë ) button, and changes to them can be made using the ( ÁÂ ) buttons.
You can confirm the settings with the ( ë ) button, which will save them and allow the controller to resume normal operation, or wait approximately 5 seconds for them to be automatically saved. In this case, the controller will remain off.
Advanced Settings Table B.
| No. | Description | Function | Factory setting |
| BN | Sensor control options |
N1: controller operation only with built-in sensor N2: controller operation only with an external sensor. N3: controller operation with two sensors. In this case, the heating will be turned off when either sensor reaches the required temperature. |
N1 |
| BC | Descaling function |
0: Disable descaling function 1: Turn on the descaling function |
0 |
| Because | Software version | It cannot be changed | 02 |
Select the correct operation mode for the built-in and external sensors. In the event of an incorrect selection or sensor damage (failure), "E1" or "E2" will be displayed on the screen. The AURATON 2YA regulator will turn off the heating until the fault is removed.
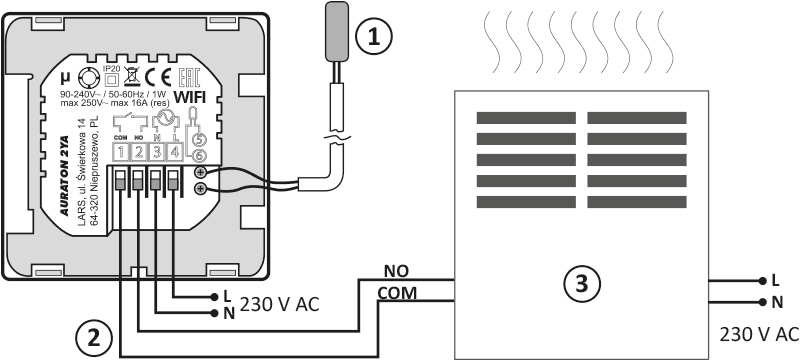
Connection diagram
Connections to a gas furnace – potential-free control
- External temperature sensor
- Control
- A heating device, e.g. a gas furnace
Connections to an electrical device – voltage control
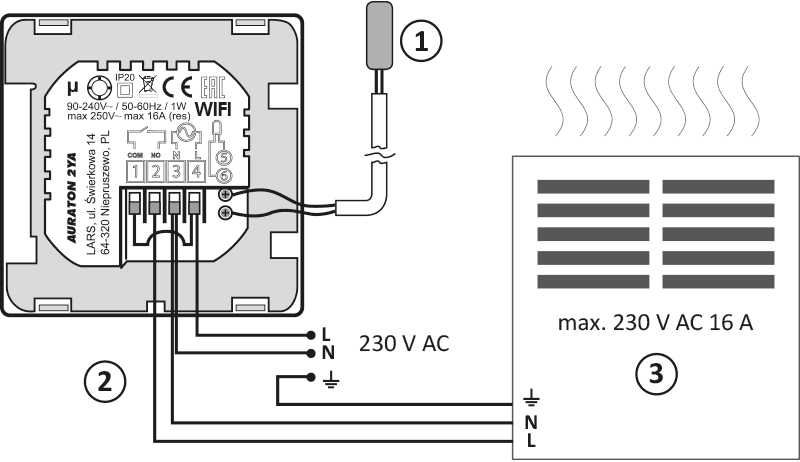
- External temperature sensor
- Control
- Electric heating or air conditioning device (max. 230 V AC 16 A)
Q
When installing the AURATON 2YA, the power supply should be turned off. It is recommended that the regulator be installed by a specialist.
The building's permanent installation must include a circuit breaker and overcurrent protection.
Cleaning and maintenance
- Clean the exterior of the device with a dry cloth. Do not use solvents (such as benzene, thinner, or alcohol).
- Do not touch the device with wet hands. This may result in electric shock or serious damage to the device.
- Do not expose the device to excessive smoke or dust.
- Do not touch the screen with a sharp object.
- Avoid contact of the device with liquids or moisture.
Technical data
| Power supply: | 90-240V AC/50-60Hz/1W |
| Operating temperature range: | 0-90 °C |
| Temperature limit range: | 1-70 °C |
| Temperature control range: | 1-35 °C |
| Temperature display range: | 1-70 °C ±0.5 °C |
| Probe sensor: | NTC(10k)1% |
| Duty cycle: | weekly, programmable |
| Operating status indication: | LED display |
| Relay load capacity: | Max 250V AC, max 16A |
| Number of temperature levels: | 8 |
| Minimum/maximum temperature | 1-10 °C/20-70 °C |
| Temperature control range: | 1-70 °C |
| Hysteresis: | 0.5-2.5 °C |
| Degree of protection: | IP20 |
| Humidity: | ≤85% non-condensing |
| Color: | black or white |
| Wi-Fi | Tuya Smart, Smart Life |
| Installation: | concealed |
| Dimensions [mm]: | 86 x 86 x 27 |
Disposal of the device
O
Devices are marked with a crossed-out waste bin symbol. In accordance with European Directive 2012/19/EU and the Waste Electrical and Electronic Equipment Act, this marking indicates that this equipment, after its useful life, must not be disposed of with other household waste.
Users are obligated to dispose of it at a collection point for used electrical and electronic equipment.
Manufacturer's address and contact details:
LARS, ul. Świerkowa 14
64-320 Niepruszewo
www.auraton.pl