User manual ver.
The document presents collected information on safety, assembly and use of AURATON Pictor DS.
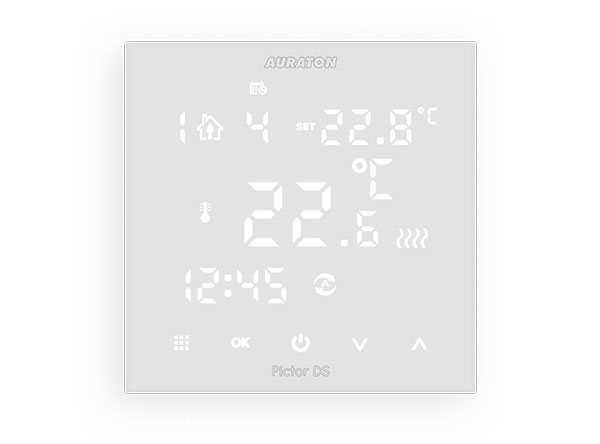
Weekly Wired Temperature Controller (with two-sensors)
AURATON Pictor DS is a weekly, wired temperature controller with additional, external temperature sensor, designed to work with a gas or electric heating system.
é |
Six independent temperature measurements per day AURATON Pictor DS allows setting up of up-to six independent temperature measurements during the day scheduled with interval accuracy of one minute. Intervals of measurements are freely selectable by the user. |
 |
Calibration of temperature measurements (offset) It allows temperature adjustment within a tolerance of ±3 °C. |
| LED | LED display Thanks to the backlit display, operation of the controller may be monitored even in a poorly lit room. |
Description of AURATON Pictor DS
Weekly Wired Temperature Controller
A LED display and five touch-sensitive function keys are located on the front side of the controller housing.
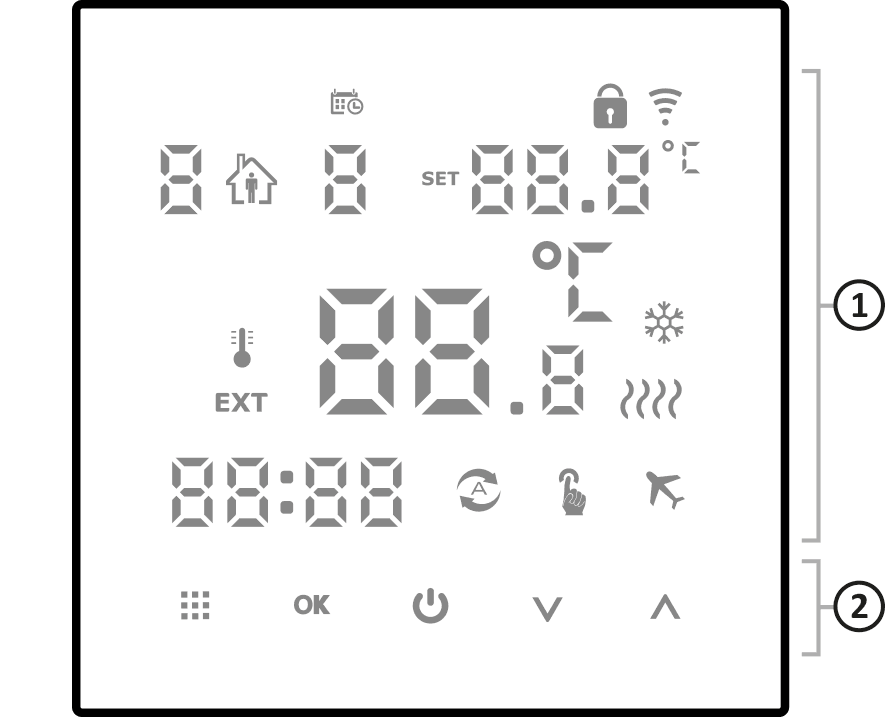
- Display
- Function keys
Display
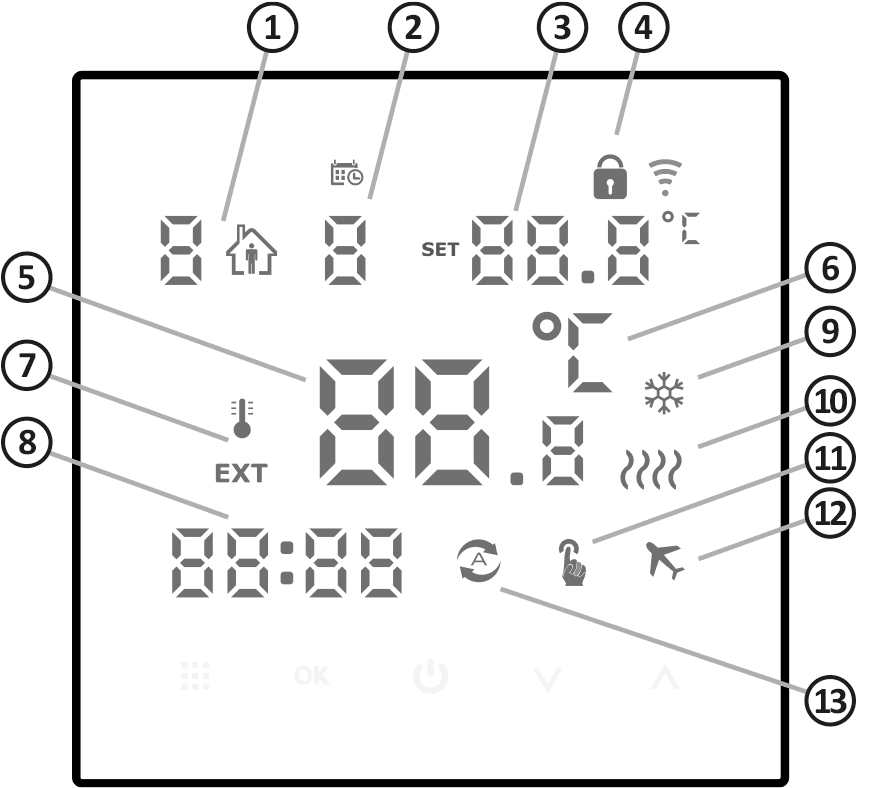
- Program Number – indicates the number of currently running program. (see chapter: ‘Default programs’ and ‘Weekly programming’)
- Day of week (1-7) – indicates the current weekday. Each day has its own number assigned. Scheduling of program operation (programming).
- Program temperature – indicates the currently set temperature to maintain.
- (Î) icon – indicates key lock function is enabled.
- Temperature – In the normal operation mode, AURATON Pictor DS displays the temperature of the room in which it is installed or, alternatively, the temperature of an external sensor.
- Temperature measurement unit – indicates the temperature is displayed in degrees Celsius (°C).
- Indicates the source of the displayed temperature:
é – internal sensor
EXT – external sensor. - Clock – time displayed in 24-hour pattern.
- Air conditioning mode indicator (Ë) – indicates operation of AURATON Pictor DS in air conditioning mode.
- Controller power ON indicator (ç) – informs about the operation status of AURATON Pictor DS, and appears once the controlled equipment has been switched on.
- Manual control indicator (Ö) – appears once the automatic mode of operation has been disabled (see the chapter: “Manual control mode”).
- Holiday operation mode indicator (Ç)
- Automatic operation mode indicator (Ü)
Function keys
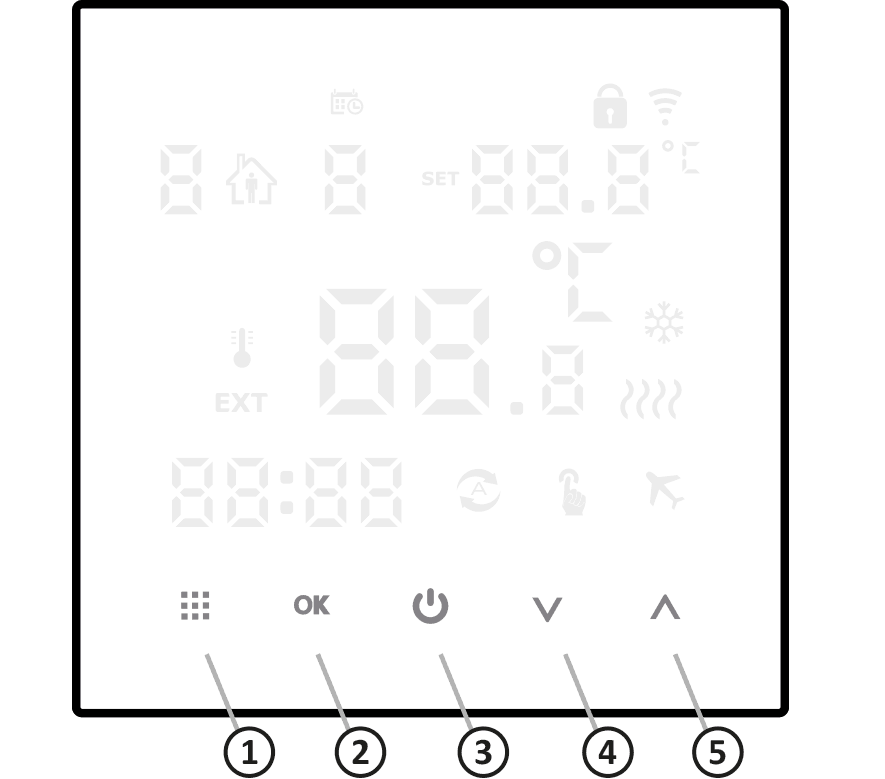
- menu (ë)
- press and release the key to switch between manual and automatic mode of operation
- press and hold down for about 5 s when the controller is off to proceed to advanced settings
- press and hold down for about 5 s when the controller is switched on to set the programs
- Setting-up key (É)
- used along with the menu key
- setting the clock press and hold down the key for approx. 5 s with the controller switched off
- holiday mode press and hold down the key for approx. 5 s with the controller switched on
- reading temperature of external sensor press and hold down this key along with the menu key for approx. 5 s with the regulator switched on (if connected and set-up – both sensors active)
- power ON/OFF of the controller (â)
- power on – press and hold down for 2 s
- power off – press and hold down for 5 s
- DOWN key (Á) – press and hold down to decrease quickly temperature or time
- UP key (Â) – press and hold down to increase quickly temperature or time
In the automatic mode, pressing DOWN or UP key changes the AUTO mode to the temporary manual mode, which remains active until next program change.
Pressing DOWN and UP key simultaneously activates the key lock function (parental control).
Selection of proper location to install the controller
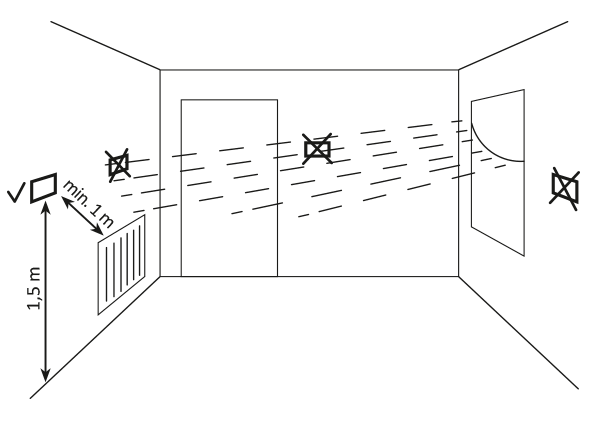
Proper operation of AURATON Pictor DS depends to considerable extent on its location. Do not install the controller in a place with restricted air circulation or in direct sunlight as it may interfere with its proper operation. Install AURATON Pictor DS on internal (partition) wall in a place with unconstrained air circulation. Avoid location next to heat emitting devices (TV-set, heater, fridge) or exposed to direct sunlight.
Connection of cables
Cable terminals are located on the rear panel of AURATON Pictor DS.
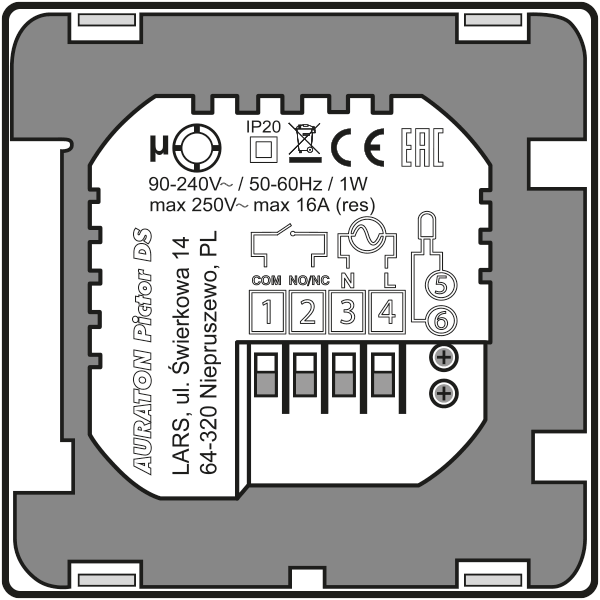
1-2 – terminals of control input (COM-NO/NC)
3-4 – terminals of 230 V AC power supply (N, L)
5-6 – terminals of external temperature sensor
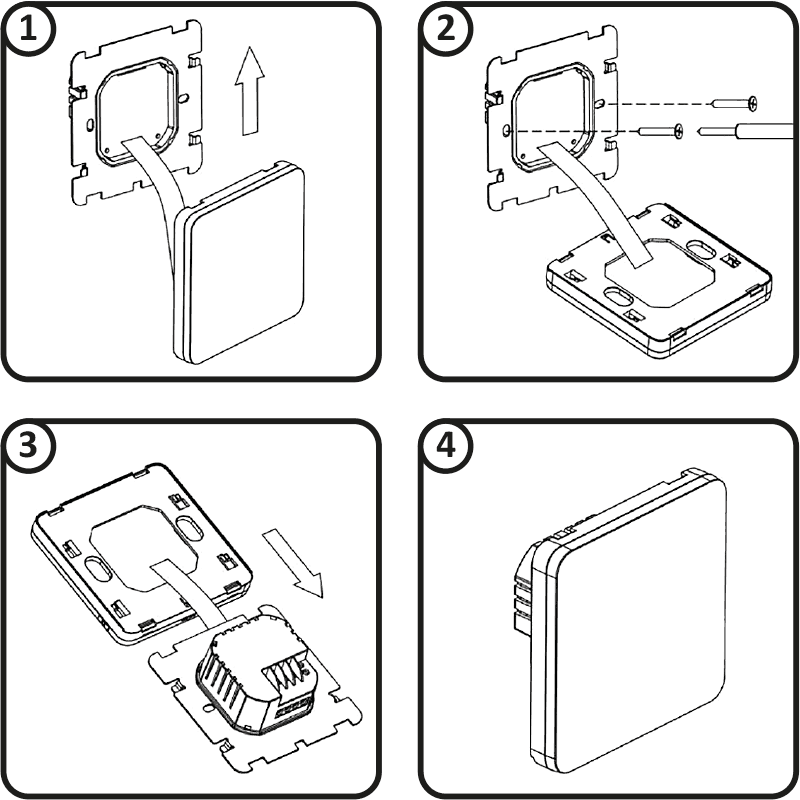
Mounting of AURATON Pictor DS
weekly, wired temperature controller
- Remove the housing as shown below.
- Tighten rear part of the controller housing to standard junction box Ø 60 mm using the supplied screws.
- Insert the housing.
First start-up
When the power is properly connected, the LED display shows all indicator’s segments for a while.

Then the controller waits for first start-up or time setting (off mode)

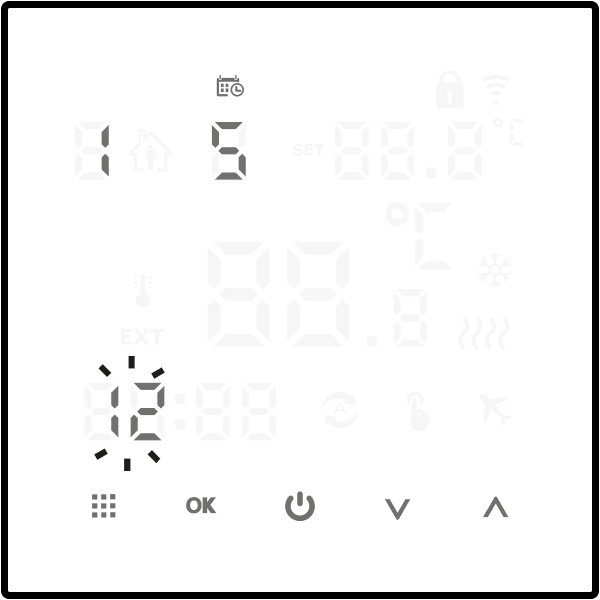
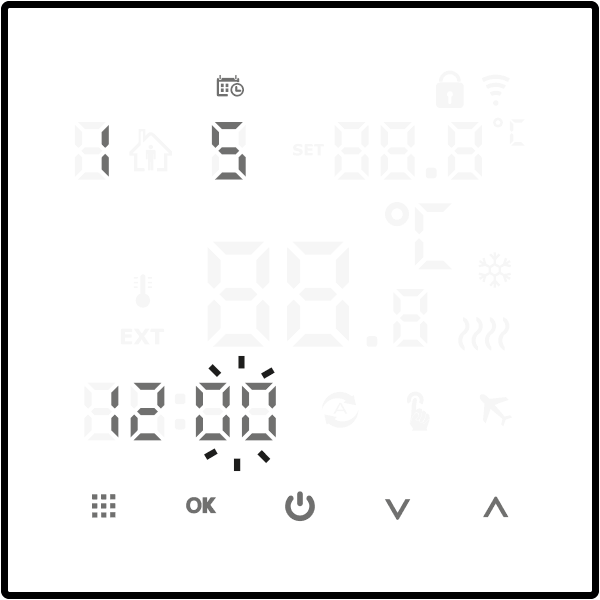
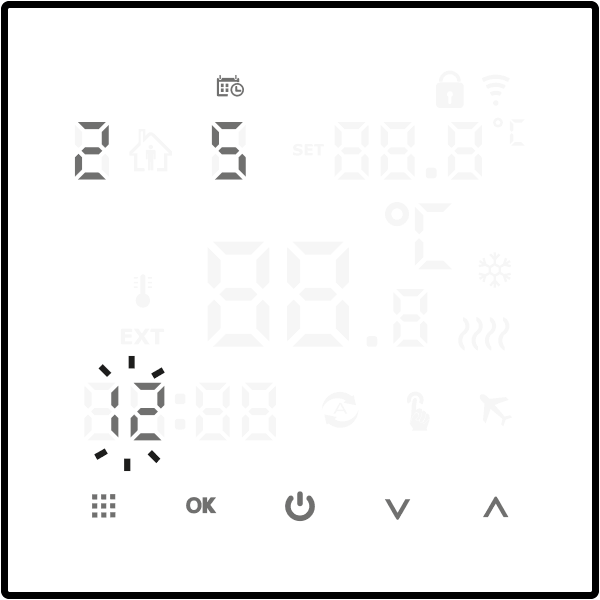
Setting clock time and day of week
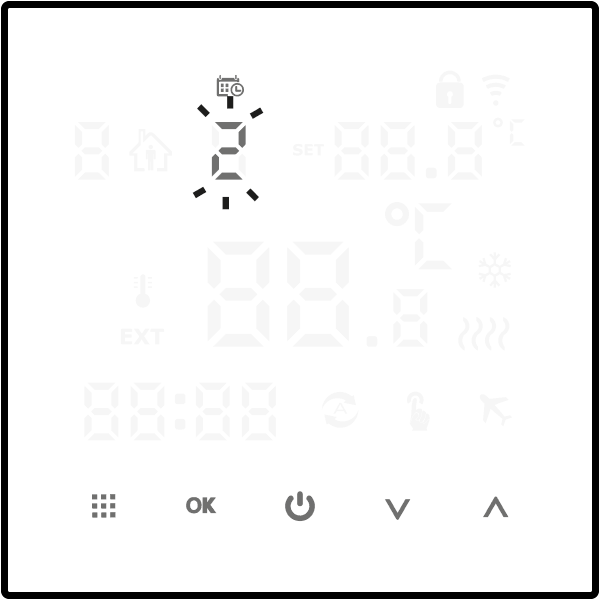
To set the clock time, switch off the controller.
- Press and hold down (É). for 5 s. The “minutes” indicator starts blinking.
- Use (ÁÂ) function keys to set the desired number of minutes and confirm with (É).
- Use (ÁÂ) function keys to set the desired number of hours and confirm with (É)
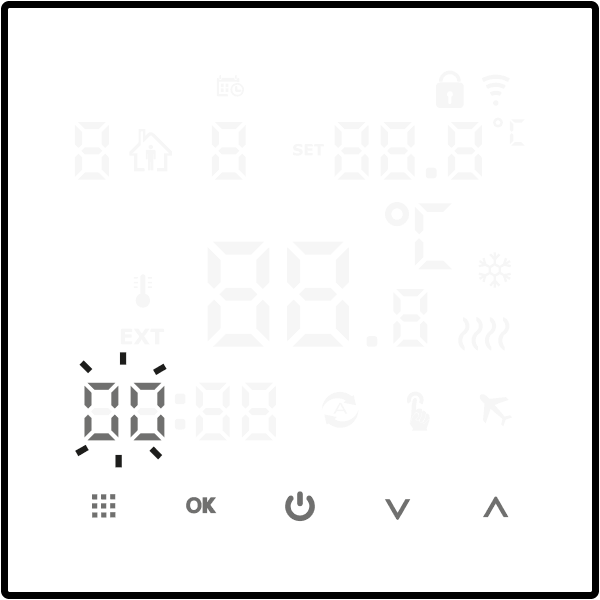
- A blinking day of week symbol appears in the upper left corner of the display. Use (ÁÂ) function keys to set the desired day of week and confirm with (É).
When setting any function, failure to press any key for 10 s is deemed the entered data have been confirmed.
When you press any function key once, always all data are displayed at the beginning, and twice – the function of respective key is enabled.
Programming
Before start of programming, set one of three program operation schedules in the controller menu.
Setting the schedule of controller program operation – see section Advanced settings.
When working with three schedules, AURATON Pictor DS enables saving of up to six programs. This allows exceptionally precise scheduling of the temperature in the house depending on the time of day.
Schedule 0 (5 + 2 days; default setting) – allows setting programs from Monday through Friday and separately for Saturday and Sunday.
Schedule 1 (6 + 1 day) – allows setting programs from Monday through Saturday and separately for Sunday.
Schedule 2 (7 days) – sets six programs for the entire week.
Examples of default programs
| Ä 1 | wake-up call | From 6:00 | 20 °C |
| Ä 2 | outside home | From 8:00 | 15 °C |
| Ä 3 | return home | From 11:30 | 15 °C |
| Ä 4 | outside home | From 13:30 | 15 °C |
| Ä 5 | return home | From 17:00 | 22 °C |
| Ä 6 | night time | From 22:00 | 15 °C |
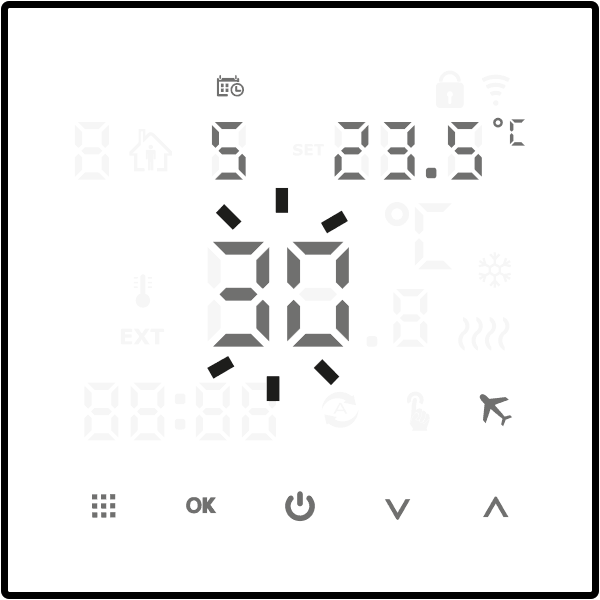
To start programming:
Switch on the controller.
Press and hold down the (ë) key for about 5 s to display flashing hour indicator.
Use the (ÁÂ) keys to set the start time (hours) of the program and then move on to setting the minutes by pressing the (ë) key again.
Use the (ÁÂ) keys to set the start time (minutes) of the program and then move on to setting the temperature by pressing the (ë) key.

Use the (ÁÂ) keys to set the programmed temperature, and then move on to setting the next program by pressing the (ë) key.
Set all other programs up to the total of six in the same way.
Now, all programs Monday through Friday (5 days) have been set. To set six other programs for Saturday and Sunday (two days) follow the same procedure as for weekdays; the display shows “2”, which means Saturday and Sunday.

Once the program setting has been completed, the controller automatically saves the settings and starts normal operation.
Upon setting the 2nd schedule (2:7 days), it is enough to set six programs, one for each day of the week.
Manual control
ÖTo interrupt automatic operation for any reason or to change the maintained temperature, switch-over the controller to manual mode.
Use the (ë) key to select the manual mode indicated by the (Ö) symbol on the display. Then, using the (ÁÂ) keys, set the desired value which will be automatically saved. To resume AUTO mode of program operation, press the (ë) key. Then the (Ü) symbol appears on the display.
It is possible also to set a temporary manual mode to hold the temperature until the next program change.
To activate the temporary manual mode, press the (Á or Â) key in automatic mode, and then use the same keys to set the desired value.
To exit this mode, press and hold down the (ë) key until the (Ü) sign appears on the display.
Holiday mode
ÇTo interrupt the program running for a longer time, use the holiday mode. When this option is active, AURATON Pictor DS keeps only the “holiday temperature”
The maximum duration of the holiday mode is 30 days.
To activate the holiday mode, switch on the controller and:
- Press and hold down the (É) key for about 5 s until the display shows blinking OFF.
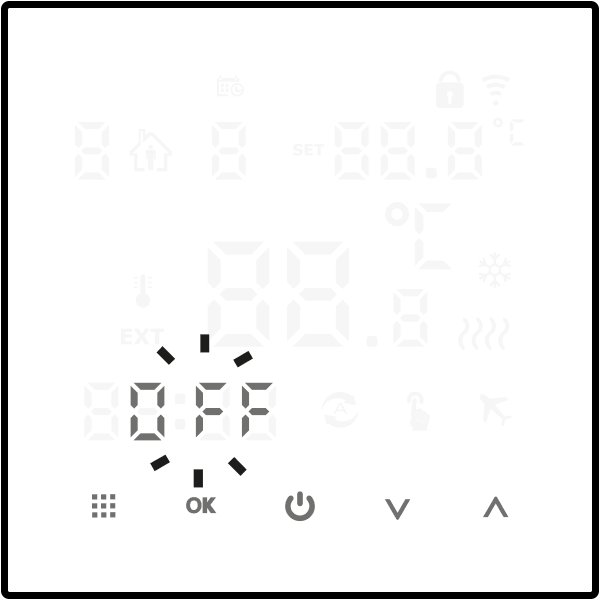
- Change to ON using the (ÁÂ) keys and confirm with (É) key.
- Now, using the (ÁÂ) keys, select the desired number of days and confirm with (É).
- Use the (ÁÂ) keys to set the desired temperature.
- Confirm the above settings with the (É).
During the holiday mode, the (Ç) icon is displayed on the screen.
To exit the holiday mode at any time – press and hold down the (É) key for about 5 s and the (ÁÂ) key to change to OFF. Confirm the setting with (É).
When setting any function, failure to press any key for 10 s is deemed the entered data have been confirmed.
Advanced settings
Switch off the AURATON Pictor DS controller and press and hold down the (ë) key for about 5 s to enable the advanced settings menu. Select any item A1 through A16 by short pressing and release the (ë) key and make desired changes using the (ÁÂ) keys.
Confirm new settings using the (â) key. New settings are now saved and the controller begins normal operation; otherwise wait 10 s to have the settings automatically saved. In this case, the controller stays off.
Advanced Settings Table.
| Option | Description | Functions | Default setting |
| A1 | Calibration of temperature indication | from -3 °C to +3 °C with accuracy of 0.2 °C | 0 |
| A2 | Hysteresis | ±0,2 °C or ±0,4 °C | ±0,2 °C |
| A3 | Parental control | 0: partial lock, only the POWER ON/OFF switch is active 1: full lock, all keys are inactive | 0 |
| A4 | In case of power failure |
0: Upon power return, the controller remains in the pre-failure state 1: Upon power return, the controller goes OFF 2: Upon power return, the controller goes ON | 0 |
| A5 | Display brightness | 0: 0% brightness 1: 50% brightness 2: 100% brightness | 2 |
| A6 | Schedule of program run |
0: 5+2 (Mon through Fri + Sat and Sun) 1: 6+1 (Mon through Sat + Sunday) 2: 7 (all week) | 0 |
| A7 | Lower limit of temperature setting | 1-10 °C | 5 °C |
| A8 | Upper limit of temperature setting | 20-70 °C | 35 °C |
| A9 | Anti-freeze protection temperature | Range: 1-10 °C. Upon setting a value higher than 10 °C, the (ä) symbol is displayed and the antifreeze protection goes OFF. When the controller is off and the built-in sensor detects the temperature is below the set Anti-Freeze Protection Temperature, the heating turns on. | 5 °C |
| A10 | Overheating Protection | Range: 20-70 °C. Upon setting the value lower than 20 °C , the (ä) symbol is displayed and the overheating protection goes OFF. When N3 is selected in A12-setting and the external sensor detects the temperature is higher than the set Overheating Protection value, the heating goes off. | 45 °C |
| A11 | Hysteresis of overheating protection | 1-9 °C | 2 °C |
| A12 | Temperature sensor selection |
N1: Controller operation only with a built-in sensor. N2: Controller operation only with an external sensor. N3: Controller operation with both sensors. | N1 |
| A13 | Minimum time-out between relay change-over |
0: No time-out 90: Timeout 90 s | 90 |
| A14 | Mode of operation |
0: Heating 1: Air conditioning | 0 |
| A15 | Relay operation | 0: NO 1: NC | 0 |
| A16 | Reset of the controller to default settings | When the (Ü) symbol is displayed, press and hold down the (É) key for few seconds |
Make sure you have selected correct way of operation of built-in and external sensor; in case of wrong selection or sensor damage (failure), “E1” or “E2” appears on the screen. The AURATON Pictor DS controller turns off the heating until the fault removal.
A1 Calibration of temperature indication
The calibration function allows fine tuning of the temperature indication within the tolerance range of ± 3 °C. -e.g. AURATON Pictor DS indicates the room temperature is 23 °C, while an ordinary thermometer placed nearby indicates 24 °C. Upon completed calibration by +1 °C, AURATON Pictor DS will indicate the same temperature as the room thermometer.
A2 Hysteresis
The hysteresis prevents too frequent start-up of the heating/air conditioning equipment caused by slight temperature fluctuations.
E.g. for a hysteresis of ±0.2 °C when the temperature is set at 20 °C, heating equipment goes ON at 19.8 °C and OFF at 20.2 °C. Likely, if a hysteresis is ±0.4 °C , the system goes ON and OFF at 19.4 and 20.4 °C, respectively.
A3 Parental control
Allows restriction of access to strangers.
A4 In case of power failure
This function allows setting the behavior of the AURATON Pictor DS controller in the event of power failure and return.
A5 Display brightness
Allows setting the display brightness during operation.
A6 Program operation schedule
Allows setting the way of programming the Auraton Pictor DS controller.
Three programming schedules are available, namely:
Schedule „0” (5+2) enables programming the controller from Monday through Friday (six programs) and separately, Saturday and Sunday (six programs).
Schedule „1” (6+1) enables programming the controller from Monday through Saturday (six programs) and separately, Sunday (six programs).
Schedule „2” (7) is designed to set six identical programs for the entire week.
A7 Lower limit of temperature setting
This function is used to set the lower limit of temperature setting range. The value is adjustable from 1 to 10 °C
A8 Upper limit of temperature setting
This function is used to set the upper limit of temperature setting range. The value is adjustable between 20 and 70 °C.
A9 Anti-freeze protection temperature
This function enables setting the temperature of triggering protection against freezing of water in the heating system.
Range: 1-10 °C. Upon setting the value higher than 10 °C, the (ä) symbol is displayed and the antifreeze protection goes OFF. When the controller is off and the built-in sensor detects the actual temperature is below the set Anti-Freeze Protection Temperature, the heating turns on.
A10 Overheating protection
This function allows setting the temperature of triggering overheating protection.
Range: 20-70 °C. Upon setting the value lower than 20 °C , the (ä) symbol is displayed and the overheating protection goes OFF. When N3 is selected in A12 setting and the external sensor detects the actual temperature is higher than the set Overheat Protection value, the heating goes off.
A11 Hysteresis of overheating protection
This function enables setting the value of temperature drop required to switch on the heating again after an emergency shutdown. The value is adjustable from 1 to 9 °C
A12 Temperature sensor selection
The AURATON Pictor DS controller supports three ways of temperature measurement.
When N1 is set, the controller operates only with the internal (built-in) sensor.
If N2 is set, AURATON Pictor DS controller operates only with the external sensor (connected by cable). Setting N3 – both sensors work simultaneously. In this case, heating goes OFF once the required temperature has been reached at either sensor.
A13 Minimum time-out between relay change-over
The set time-out prevents too frequent start-up of the heating/ air conditioning equipment caused by momentary temperature fluctuation. (e.g. caused by opening a window).
A14 Operation mode
AURATON Pictor DS enables control of a heating or air conditioning equipment.
Select “0” is for heating system or “1” for air conditioning equipment. When setting is “1”, the display shows the (Ë) symbol.
A15 Relay operation
The AURATON Pictor DS controller enables equipment switch-on by closing or opening the relay circuit. In most cases, the former option is used. To enable reverse relay operation, make changes in the advanced settings. Default setting – relay contacts are closed during operation of the heating/ air conditioning equipment.
A16 Reset of the controller to factory settings (except for clock settings)
Use this function to delete all user settings and to return to the factory settings.
Wiring diagram
Connections to gas boiler – potential-free control
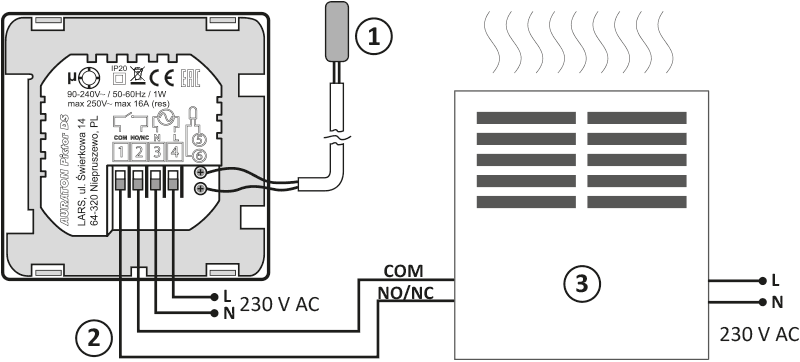
- External temperature sensor
- Control
- Heating device, e.g. gas boiler
Connections to electrical equipment – voltage control
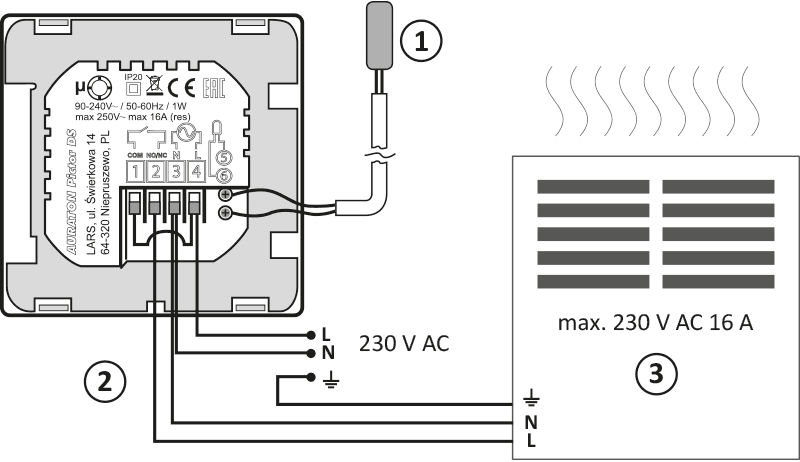
- External temperature sensor
- Control
- Electric heating or air conditioning equipment (max. 230 V AC 16 A)
Q
During installing AURATON Pictor DS, switch off the power supply. It is recommended to hire qualified service technician to install the controller.
Internal building electrical system shall be equipped with main switch and overcurrent protection.
Cleaning and maintenance
- The outside part the device should be cleaned with a dry cloth. Do not use solvents (such as benzene, thinner or alcohol).
- Do not touch the device when your hands are wet. It may cause electric shock or serious damage to the device.
- Do not expose the device to excessive smoke or dust.
- Do not touch the screen with a sharp object.
- Keep the device away from liquids or moisture.
Technical specifications
| Power supply: | 90-240 V AC/50-60 Hz/1 W |
| Working temperature range: | 0-90 °C |
| Working status indication: | LED display |
| Number of temperature levels: | 6 + holiday setting, manual setting |
| Minimum/maximum temperature: | 1-10 °C/20-70 °C |
| Temperature control range: | 1-70 °C |
| Hysteresis: | ±0.2 °C/±0.4 °C |
| Relay load capacity: | Maks. 250 V AC, maks. 16 A |
| Working cycles: | weekly, programmable |
| Number of programs: | 6 a day |
| Level of security: | IP20 |
| Dimensions [mm]: | 86 x 86 x 43 |
Disposing of the devices
O
The devices are marked with the crossed-out wheeled bin. According to European Directive 2012/19/EU and the Waste Electrical and Electronic Equipment Act, this kind of marking indicates that the equipment, after its operational life must not be disposed of together with other waste from households.
The user shall return it to a collection point for electrical and electronic waste.
Contact and address of the manufacturer:
LARS, ul. Świerkowa 14
64-320 Niepruszewo
www.auraton.pl


