User manual ver. 20211204
This document collects information on the safety, installation and use of the AURATON Ursa device.
Device description
AURATON Ursa is a modern controller designed on processors, intended to cooperate with central heating (CH) and domestic hot water (DHW) circulation pumps. The device can cooperate with a thermo-fireplace (fireplace with a water jacket) in a central heating system and with solid fuel-fired central heating boilers.
Display description
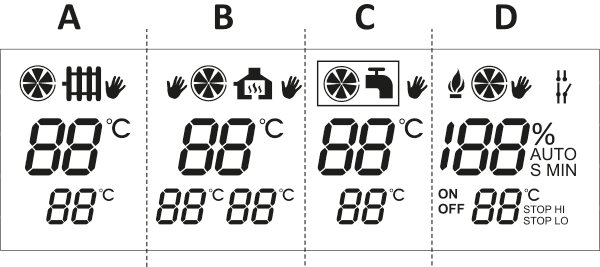
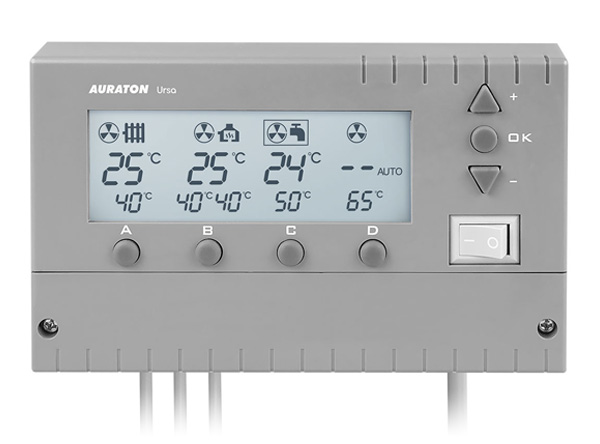
The AURATON Ursa controller display is divided into four sections. Each section controls a separate device:
| Part A | Control of the central heating pump "CO". |
| Part B | Control of the central heating pump "CO" with a self-return actuator or a second central heating pump (fireplace system). |
| Part C | Control of the domestic hot water pump "CWU". |
| Part D | Fan (blower) control. |
Description of buttons and connection terminals
To access the connection terminals, unscrew the front cover.
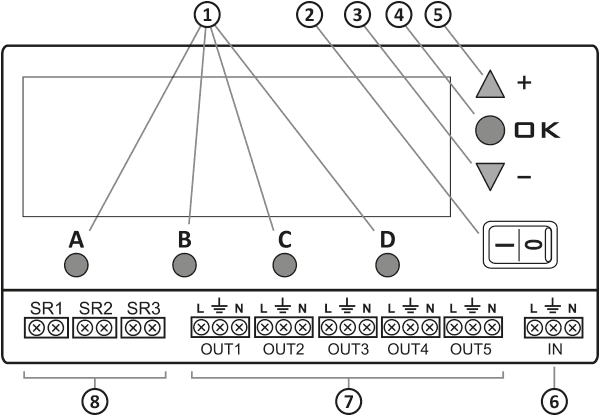
- "A, B, C, D" buttons for configuring individual settings
- Main power switch
- "-" button - decrease settings
- "OK" button - confirmation
- "+" button - increase settings
- Terminals for power connection
- Terminals for connecting actuators (OUT1-OUT5)
- Terminals for mounting temperature sensors (SR1-SR3)
General notes
- Before connecting the wiring to AURATON Ursa, remove the protective caps by cutting them off.
- The set includes only one sensor (on a cable approximately 2.5 m long). If you need to expand the functionality of the AURATON Ursa, additional temperature sensors must be purchased (optionally). An additional sensor on a 15 m cable is also available.
Working in a central heating system
(display part A)
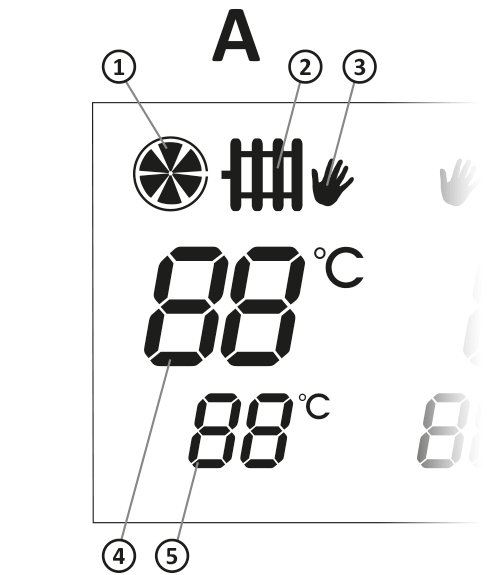
- Central heating pump operation indicator,
- Central heating pump sensor indicator,
- Manual mode operation activation indicator,
- Current temperature of the CO sensor (SR1),
- Set temperature indicator.
The controller-pump assembly forces water circulation in a central heating system with a coal-fired or gas boiler without a pump control system. The controller sensor measures the temperature of the water at the central heating system's supply.
In a central heating system with a coal-fired boiler, the AURATON Ursa will turn off the circulation pump once the boiler flame goes out. Pumping water with the flame extinguished is not recommended, as the air draft up the chimney causes the water in the boiler to cool faster than in the radiators. The optimal temperature can be set on the AURATON Ursa display (usually around 40°C).
In a central heating system with a gas boiler, the temperature must be lower than the temperature set on the central heating boiler thermostat. Setting the temperature above the dew point prevents the boiler from "sweating" while the water in the central heating system is heating up.
The AURATON Ursa is also equipped with an AntiStop , which prevents the pump impeller from seizing when not in use. Additionally, the built-in processor automatically restarts the pump for 30 seconds every 14 days after the heating season ends.
For the system to function after the season, the AURATON Ursa must be left on.
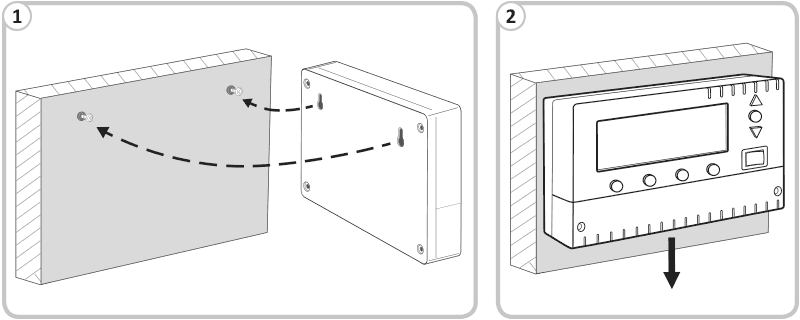
Installation
AURATON Ursa mount
Mount the AURATON Ursa on a wall or other support using two screws (wall plugs included). Attach the cables extending from the AURATON Ursa to the wall using wall brackets.
Sensor mounting
Remove the protective caps by cutting them off before installing the wiring. In the AURATON Ursa, connect the temperature sensor to the SR1 terminals. Then, install the sensor on the exposed outlet pipe from the central heating boiler (as close to the boiler as possible).
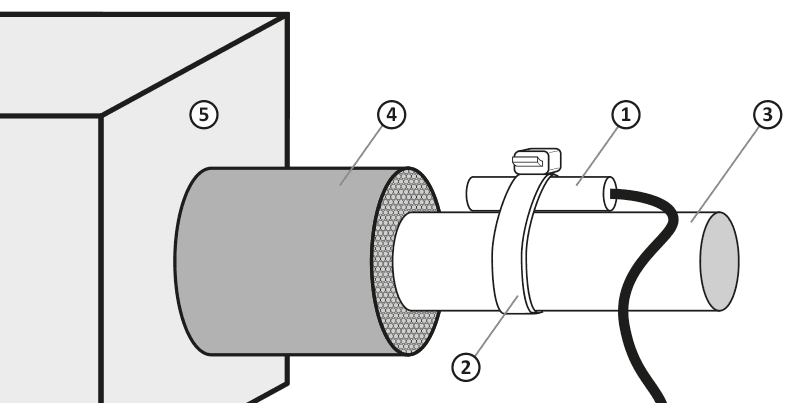
- temperature sensor
- cable tie
- pipe
- pipe insulation
- central heating furnace
If coal and gas boilers operate on a common central heating installation, the sensor should be mounted at the point where both outputs connect and insulated.
Connecting the pump power cable
In the controller, the pump connection should be connected to the OUT1 terminals. In the case of a pump, connect the green or yellow-green wire (grounding or protective neutral) to the " $ " terminal, and the blue wire to the "N" terminal. Connect the brown wire to the "L" terminal.
Checking the correct connection
Check the correct connection of the cable and screw the cover of the pump motor terminal box.
Connecting AURATON Ursa
After securing the wires against accidental breakage, connect the power cord to a 230 V AC/50 Hz mains socket with a grounding pin.
| P | NOTE: The ambient temperature where AURATON Ursa is installed should not exceed 40 °C. |
| Q | NOTE: All cable connections must be made with the power source disconnected. |
First start-up
AURATON Ursa activation
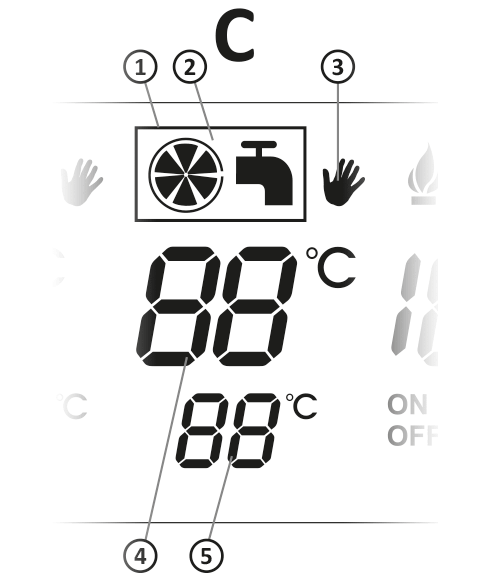
Set the switch À to the " I " position. After switching on, all display segments and the software version will be displayed for approximately 2 seconds, and then the display will show the " º » symbol, the current sensor temperature (4) and the set temperature (5).
Display description
The indicator on the upper part of the display (4) shows the current sensor temperature, while the lower part (5) indicates the set temperature. The movement of the vanes on the indicator (1) indicates the operation of the central heating pump.
Temperature change
Press the " A " button under the temperature setting. The digits will flash and indicate the current setting. Use the "+" (increase) or "–" (decrease) buttons to set the desired temperature. After setting the desired value, confirm it (within 10 seconds) by pressing the " OK " button. Otherwise, the temperature change will not be saved and AURATON Ursa will revert to the previous setting.
Hysteresis change
Press the " A " button under the temperature setting. The digits will flash and indicate the current setting. Press the " A " button again to display the hysteresis setting ( HI ). Use the "+" or "–" button to set the desired hysteresis value within the range of 2°C to 10°C (in 2°C increments). After setting the desired value, confirm it (within 10 seconds) by pressing the " OK " button. Otherwise, the change will not be saved and the controller will revert to the previous setting.
For example: With a setting of 40°C and a hysteresis of 4°C, the pump will turn on at 42°C and turn off at 38°C.
Changing the forced pump operation mode
Press the " A " button under the temperature setting. The digits will flash and indicate the current setting. Press the " A " button again to display the hysteresis setting ( HI ). Pressing
the " A " button again will display the value 85 °C in the temperature section, while the forced pump operation symbol ( ¾ ¾ when the temperature exceeds 85 °C ¿ when the temperature exceeds 85 °C .
After setting a given mode, confirm it (within 10 seconds) by pressing the " OK " button. Otherwise, the change will not be saved and AURATON Ursa will revert to the previous setting.
Automatic operation
Once set, the AURATON Ursa turns the pump on and off depending on the set temperature. In a central heating system, the pump is turned on when the temperature at the sensor location is higher than the set temperature, and turned off when the temperature drops below the value set on the AURATON Ursa, taking into account the hysteresis value.
Manual mode - Continuous operation
To manually turn on the circulation pump (regardless of the temperature at the SR1 (CH) sensor), press and hold the " A " button for 3 seconds.
V will then appear on the display , and if you want to manually turn off the pump, press and hold the " A " button again for 3 seconds.
When only the SR1 sensor is connected, the remaining AURATON Ursa functions are inactive, i.e. there are no indications of the operation of the central heating pumps in the fireplace system and no indications of the pump controller in the domestic hot water system.
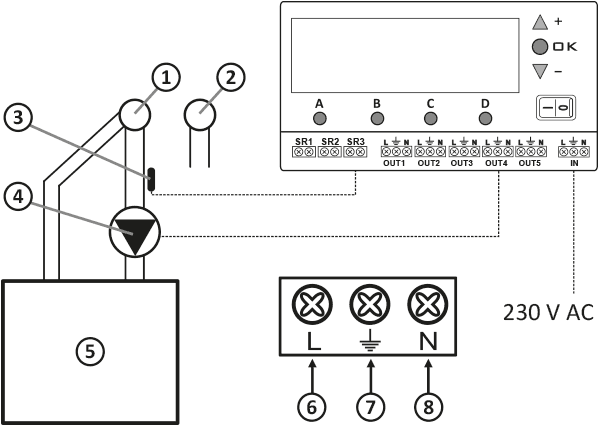
Connection diagram for the pump at the central heating boiler
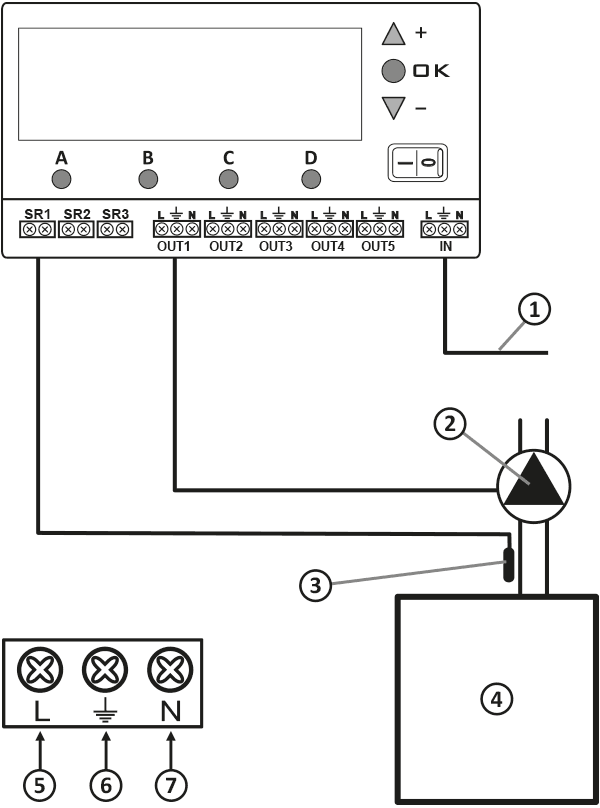
- Power supply 230 V AC
- Pump
- Temperature sensor (attached with a strap)
- Central heating boiler
- Brown wire
- Yellow-green wire
- Blue wire
Description of cooperation with a central heating pump and a self-return actuator or a second central heating pump - fireplace system
(display part B)
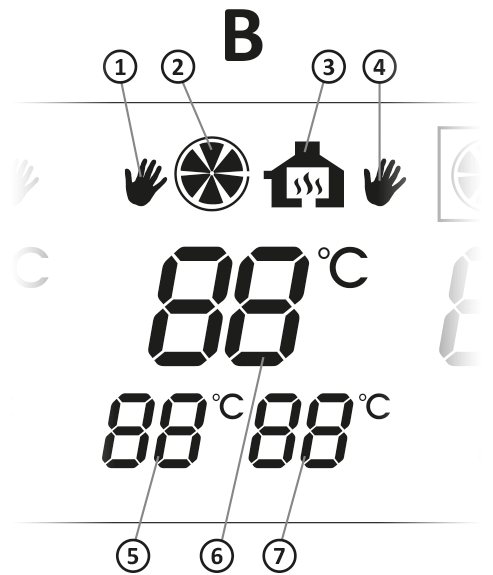
- Manual central heating pump activation indicator
- Central heating pump operation indicator
- Operation indicator of the three-way valve or the second central heating pump
- Indicator for manual activation of the three-way valve or the second central heating pump
- Central heating set temperature indicator in the fireplace system
- Current temperature of the central heating sensor ( SR2 )
- Set temperature indicator for the self-return actuator or the second central heating pump
AURATON Ursa uses two control outputs in the thermo-fireplace system:
- for the fireplace circulation water pump,
- for a valve with an actuator or a second pump, which is necessary for the correct cooperation of the fireplace stove with the central heating system
Once the power is turned on, the temperature in the water jacket of the fireplace is measured (using a sensor), with the option of splitting it into two independent channels.
Depending on the water temperature in the fireplace system, AURATON Ursa automatically turns the fireplace's central heating water pump on or off and activates a valve or a second pump.
The AURATON Ursa is equipped with an AntiStop that prevents the pump rotor from seizing when not in use. After the heating season ends, the AURATON Ursa automatically restarts the pump for 30 seconds every 14 days.
For the system to function after the season, the controller must be left on.
Installation
AURATON Ursa mount
Mount the AURATON Ursa on a wall or other support using two screws (wall plugs included). Attach the cables extending from the AURATON Ursa to the wall using wall brackets.
Sensor mounting
Remove the protective caps by cutting them off before installing the wiring. In the AURATON Ursa, connect the temperature sensor to the SR2 . Then, install the sensor on the outside of the fireplace's water jacket or on the exposed outlet pipe from the central heating boiler (as close to the boiler as possible). The sensor must not be immersed in liquids and must not be installed on the flue gas outlets to the chimney.
- temperature sensor
- cable tie
- pipe
- pipe insulation
- central heating furnace
Connecting the central heating pump power cable
The central heating pump should be connected to the OUT2 ( L , $ , N ). In the case of a pump, connect the green or yellow-green wire to the $ connect the blue wire N connect the brown wire L
Connecting the supply line to the valve (or second central heating pump)
In AURATON Ursa, the valve connection should be connected to the OUT3 ( L , $ , N ). In the case of the valve, connect the green or yellow-green wire to the " $ connect the blue wire N terminal connect the brown wire L
Connecting AURATON Ursa
After securing the wires against accidental breakage, connect the power cable from the AURATON Ursa side to the IN ( L , $ , N ). Then connect it to a 230 V AC/50 Hz mains socket with a grounding pin.
| P | NOTE: The ambient temperature where AURATON Ursa is installed should not exceed 40 °C. |
| Q | NOTE: All cable connections must be made with the power source disconnected. |
First start-up
AURATON Ursa activation
Set the switch À to the " I " position. After switching on, all display segments and the software version will be displayed for approximately 2 seconds, and then the display will show the " º » symbol, the current sensor temperature (4) and the set temperature (5).
Setting range
- Temperature measurement (from 0 to 99 °C) is performed using the SR2 ,
- The central heating pump is controlled via the OUT2 ,
- The self-return actuator or the second central heating pump is controlled via the OUT3 ,
- The setting range for the central heating pumps and the self-return actuator (or the second central heating pump) is from 10 to 85 °C, the hysteresis (temperature difference between switching on and off) is adjustable from 2 to 10 °C.
Temperature change
B button once briefly . The central heating set temperature indicator (left) in the fireplace system will start flashing, then use the " + " or " – " button to set the desired temperature. Press the " B " button again, the valve or second central heating pump set temperature indicator (right) in the fireplace system will start flashing, then use the " + " or " – " button to set the desired temperature. After setting the value, confirm it (within 10 seconds) by pressing the " OK " button. Otherwise, the temperature change will not be saved and AURATON Ursa will revert to the previous setting.
Hysteresis change
Press the " B " button under the temperature setting. The digits will start flashing and indicate the current setting (left indicator). Press the " B " button again to flash the right temperature indicator. Press the " B " button again to edit the hysteresis ( HI ) value within the range of 2 to 10 °C for the central heating pumps (left indicator). Then use the " + " or " – " buttons to set the desired value. Press the " B " button again to set the hysteresis ( HI ) within the range of 2 to 10 °C for the valve or second central heating pump (right indicator). Use the " + " or " – " buttons to set the desired hysteresis value. After setting the value, confirm it (within 10 seconds) by pressing the " OK " button. Otherwise, the change will not be saved and the controller will revert to the previous setting.
For example, with a setting of 40 °C and a hysteresis of 4 °C, the pump will turn on at 42 °C and turn off at 38 °C.
Changing the forced pump operation mode
Press the " B " button under the temperature setting. The digits will flash and indicate the current setting (left indicator). Pressing the " B B button again to edit the HI of the left indicator. Pressing the " B " button again will edit the HI of the right indicator.
Pressing the " B " button again will display the value 85 ° C in the temperature section (left indicator), while the forced pump operation symbol ( ¾ ) will appear on the right side of the display. Using the " + " or " – " buttons, you can set the pump to run continuously ( ¾ ) after exceeding 85 ° C or to be turned off ( ¿ ) after exceeding 85 ° C. You can also use the " + " or " – " buttons to set the maximum value of 55 ° C, above which the central heating pump will turn off (e.g. underfloor heating).
Similarly, you can set the operation of the valve or the second central heating pump. After setting a given mode, confirm it (within 10 seconds) by pressing the " OK " button. Otherwise, the change will not be saved and the controller will return to the previous setting.
Automatic operation
AURATON Ursa turns the pump and valve on or off depending on the set temperature. In a central heating system, the pump and valve turn on when the temperature at the sensor location is higher than the set temperature, and turn off when the temperature drops below the value set on the AURATON Ursa, taking into account hysteresis.
Manual mode - continuous operation
STEP 1
To manually turn on the central heating pump in the fireplace system (regardless of the temperature on the SR2 ), press the " B " button for 3 seconds. The display will then show the " V " hand symbol located to the left of the central heating pump operation pictogram in the fireplace system.
STEP 2
B button again for 3 seconds V " for the three-way valve (or the second central heating pump) " V " (hand symbol on the right) will be activated
STEP 3
B button again for 3 seconds V " (left side) will be turned off
STEP 4
B button again for 3 seconds V " of the self-return valve (or the second central heating pump) in the fireplace system (right side) will be turned off
Wiring diagram
Sample connection diagram. The diagram presented is simplified and does not include all the elements necessary for proper operation of the installation.
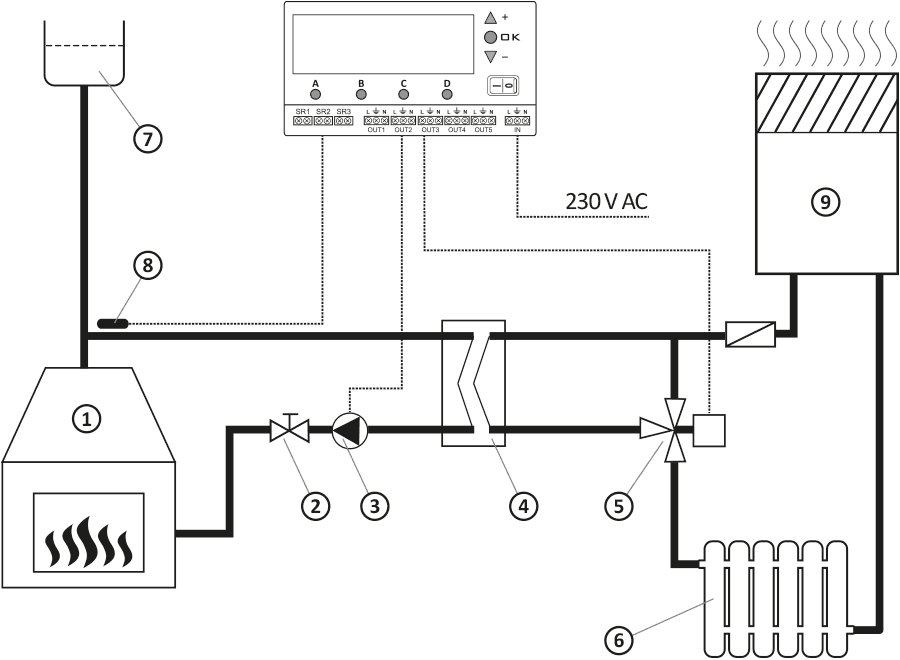
- fireplace with a water jacket
- shut-off valve
- pump
- exchanger
- self-return actuator
- heat receiver (e.g. radiator)
- expansion tank
- temperature sensor
- central heating boiler
When only the SR2 sensor is connected, the remaining controller functions are inactive, i.e. there are no indications of the central heating pump operation, no indications of the pump control in the DHW system and no control of the blower.
Description of cooperation with the domestic hot water pump (DHW)
(display part C)
- Indicator (frame) of priority of domestic hot water over central heating
- Pump operation indicator in the domestic hot water system
- Manual pump activation indicator in the domestic hot water system
- Current temperature of the domestic hot water sensor (SR3)
- Domestic hot water sensor temperature setting
AURATON Ursa is also designed to automatically control the circulation pump (depending on temperature) in a domestic hot water (DHW) system. In a domestic hot water (DHW) system, the controller maintains a constant water temperature in the tank or DHW system.
The AURATON Ursa has a priority function. This prevents the water in the DHW tank from cooling down.
Operation with DHW priority over central heating disabled
If the DHW over CH priority function is disabled, switching on the pump in the domestic hot water (DHW) system depends solely on the setting and the temperature at the SR3 , which will be mounted in the tank.
Setting range
Temperature measurement (from approximately 0 to 99 °C) is performed using the SR3 sensor. The DHW pump is controlled via the OUT4 . The setting range for the DHW pump is from 10 to 85 °C. Hysteresis (on/off difference) is from 2 to 10 °C.
Programming the DHW function
Pressing the " C " button will cause the set value of 50 °C (factory setting) to flash, and then use the " + " or " – " buttons to set the desired temperature.
Once the desired temperature value is set, it must be confirmed (saved) within 10 seconds by the " OK " button. Otherwise, the temperature change will not be saved and AURATON Ursa will revert to the previous setting.
After saving the new values, AURATON Ursa exits the settings mode and switches to normal operation (the temperature setting stops flashing). AURATON Ursa will turn off the DHW pump ( OUT4 SR3 sensor exceeds the set temperature by the hysteresis value, and will turn it on if the temperature drops below the set hysteresis value.
Manual mode - continuous operation
To manually turn on the circulation pump (regardless of the temperature at the SR3 C button V symbol will then appear on the display. C button again for 3 seconds .
If the temperature at the sensor (SR3) exceeds 85 °C, the DHW pump will be switched off. This is a protection against excessive heating of the hot water in the tank.
Operation with DHW priority over central heating enabled
If the DHW over CH priority function is enabled, then switching the pump in the DHW system depends not only on the setting and temperature at the SR3 , which is installed in the domestic hot water tank, but also on the temperature at the SR1 (CH) sensor.
If the DHW over CH priority function is enabled, and if a situation occurs in which both the DHW and CH pumps should operate simultaneously (provided that the SR1 [CH] temperature sensor and the CH pump power cable [ OUT1 ] are connected), then the DHW pump has priority.
This works by switching the domestic hot water (DHW) pump on first until the desired temperature is reached, and then the CH pump is switched on. Another function of DHW over CH priority is that if the temperature at the SR1 (CH) sensor is lower than the temperature at the SR3 (DHW) sensor, the DHW pump will not switch on. This is to protect the water from the DHW tank from cooling down.
Installation
AURATON Ursa mount
Mount the AURATON Ursa on a wall or other support using two screws (wall plugs included). Attach the cables extending from the AURATON Ursa to the wall using wall brackets.
Sensor mounting
On the AURATON Ursa side, the temperature sensor should be connected to the SR3 and then mounted in the domestic hot water tank. The sensor should not be immersed in liquids and should not be installed on the flue gas outlets leading to the chimney. Maximum temperature measurement is 99°C.
Connecting the DHW pump power cable
In AURATON Ursa, the DHW pump connection should be connected to the OUT4 terminals ( L , $ , N ). In the case of the pump, connect the green or yellow-green wire to the " V Connect the blue wire to the " N the brown wire L
Connecting AURATON Ursa
After securing the wires against accidental breakage, connect the power cable from the controller side to the IN ( L , $ , N ). Then connect it to a 230 V AC/50 Hz power outlet with a grounding pin.
| P | NOTE: The ambient temperature where AURATON Ursa is installed should not exceed 40 °C. |
| Q | NOTE: All cable connections must be made with the power source disconnected. |
First start-up
AURATON Ursa activation
Set the switch À to the " I " position. After switching on, all display segments and the software version will be displayed for approximately 2 seconds, and then the display will show the " º » symbol, the current sensor temperature (4) and the set temperature (5).
Temperature change
Press the " C " button. The DHW set temperature indicator will start flashing. Use the " + " or " – " buttons to set the desired temperature. Once the desired temperature value is set, confirm (save) it within 10 seconds by pressing the " OK " button. Otherwise, the temperature change will not be saved and the controller will revert to the previous setting.
Hysteresis change
Press the " C " button under the temperature setting. The digits will start flashing and indicate the current setting. Press the " C " button again to display the hysteresis setting ( HI ). Using the "+" or "–" button, you can set the desired hysteresis value within the range of 2 to 10 °C (in 2 °C increments). After setting the desired value, confirm it (within 10 seconds) by pressing the " OK " button. Otherwise, the change will not be saved and AURATON Ursa will revert to the previous setting.
For example: With a setting of 40 °C and a hysteresis of 4 °C, the pump will turn off at 42 °C and turn on at 38 °C.
Enabling the priority function
Press the " C " button under the temperature setting. The digits will flash and indicate the current temperature setting. Press the " C " button again to display the hysteresis setting ( HI ). Then press the " C " button again, and the DHW pump operation indicator ( ¼ ) will be displayed.
Use the " + " and " – " buttons to enable or disable the priority function. Activation of the priority function is signaled by a frame displaying around the DHW pump operation indicator ( ¼ ). Deactivation of the priority function is signaled by no frame displaying around the DHW pump operation indicator ( ¼ ).
Turning on the emergency heat collection function
The emergency heat removal function is disabled by default. Exercise extreme caution when using this function. In extreme cases, the temperature in the tank may reach approximately 85°C, which may pose a risk of scalding to third parties, especially small children!
Press the " C " button under the temperature setting. The digits will flash and indicate the current temperature setting. Press the " C " button again to display the hysteresis setting ( HI ). Then press the " C " button again, and the DHW pump operation indicator ( ¼ ) will be displayed.
C button again (then you can set whether the emergency heat draw function is to be enabled or disabled), dashes will be displayed in the " A " section (flashing) and in the " C " section (function disabled). While the dashes are displayed, change the setting by pressing the " + " or " – A section displays 85°C, which means that above this value (measured by the SR1 A section) will be activated . In the " C " section (setpoint value), the value 85°C is displayed, which means that the tank will receive heat, but only up to 85°C ( SR3 ). The forced operation indicator (CH pump on) is also displayed. After setting the value, confirm it (within 10 seconds) by pressing the " OK " button. Otherwise, the change will not be saved and AURATON Ursa will revert to the previous setting.
The emergency heat collection function is used when the temperature in the system dangerously rises above 85°C and cannot be quickly absorbed by the heating system. In such a situation, the DHW tank will be used as a heat buffer. The CH pump in section " A " is also used.
The emergency heat removal function uses the central heating pump in section "A" only when the forced pump operation mode ( ¾ ) is activated in section "A".
Wiring diagram
In the DHW circuit
- Hot water
- Cold water
- Temperature sensor (secure with a cable tie)
- Pump
- DHW tank
- Brown wire
- Yellow-green wire
- Blue wire
With DHW tank
- Temperature sensor
- DHW tank
- Pump
- Heating boiler
- Brown wire
- Yellow-green wire
- Blue wire
When only the SR3 sensor is connected, the remaining AURATON Ursa functions are inactive, i.e. no indication of the operation of the central heating pump (SR1), no indication of the operation of the central heating pump and the three-way valve in the fireplace system, and no control of the blower.
Fan control
(display part D)
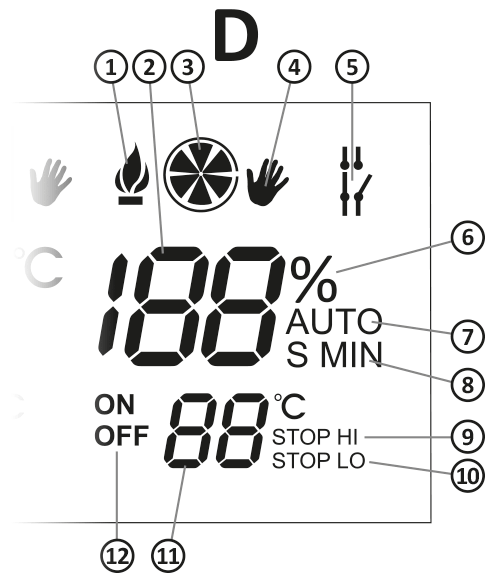
- Ignition indicator
- Countdown of fan operation time and pause time between blow-offs ("EE" signal, hysteresis setting; fan power and start time setting)
- Fan operation indicator
- Manual fan activation indicator
- Forced operation indicator (central heating pumps)
- Fan power percentage indicator
- AUTO function indicator
- Unit of set time (S – seconds, MIN – minutes)
- STOP HI Function Indicator
- STOP LO function indicator
- Setting the temperature above which the fan is to be switched on and off cyclically (according to the settings)
- Symbols for setting the fan operation time (ON) and the pause time between blows (OFF)
The AURATON Ursa is a modern processor-based controller, also designed for use with solid fuel forced-air central heating boilers.
Depending on the boiler water temperature, the AURATON Ursa automatically turns on or off the water pump in a coal-fired central heating system, as well as the blower mounted under the furnace.
The AURATON Ursa sensor measures the boiler water temperature and controls the pump and blower based on this information.
The AURATON Ursa is equipped with an AntiStop , which prevents the pump rotor from seizing when not in use.
Installation
AURATON Ursa mount
Mount the AURATON Ursa on a wall or other support using two screws (wall plugs included). Attach the cables extending from the AURATON Ursa to the wall using wall brackets.
Sensor mounting
In the AURATON Ursa, connect the temperature sensor to the SR1 . Then, install the sensor on the boiler in the designated location. The sensor must not be immersed in liquids and must not be installed on the flue gas outlets to the chimney. Maximum temperature measurement is 99°C.
Connecting the power cord to the blower
In AURATON Ursa, the blower connection should be connected to the OUT5 ( L , $ , N ). In the case of the blower, connect the green or yellow-green wire (grounding or neutral) to the " $ connect the blue wire N the brown wire L
Connecting AURATON Ursa
After securing the wires against accidental breakage, connect the power cable from the controller side to the IN ( L , $ , N ). Then connect it to a 230 V AC/50 Hz power outlet with a grounding pin.
| P | NOTE: The ambient temperature where AURATON Ursa is installed should not exceed 40 °C. |
| Q | NOTE: All cable connections must be made with the power source disconnected. |
AURATON Ursa activation
Turn the switch À to the " I " position. After switching on, all display segments and the software version will be displayed for approximately 2 seconds. The controller will then indicate the current temperature of the SR1 .
Setting range
- Temperature setting (from 10 to 85 °C),
- Setting the operating time and the pause time between blows from 10 seconds to 99 minutes,
- The fan is controlled via the OUT5 , the set temperature refers to the temperature measured by the SR1 (CO) sensor,
- Hysteresis adjustable from 2 to 10 °C (2 °C increments).
Temperature change
D button once briefly , which will cause the set value -°C (the fan is off by default) to flash, and then use the " + " or " – " buttons to set the desired temperature value above which the fan will be switched on and off cyclically.
Once you have set the desired temperature value, you must confirm (save) it within 10 seconds by pressing the " OK " button. Otherwise, the temperature change will not be saved and AURATON Ursa will revert to the previous setting.
Changing the operating time and cyclic fan break time
D button once causes the fan temperature to flash. Pressing the " D " button again within 10 seconds will switch to the programming mode for the cyclical fan operation time (blow-off – the factory-set value is 10 seconds), and then using the " + " or " – " buttons, set the desired value (after exceeding 59 seconds, the time will automatically start to be displayed in minutes).
D button again within 10 seconds , you will set the cyclical fan pause time (between subsequent blows – the factory-set value is 5 minutes). Then, use the " + " or " – " buttons to set the desired value (after reducing the time below 1 minute, the time will automatically start being displayed in seconds). Once you have set the desired value, you must confirm (save) it within 10 seconds with the " OK " button. Otherwise, the change will not be saved and AURATON Ursa will revert to the previous setting.
AUTO operation mode
During normal operation, when AURATON Ursa attempts to reach the set temperature value in the " D " section, the AUTO . The fan then operates at full power (programmed in %) until the set temperature is reached. Once it is reached, the fan switches to the cyclical operation and pause time.
Burner extinguishing function
If the temperature at the SR1 drops below the set temperature (default 30 °C) for at least 30 minutes, the fan will be permanently turned off, and the display will show a flashing STOP LO . The fan will exit the permanently turned off mode automatically when the temperature at the SR1 above 30 °C.
The permanently turned off temperature can be set within the range of 15 to 40 °C. To do this, press the " D D button again (the turned off temperature and STOP LO ) to set the permanently turned off temperature.
Use the " + " (increase temperature) and " – " (decrease temperature) buttons to set the desired value. After setting, confirm (save) the setting within 10 seconds. button " OK ". Otherwise, the change will not be saved and AURATON Ursa will return to the previous setting.
Hysteresis change
To do this, press the " D " button to display the fan temperature. Pressing it again will display the fan operation time and pause time. Pressing the " D " button again will display the fan stop temperature and the " STOP LO " message. Press the " D " button again to set the desired hysteresis using the " + " and " – OK button within 10 seconds. Otherwise, the change will not be saved and AURATON Ursa will revert to the previous setting.
For example, with a setting of 40 °C and a hysteresis of 4 °C, the fan will be turned on permanently when the temperature drops below 38 °C, while cyclical fan operation will occur at 42 °C.
Setting the maximum fan power
AURATON Ursa features a fan power limiting function expressed as a percentage. It can be set from 30% to 100% (100% means full fan power). To change this, press the " D " button, which will display the fan temperature. Pressing the "D" button again will display the fan operation time and pause time. Pressing the " D " button again will display the fan shutdown temperature and the "STOP LO " message. Press the " D " button again to set the desired hysteresis.
D button again to set the maximum fan power (the factory value displayed is 100%). Use the " + " (power increase) and " – OK button within 10 seconds. Otherwise, the change will not be saved and AURATON Ursa will revert to the previous setting.
Setting the maximum percentage of fan power in the range from 30 to 100% means that the fan will also operate during ignition at the set power.
Setting the smooth fan start time
AURATON Ursa allows you to set the time it takes for the fan to reach full power after startup (up to the set percentage – see “Setting Maximum Fan Power”). You can set the fan's smooth start time from 0 seconds (start at full power) to 15 seconds until the fan reaches full power. Set the value using the “ + ” (increase time) and “ – OK button within 10 seconds. Otherwise, the change will not be saved and AURATON Ursa will revert to the previous setting.
Manual mode - continuous operation
To manually turn on the fan (regardless of the temperature at the SR1 ), press the " D V symbol will then appear on the display D button again for 3 seconds.
Automatic ignition function
The symbol ½ in section " D " means that the fan is switched on permanently at maximum power (programmed in %) and the circulation pump in section " A " is switched off simultaneously. It lights up when, after turning on AURATON Ursa with the À , the SR1 is lower by at least half of the hysteresis than the one set in section " D ". The display in section " D " will show the countdown of the time (30 minutes) needed to fire up the boiler.
If the temperature in section " D " ( SR1 ) is not reached within 30 minutes, the fan will be turned off and at the same time the central heating pump in section " A " will be unblocked (flashing ignition symbol).
½ symbol will turn off automatically when the stove reaches the temperature set in section " D " and the AURATON Ursa will then switch to normal operation. You can also turn the AURATON Ursa off and on again using the À to activate the ignition function.
Adding fuel to the fire
During normal operation, you can add fuel and at the same time block the fan operation in two ways:
- Turn off the AURATON Ursa using the À . Add fuel and then turn on the AURATON Ursa while simultaneously activating the ignition function.
- The second way is to use the fuel adding function, which is activated by pressing and holding the " D V symbol will be displayed , and by holding it for another 2 seconds the fuel adding function will be activated).
The display in the " D " section will show a 20-minute countdown after which the AURATON Ursa will return to normal operation (an audible warning will be heard before the fan turns on).
D button for 5 seconds .
Emergency fan shutdown
If the temperature in section " D " ( SR1 STOP HI will flash on the display ) until the temperature drops below this value.
Explanation of display functions
| § | AURATON Ursa will display the message “ LO ” if the temperature on the SR1 , SR2 and SR3 drops below 0. |
| ¹ | AURATON Ursa will display the inscription " ¹ " if the temperature on the SR1 , SR2 and SR3 exceeds 99 °C |
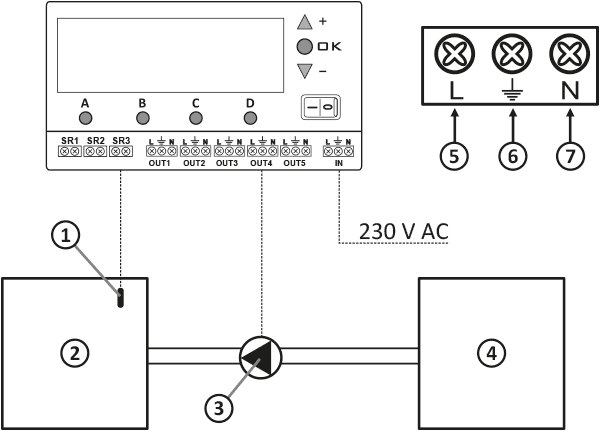
AURATON Ursa connection diagram for the boiler pump and blower
When only the SR1 sensor is connected, the remaining AURATON Ursa functions are inactive, i.e. there are no indications of the operation of the central heating pumps in the fireplace system and no indications of the pump control in the domestic hot water system.
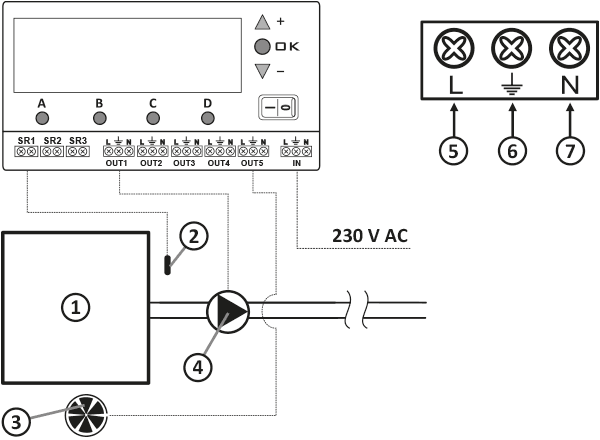
- Central heating boiler
- Temperature sensor
- Fan
- Pump
- Brown wire
- Yellow-green wire
- Blue wire
Screen backlight operation
Each time you press any button, the display backlight turns on for approximately 1 minute.
If you need to turn the backlight on permanently, press and hold the " OK " and " + " buttons for approximately 3 seconds. A beep will confirm that the backlight is on.
To turn off the permanent backlight, press the " OK " and " – " buttons. A beep will confirm that the function is off.
The first press of any function button always turns on the backlight (if permanent backlighting is off), and only the next press activates the button's function. Any changes made using the buttons are confirmed acoustically.
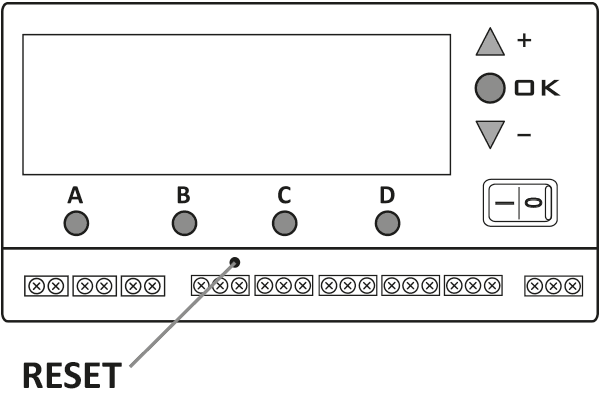
RESET AURATON Ursa
In extreme situations (AURATON Ursa freezing), you can use the " RESET " function. This button is located under the flap covering the terminal connections.
Master RESET AURATON Ursa
This function allows you to restore all settings to their factory defaults. To use it, simultaneously press the three buttons marked " + ", " OK ", and " - " for 5 seconds.
Cleaning and maintenance
- Clean the exterior of the device with a dry cloth. Do not use solvents (such as benzene, thinner, or alcohol).
- Do not touch the device with wet hands. This may result in electric shock or serious damage to the device.
- Do not expose the device to excessive smoke or dust.
- Do not touch the screen with a sharp object.
- Avoid contact of the device with liquids or moisture.
Technical data
Working in a central heating system
| Range of set temperatures: | 10–85 °C |
| Measurement range: | 0–99 °C |
| Hysteresis (on/off difference): | from 2 to 10 °C |
| Supply voltage: | 230V AC |
| Maximum load for the sum of outputs: | 6 A |
Working with a central heating pump and a three-way valve "Z" (or a second central heating pump - fireplace system)
| Range of set temperatures: | 10–85 °C |
| Measurement range: | 0–99 °C |
| Hysteresis (on/off difference): | from 2 to 10 °C |
| Supply voltage: | 230V AC |
| Maximum load for the sum of outputs: | 6 A |
Working with a DHW pump
| Range of set temperatures: | 10–85 °C |
| Measurement range: | 0–99 °C |
| Hysteresis (on/off difference): | from 2 to 10 °C |
| Supply voltage: | 230V AC |
| Maximum load for the sum of outputs: | 6 A |
Fan control
| Range of set temperatures: | 10–85 °C |
| Measurement range: | 0–99 °C |
| Hysteresis (on/off difference): | from 2 to 10 °C |
| Supply voltage: | 230V AC |
| Maximum load for the sum of outputs: | 6 A |
| Maximum load in section "D" | 1 A (230 W/AC switch) |
| Blow-off time and intervals between blow-offs: | 0–59 sec and 1–99 min. |
Disposal of the device
O
Devices are marked with a crossed-out waste bin symbol. In accordance with European Directive 2012/19/EU and the Waste Electrical and Electronic Equipment Act, this marking indicates that this equipment, after its useful life, must not be disposed of with other household waste.
Users are obligated to dispose of it at a collection point for used electrical and electronic equipment.
Manufacturer's address and contact details:
LARS, ul. Świerkowa 14
64-320 Niepruszewo
www.auraton.pl