User manual ver. 20250611
This document collects information on the safety, installation and use of the Auraton Flood Sensor device.
Basic information
The Auraton Flood Sensor detects flooding in a monitored room. The device is designed to work with the Auraton Flood Sensor Valve. One FSV valve supports a maximum of 10 sensors.
The devices are available both separately (flood sensor and water valve) and as a set (valve + flood sensor). This set is called the AURATON Water-Stop Set and is available in three thread sizes: 1/2″, 3/4″ and 1″.
NOTE:
The system will minimize damage resulting from water damage only if*:
- the Flood Sensor Valve was correctly installed in the water system by the installer,
- the FSV valve has been correctly paired with at least one Flood Sensor,
- radio communication between FS and FSV devices is correct and stable, and has been previously checked (the devices should not operate at the limits of their range),
- the Flood Sensor is placed close to a point with access to water, e.g. next to a washing machine, dishwasher, sink, and has a real possibility of detecting a leak,
- the FSV valve remains permanently powered via the included power supply or the battery is regularly recharged to maintain the device's continuous operation,
- the valve only minimizes the risk within the scope of the installation connected to it and cannot prevent damage resulting from the action of water outside the system to which it is connected, e.g. damage resulting from leaky roofs, windows or the operation of external installations (flooded by a neighboring premises).
*The manufacturer is not responsible for losses and damages resulting from flooding and other unforeseen events.
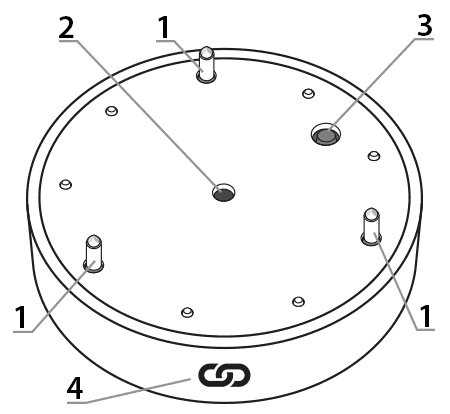
Device description
1 – Flood sensors
2 – Operation indicator light
3 – Function button
4 – Magnet used to activate the steam function in the Flood Sensor Valve ( @ )
Installation
The flood sensor should be placed on the floor, relatively close to the water system (washing machine, dishwasher, etc.) , so that it can send a signal to the valve when moisture is detected. The distance between the Flood Sensor and the Flood Sensor Valve should be no less than 1.5 meters to avoid radio communication problems. If radio communication is poor, try rotating the Valve on the pipe by 90° to better align the Valve and Sensor antennas, or reduce the distance between the devices.
Device pairing
To enable pairing on the Flood Sensor, press and hold the button. A short beep will sound after pressing . Hold the button until you hear another longer beep , then release the button. Pairing is indicated by a flashing red LED.
Long beeps (BEEP) indicate successful completion of the function, while short beeps (BEEP) indicate an error in completing the function.
After completing the appropriate function, the detector returns to its previous state.
Enabling steaming – Auraton Flood Sensor Valve
To activate pairing on the Auraton Flood Sensor Valve, place the FS flood sensor and the FSV valve together on the pairing symbol side ( @ ). A moment after placing the sensor, you will hear a short beep from the valve . Keep the sensor pressed until you hear another long beep , and then move the two devices away from each other.
Enabling pairing – Auraton Box gateway
Pairing the AURATON Flood Sensor with the AURATON Box gateway can be done in two ways:
- On the AURATON Box gateway, briefly press the right "Auraton" pairing button (
 ) – the LED under the button will start flashing. Then, put the flood sensor into pairing mode.
or
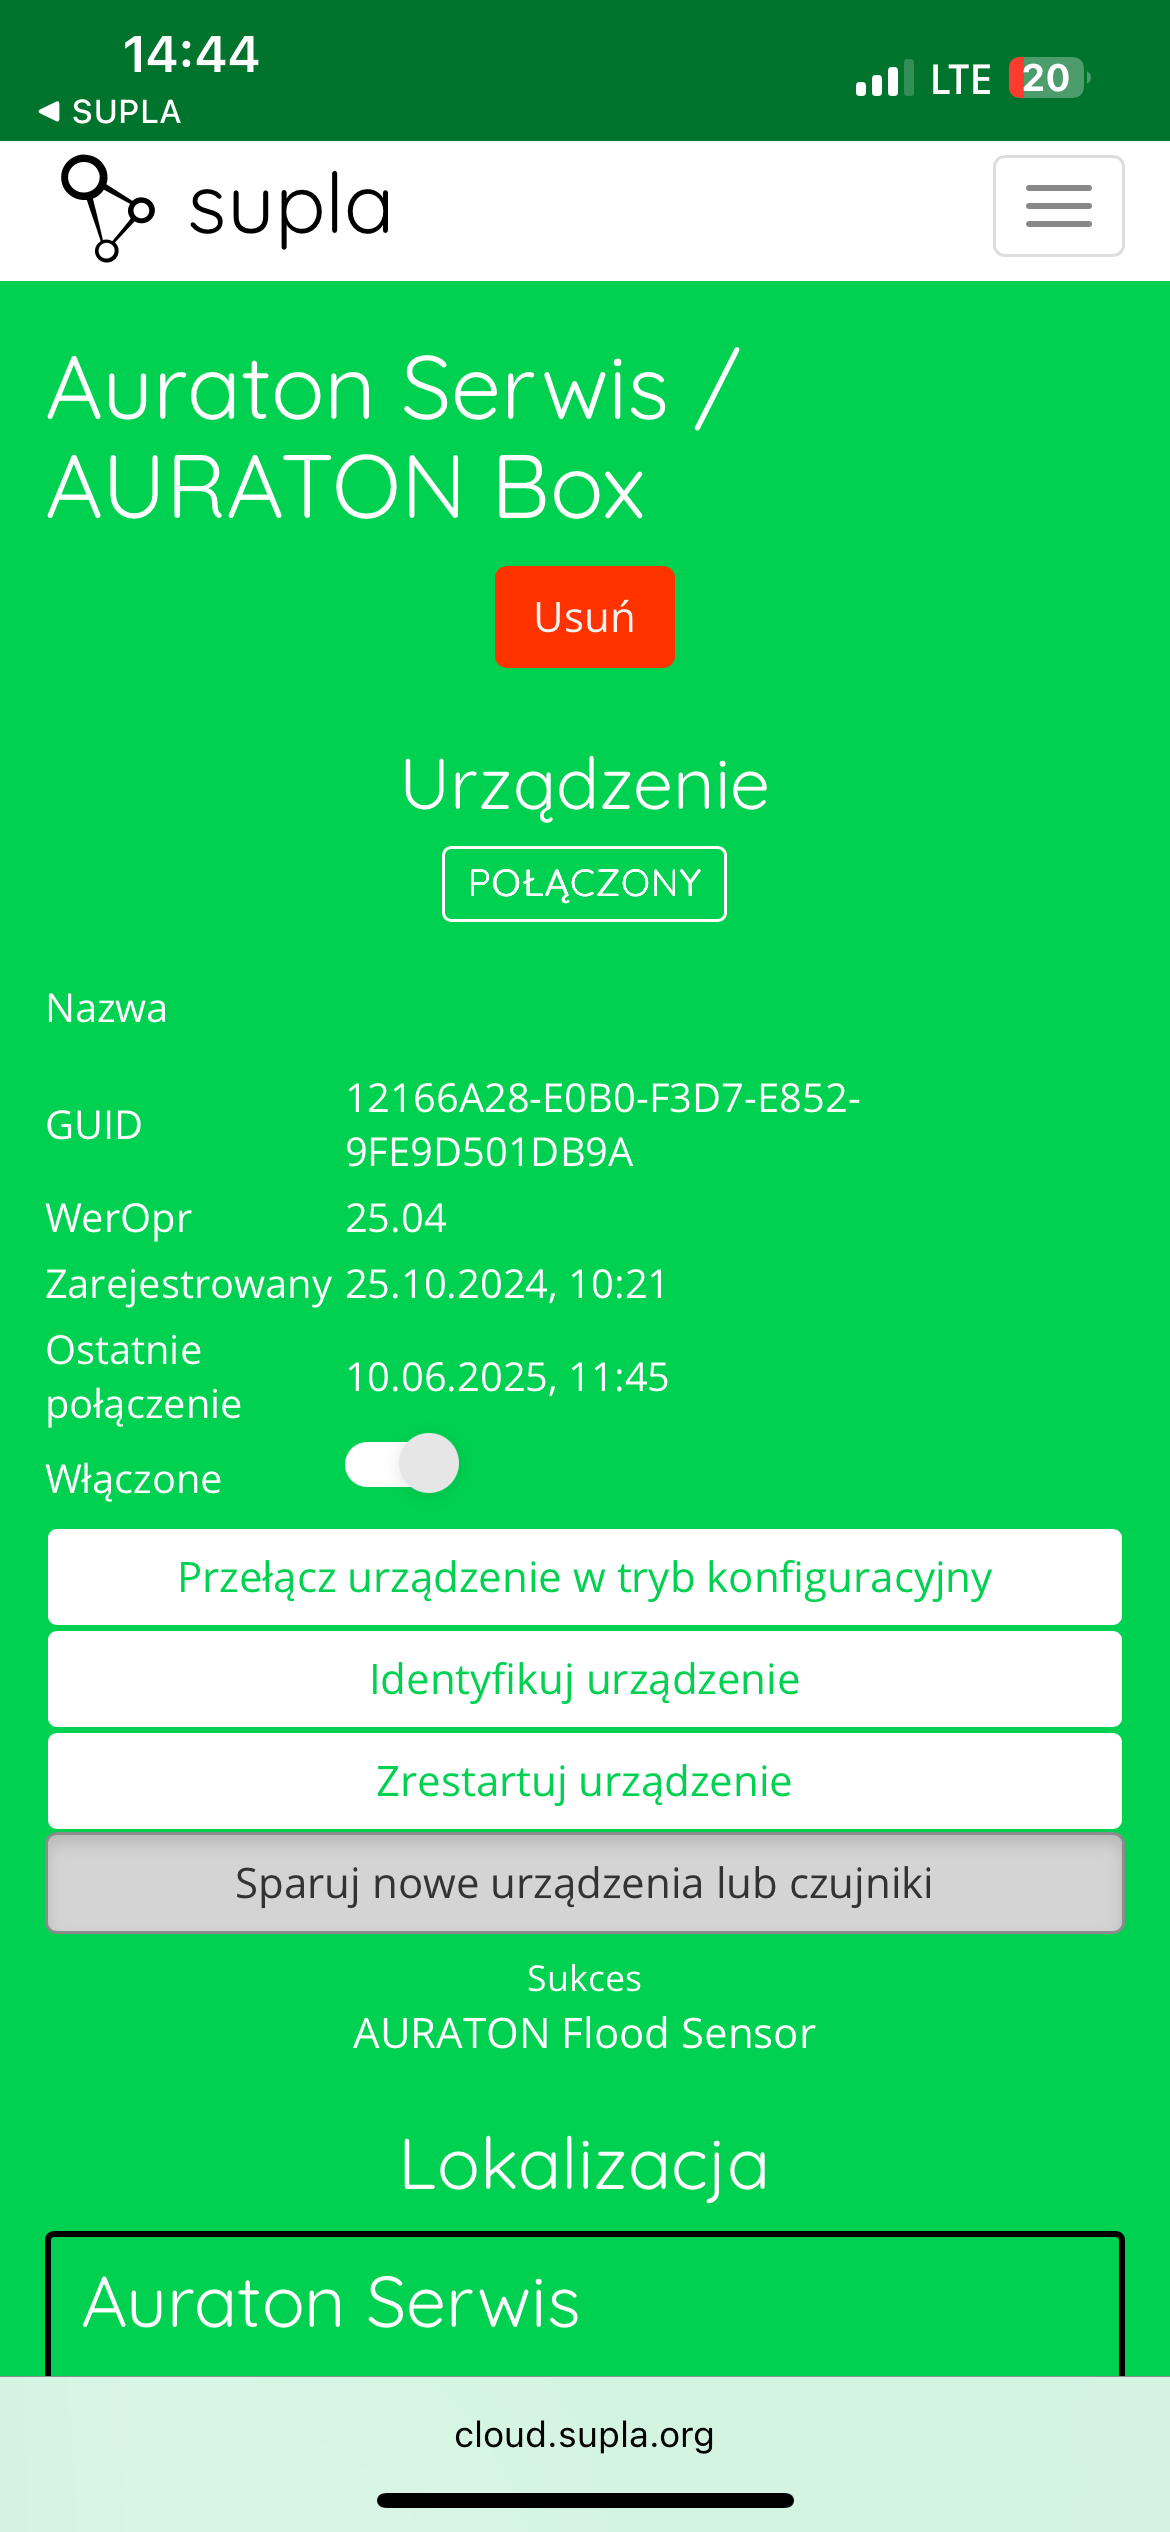
- In Supla Cloud, enter the AURATON Box gateway channel and press the "Pair new devices or sensors" button – the LED under the right "Auraton" pairing button will start flashing. Then, put the flood sensor into pairing mode.
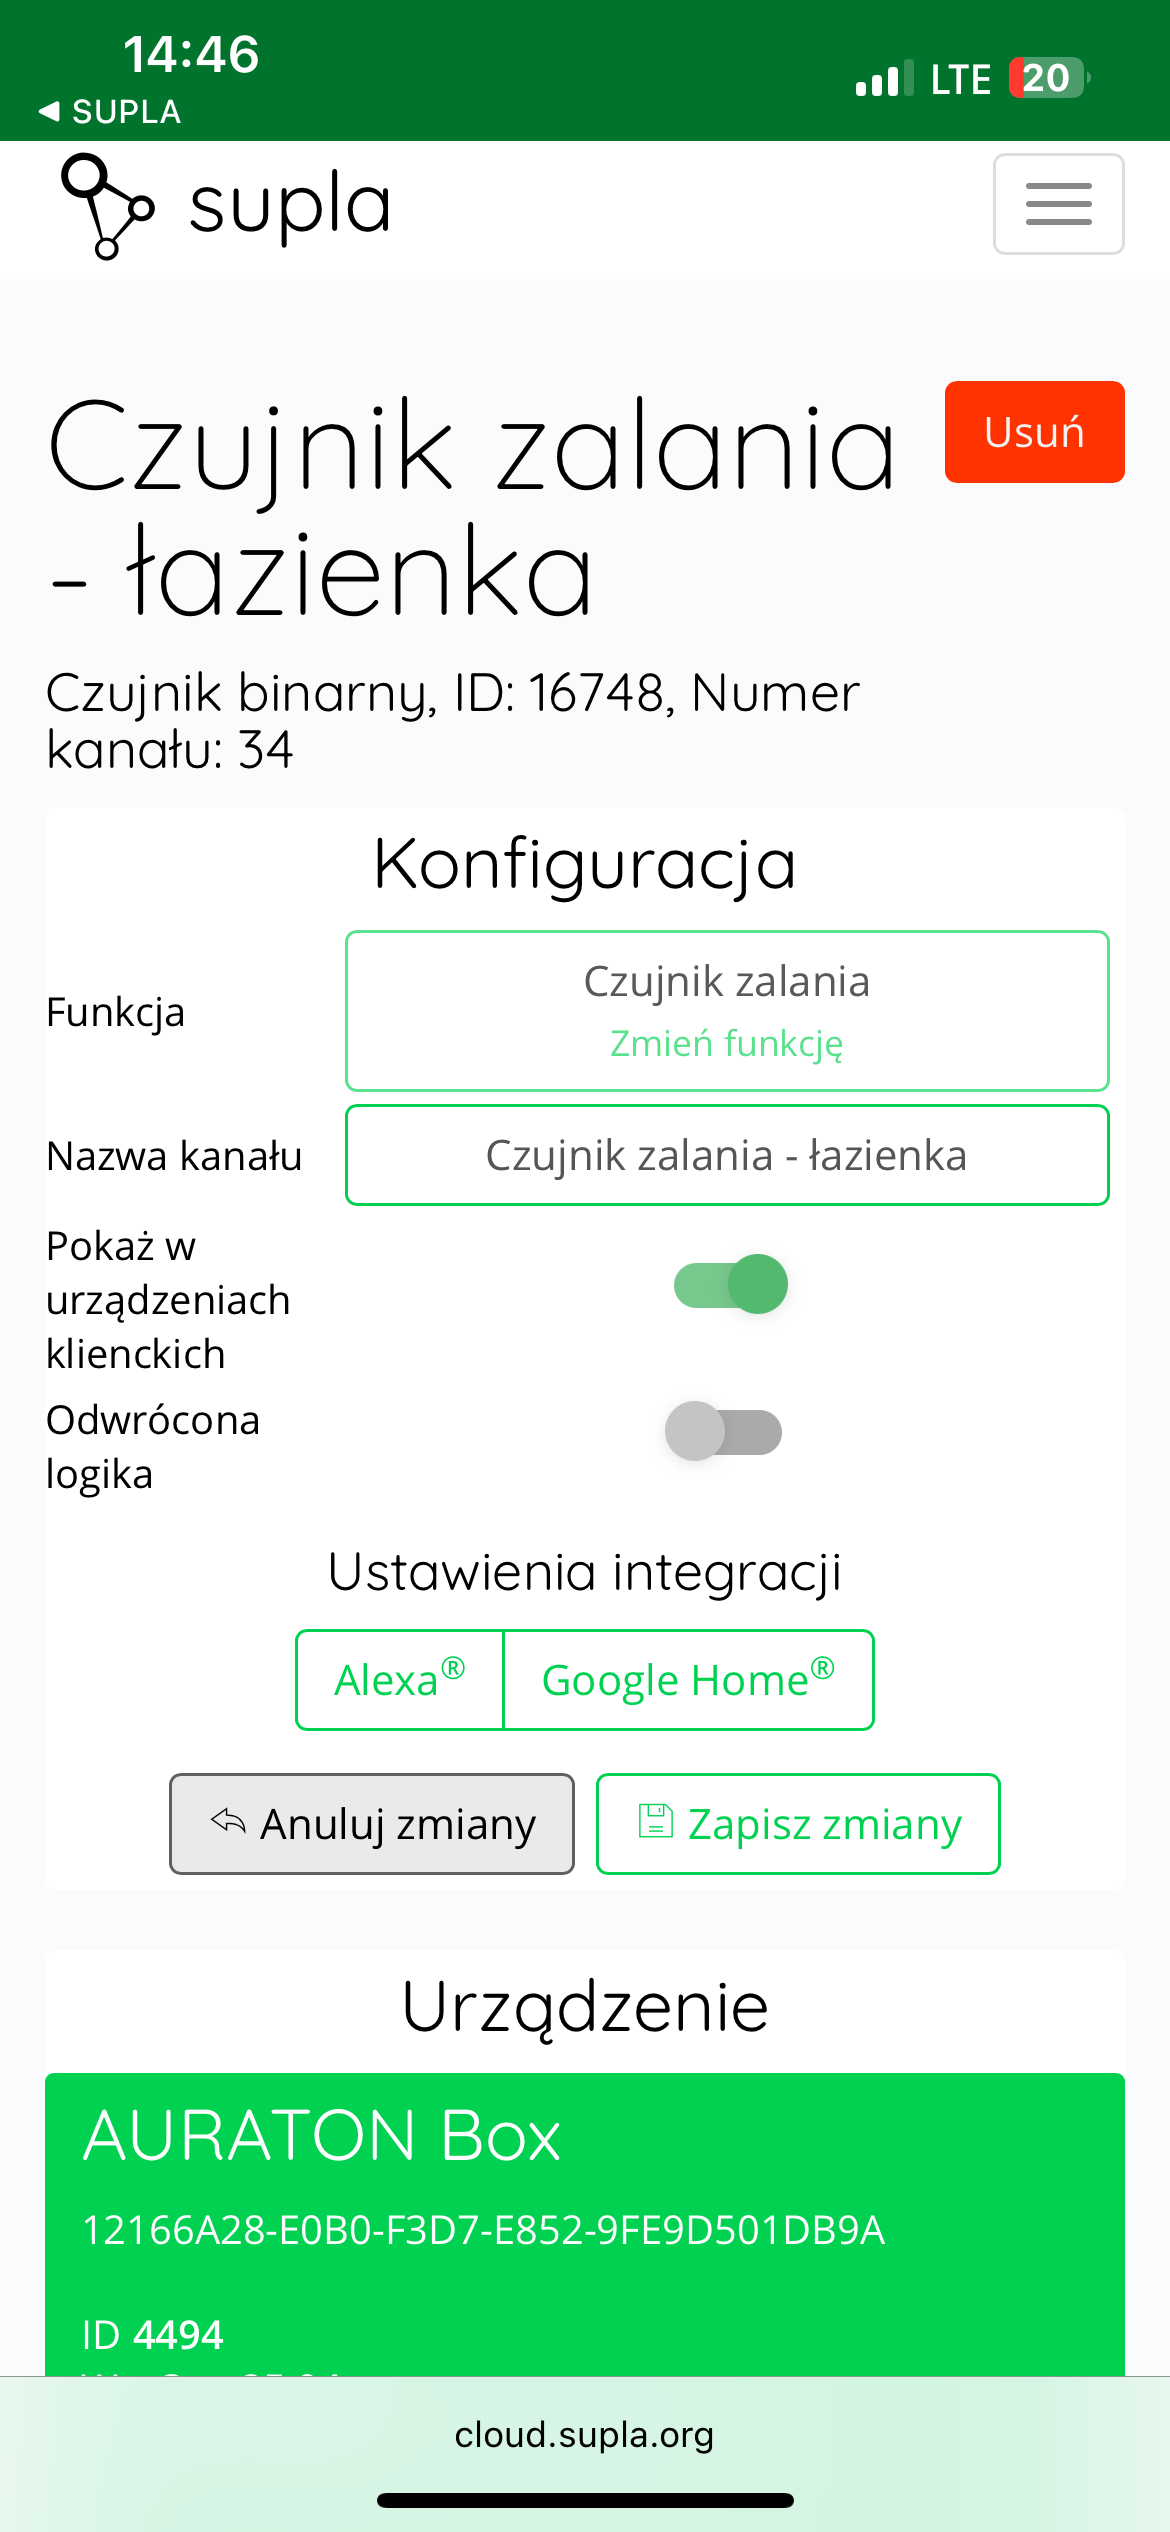
After pairing the AURATON Flood Sensor with the Auraton Box, it's recommended to immediately name it in its channel in Supla Cloud. By default, the device is named according to the model, e.g., "Flood Sensor," which can be confusing when using multiple devices of the same type. For easier identification, it's a good idea to give the sensor a unique name immediately after pairing. To do this, edit the "Channel Name" and click " Save Changes " to confirm the changes.
Factory reset
To restore the Flood Sensor to its factory settings, press and hold the button. A moment later, you'll hear a short beep . Hold the button until you hear two longer beeps , then release the button. At this point, the device should emit a continuous beep. Now, briefly press the button to confirm that you want to delete all user data from the Auraton Flood Sensor.
Long beeps (BEEP) indicate successful completion of the function, while short beeps (BEEP) indicate an error in completing the function.
After completing the appropriate function, the detector returns to its previous state.
Device functions
Indication of room flooding
The Flood Sensor detects flooding after 10 seconds of continuous contact between the "pins" (see "Device Description") located near the button and signals it with short beeps. Flood detection is divided into several stages:
- First 10 minutes (0:10 from flooding) – sound every 20-40 seconds for 3 seconds. Radio messages about flooding are transmitted at the same intervals until one is received by the second device. This will most often be the first message, but it is an additional safeguard in case of communication problems.
- after another 30 minutes (0:40 from flooding) – audible signal for 30 seconds. Extending the interval by another 30 minutes.
- after another 60 minutes (1:40 from flooding) – a sound signal sounds for 30 seconds. The interval is extended by another 30 minutes. The wake-up time is extended until it reaches 24 hours.
Function to restore the previous software
To update the software on the Flood Sensor, press and hold the button. A moment later, you'll hear a short beep . Continue holding the button until you hear three longer beeps , then release the button. At this point, the device should emit a continuous beep. Now briefly press the button to confirm that you want to restart the device. Immediately after this brief press, press and hold the button again until the red LED stops flashing (three flashes). The device will then restart and the previous software version will be restored (in the event of malfunctions after the update). The entire process can take up to a minute. The previous software version is always loaded. If the software was previously updated from version 1.6 to 1.5, the previous version is 1.6.
Transport mode
Transport mode disables all device functions and the Flood Sensor draws less current than during normal operation. The device can then be safely stored or transported without significant impact on battery life. To activate Transport mode on the Flood Sensor, press and hold the button. A moment later, a short beep will sound . Hold the button until you hear four longer beeps , then release the button. At this point, the device should emit a continuous beep, and now briefly press the button to confirm. To exit Transport mode, hold the button longer.
Long beeps (BEEP) indicate successful completion of the function, while short beeps (BEEP) indicate an error in completing the function.
After completing the appropriate function, the detector returns to its previous state.
Device operating modes
The Auraton Flood Sensor Valve and the Auraton Flood Sensor can operate in two modes.
Mode I (Local):
In this mode, the valve and sensor can operate independently without the need for an Auraton Box internet gateway. The sensor must be correctly assigned to the valve. Up to 10 sensors can be assigned to a single valve. If flooding is detected by one of the sensors, the valve will automatically close. Opening the valve is not automatic and must be done manually using the knob located on the top of the valve housing.
Mode II (remote):
In remote mode, you can use the Auraton Box internet gateway, providing access to the entire system from outside your home.
This allows you to remotely open or close the valve, check the battery levels of both the valve and the sensor itself, receive notifications of possible flooding, create schedules, and much more. Of particular importance is the ability to link valve closures to specific flood sensors, enabling automatic valve closure when flooding is detected via the Auraton Box gateway. This also allows you to receive remote notifications of flooding events.
For proper remote operation, Internet access is required both from the gateway itself and from a phone or tablet with the application (Android, iOS).
When using Mode II (remote), it is recommended to first pair the sensor with the valve itself . Pairing the valve and sensor will ensure proper operation of the set even in the event of a power outage to the Auraton Box gateway itself (e.g. power outage).
Cooperation with the SUPLA application
Cooperation of the AURATON Flood Sensor with the AURATON Flood Sensor Valve in the SUPLA application
After correctly pairing the flood sensors and valve with the AURATON Box gateway, the devices are visible in the SUPLA application – as in the picture below:
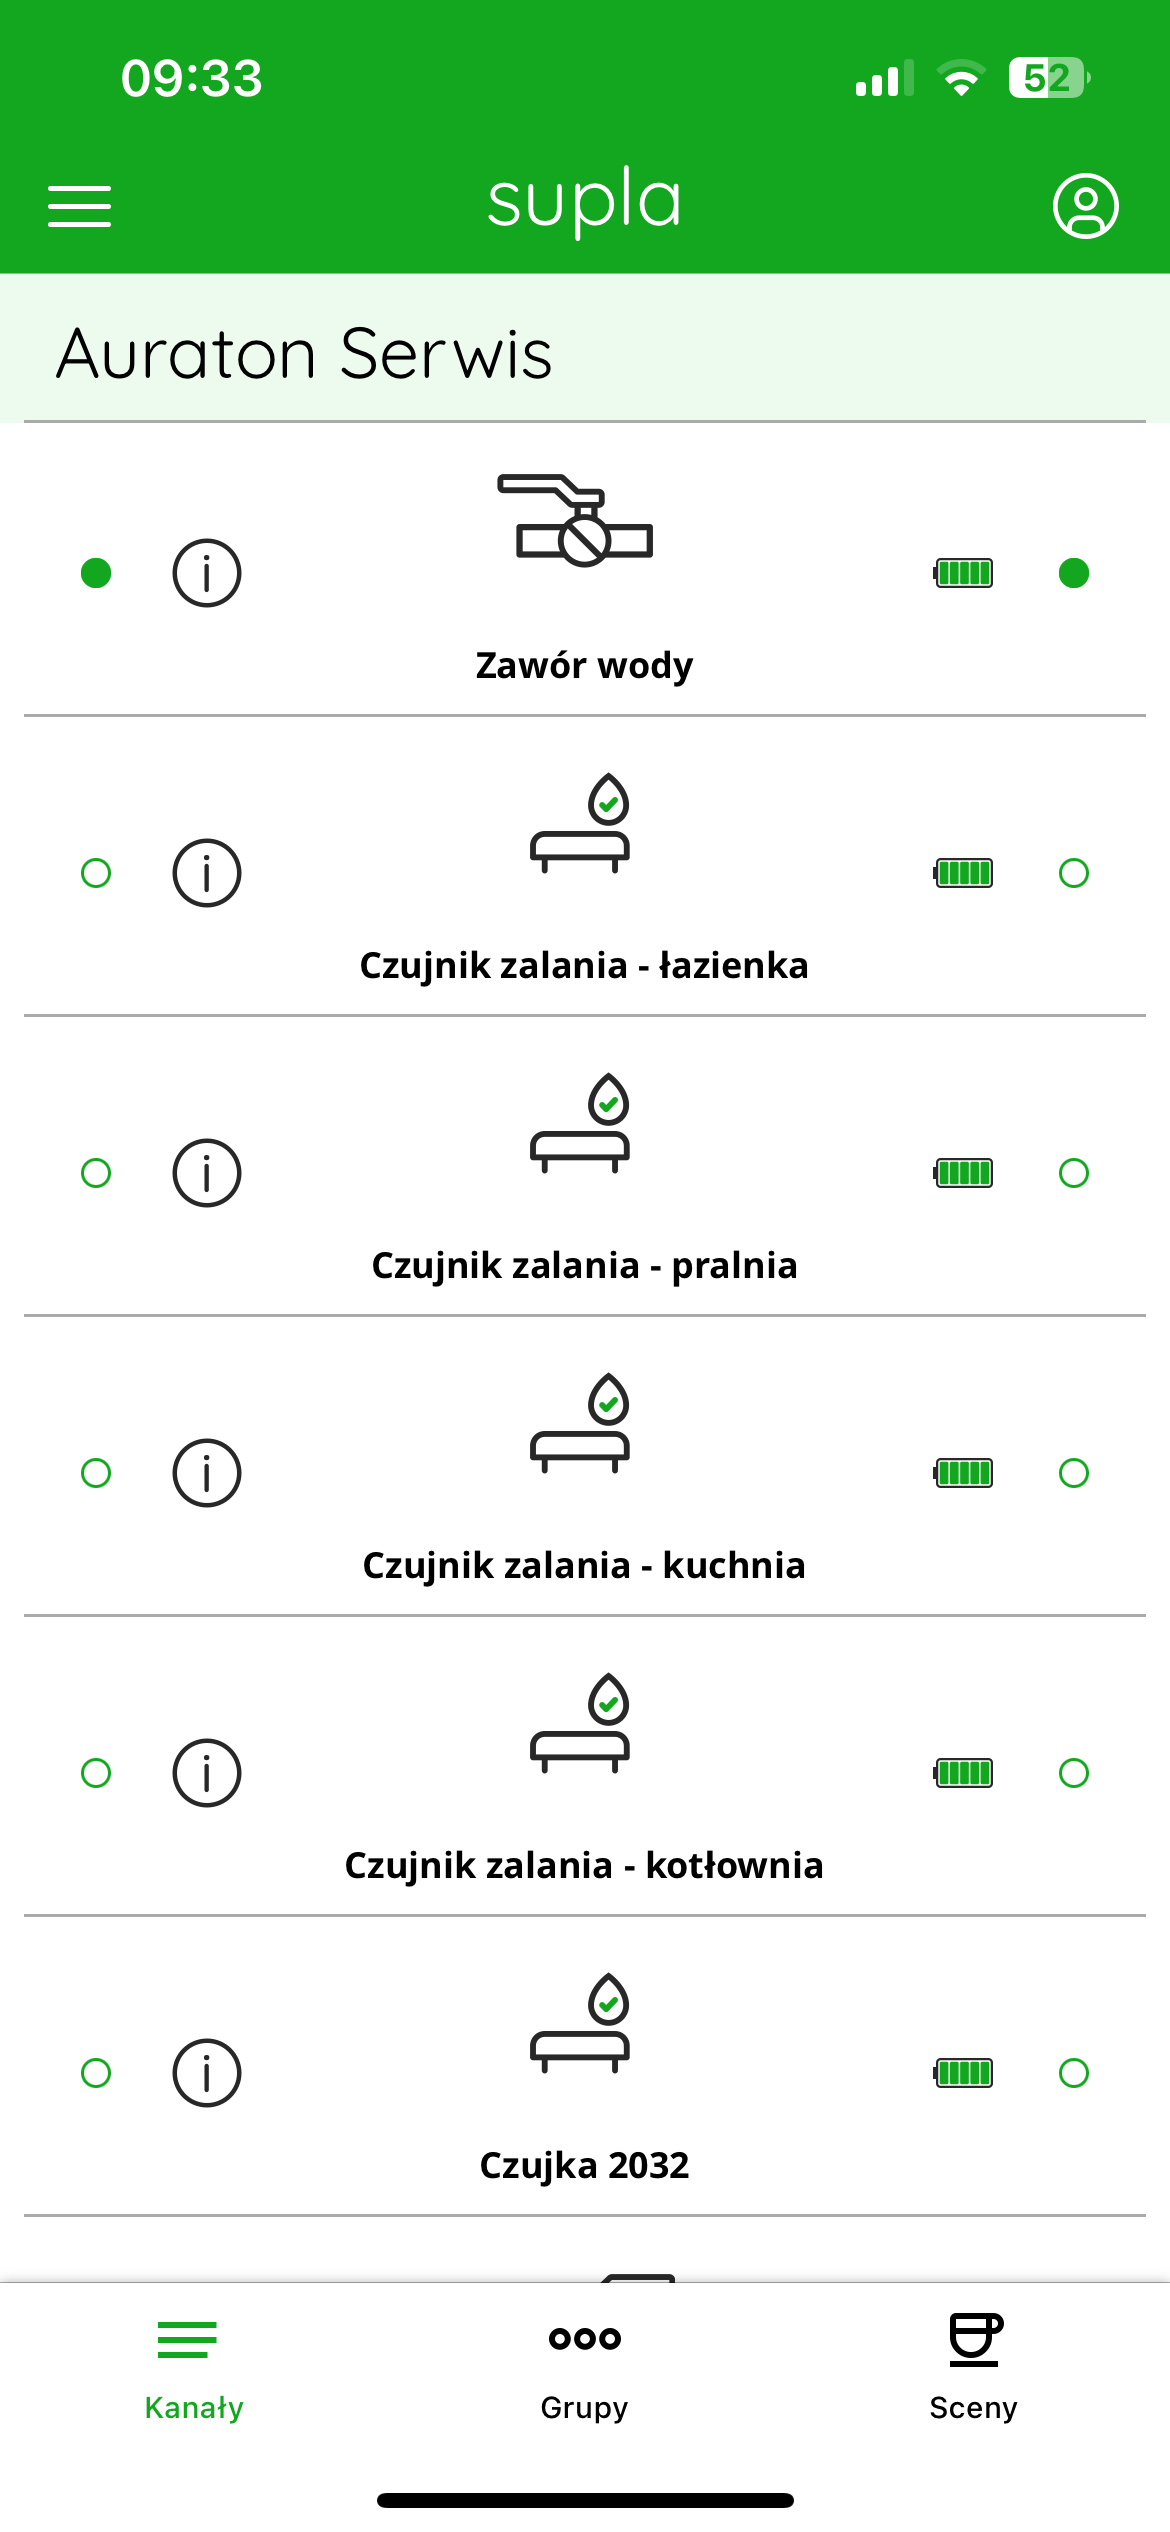
Each flood sensor and valve appear as separate channels. Device names can be freely edited in Supla Cloud, making them easier to identify when multiple sensors are present (e.g., kitchen, bathroom, boiler room).
Green status icons and battery level indicators on the sensors indicate that the devices are working properly and have an active connection to the gateway. The water valve is displayed as a separate channel with a ball valve icon – its status (open/closed) can be controlled manually or automatically in response to flooding detection.
Further configuration allows you to assign sensors to the valve to automatically shut off the water supply when flooding is detected – this process is described in the next steps of this manual.
Assigning flood sensors to the AURATON Flood Sensor Valve in the SUPLA application
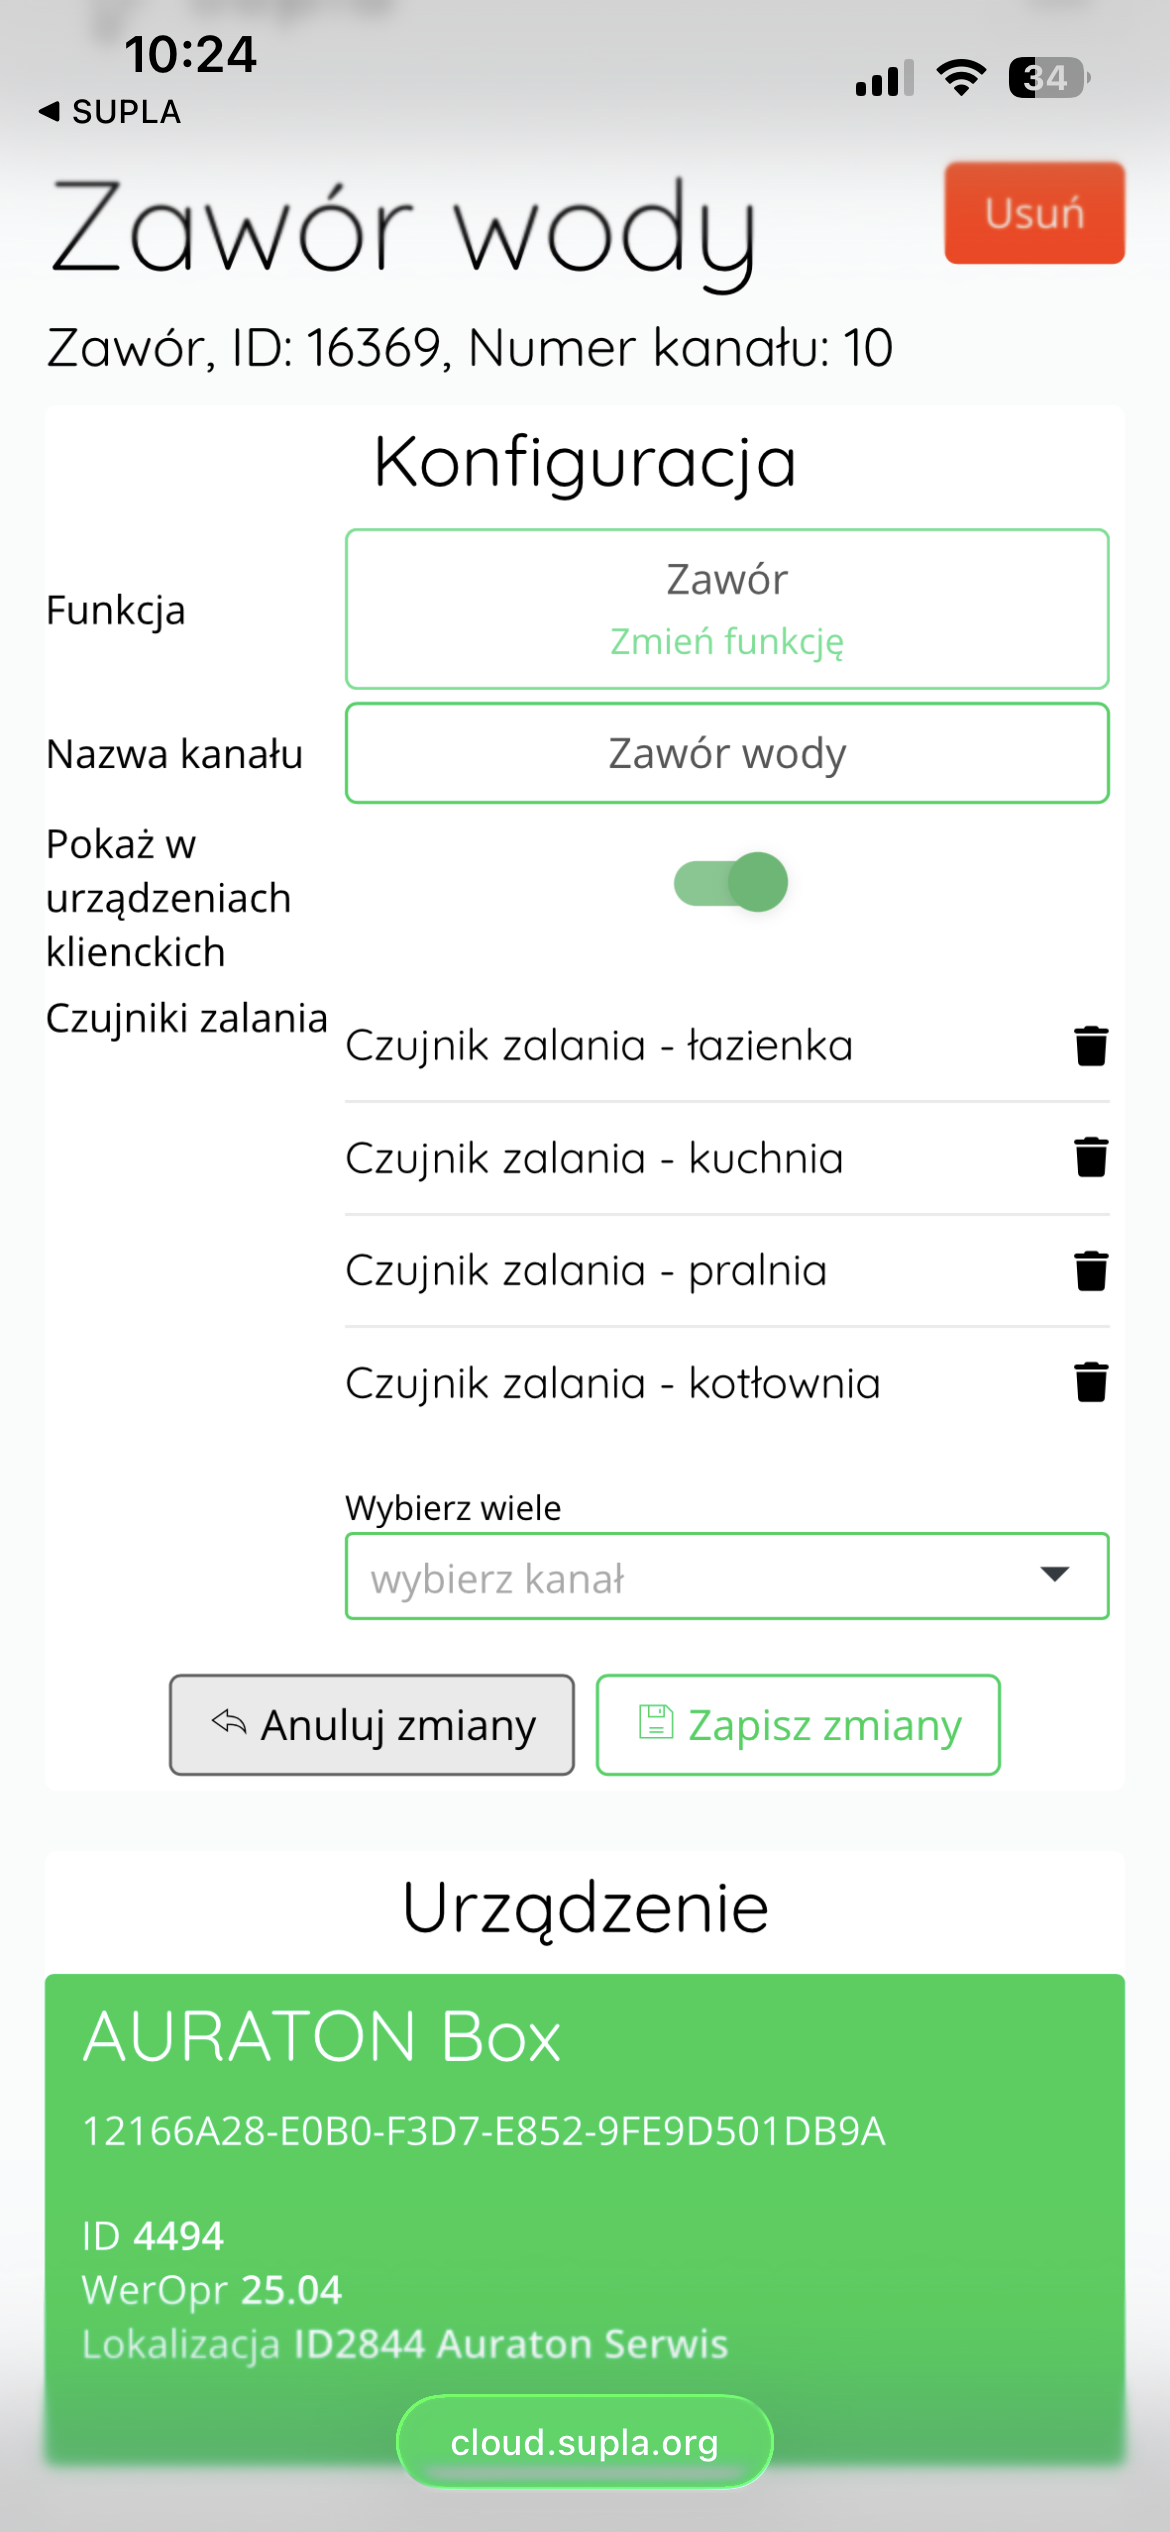
To configure automatic cooperation between AURATON Flood Sensor flood sensors and the AURATON Flood Sensor Valve, you must assign the appropriate sensor channels to the valve channel in SUPLA Cloud.
To do this, log in to SUPLA Cloud and go to the AURATON Box gateway channel to which the devices are assigned.
Next, you need to select the valve channel – most often labeled “Water Valve.”
After entering this channel, in the "Configuration" you will be able to assign flood sensors to the valve.
In the "Flood Sensors" , select all the sensors from the list that are to affect the valve (e.g. "Flood Sensor – Bathroom", "Flood Sensor – Kitchen", etc.).
To assign more than one sensor, use the "Select Multiple" and select the appropriate channels.
After assigning all sensors, confirm the configuration with the "Save changes" .
From this point on, each of the assigned sensors will be able to independently trigger the closing of the water valve in the event of flooding – which protects the entire facility against the serious consequences of a water system failure.
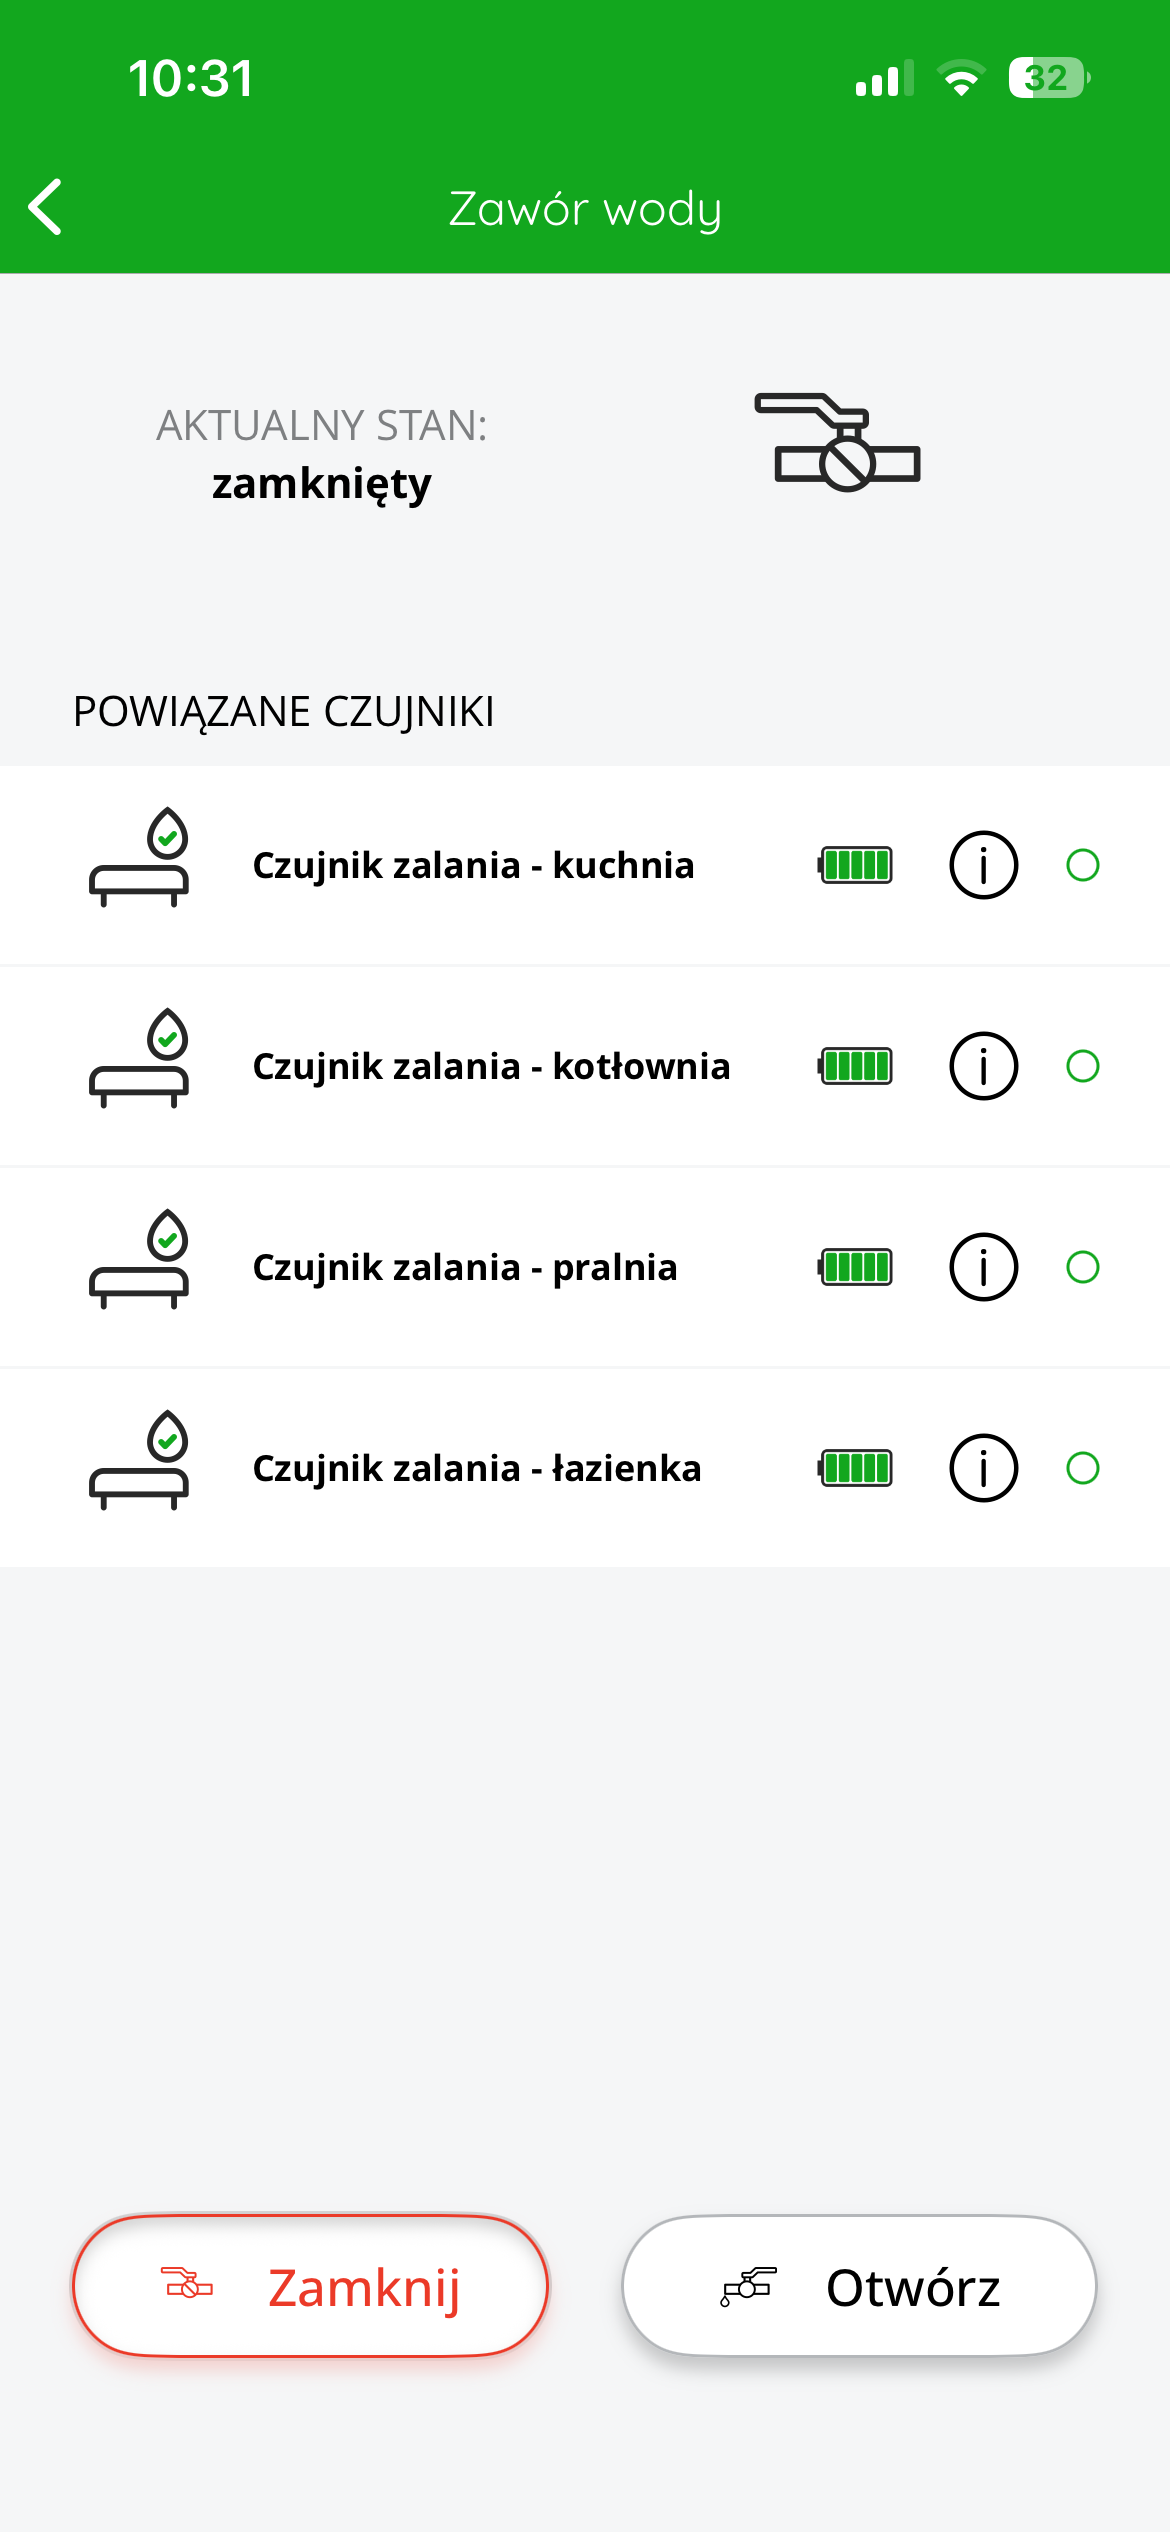
After saving the configuration, the status of the valve and the flood sensors assigned to it can be viewed at any time in the SUPLA application by entering the details of the valve channel.
This view displays the current valve status (e.g., "closed"), and below it is a list of all associated sensors with their names, battery charge status, and information about correct connection to the system.
If any of the assigned sensors detects flooding, the valve will automatically close. A clear notification of this event will also appear in the app – the sensor icon will change to an alarm icon and the valve will display a "closed" status.
Once the cause of the flooding has been removed, the user can manually open the valve by pressing the "Open" at the bottom of the screen. If necessary, the valve can also be manually closed again by pressing the "Close" .
Thanks to this function, the user has full control over the valve and a quick view of the system status without the need for physical contact with the device.
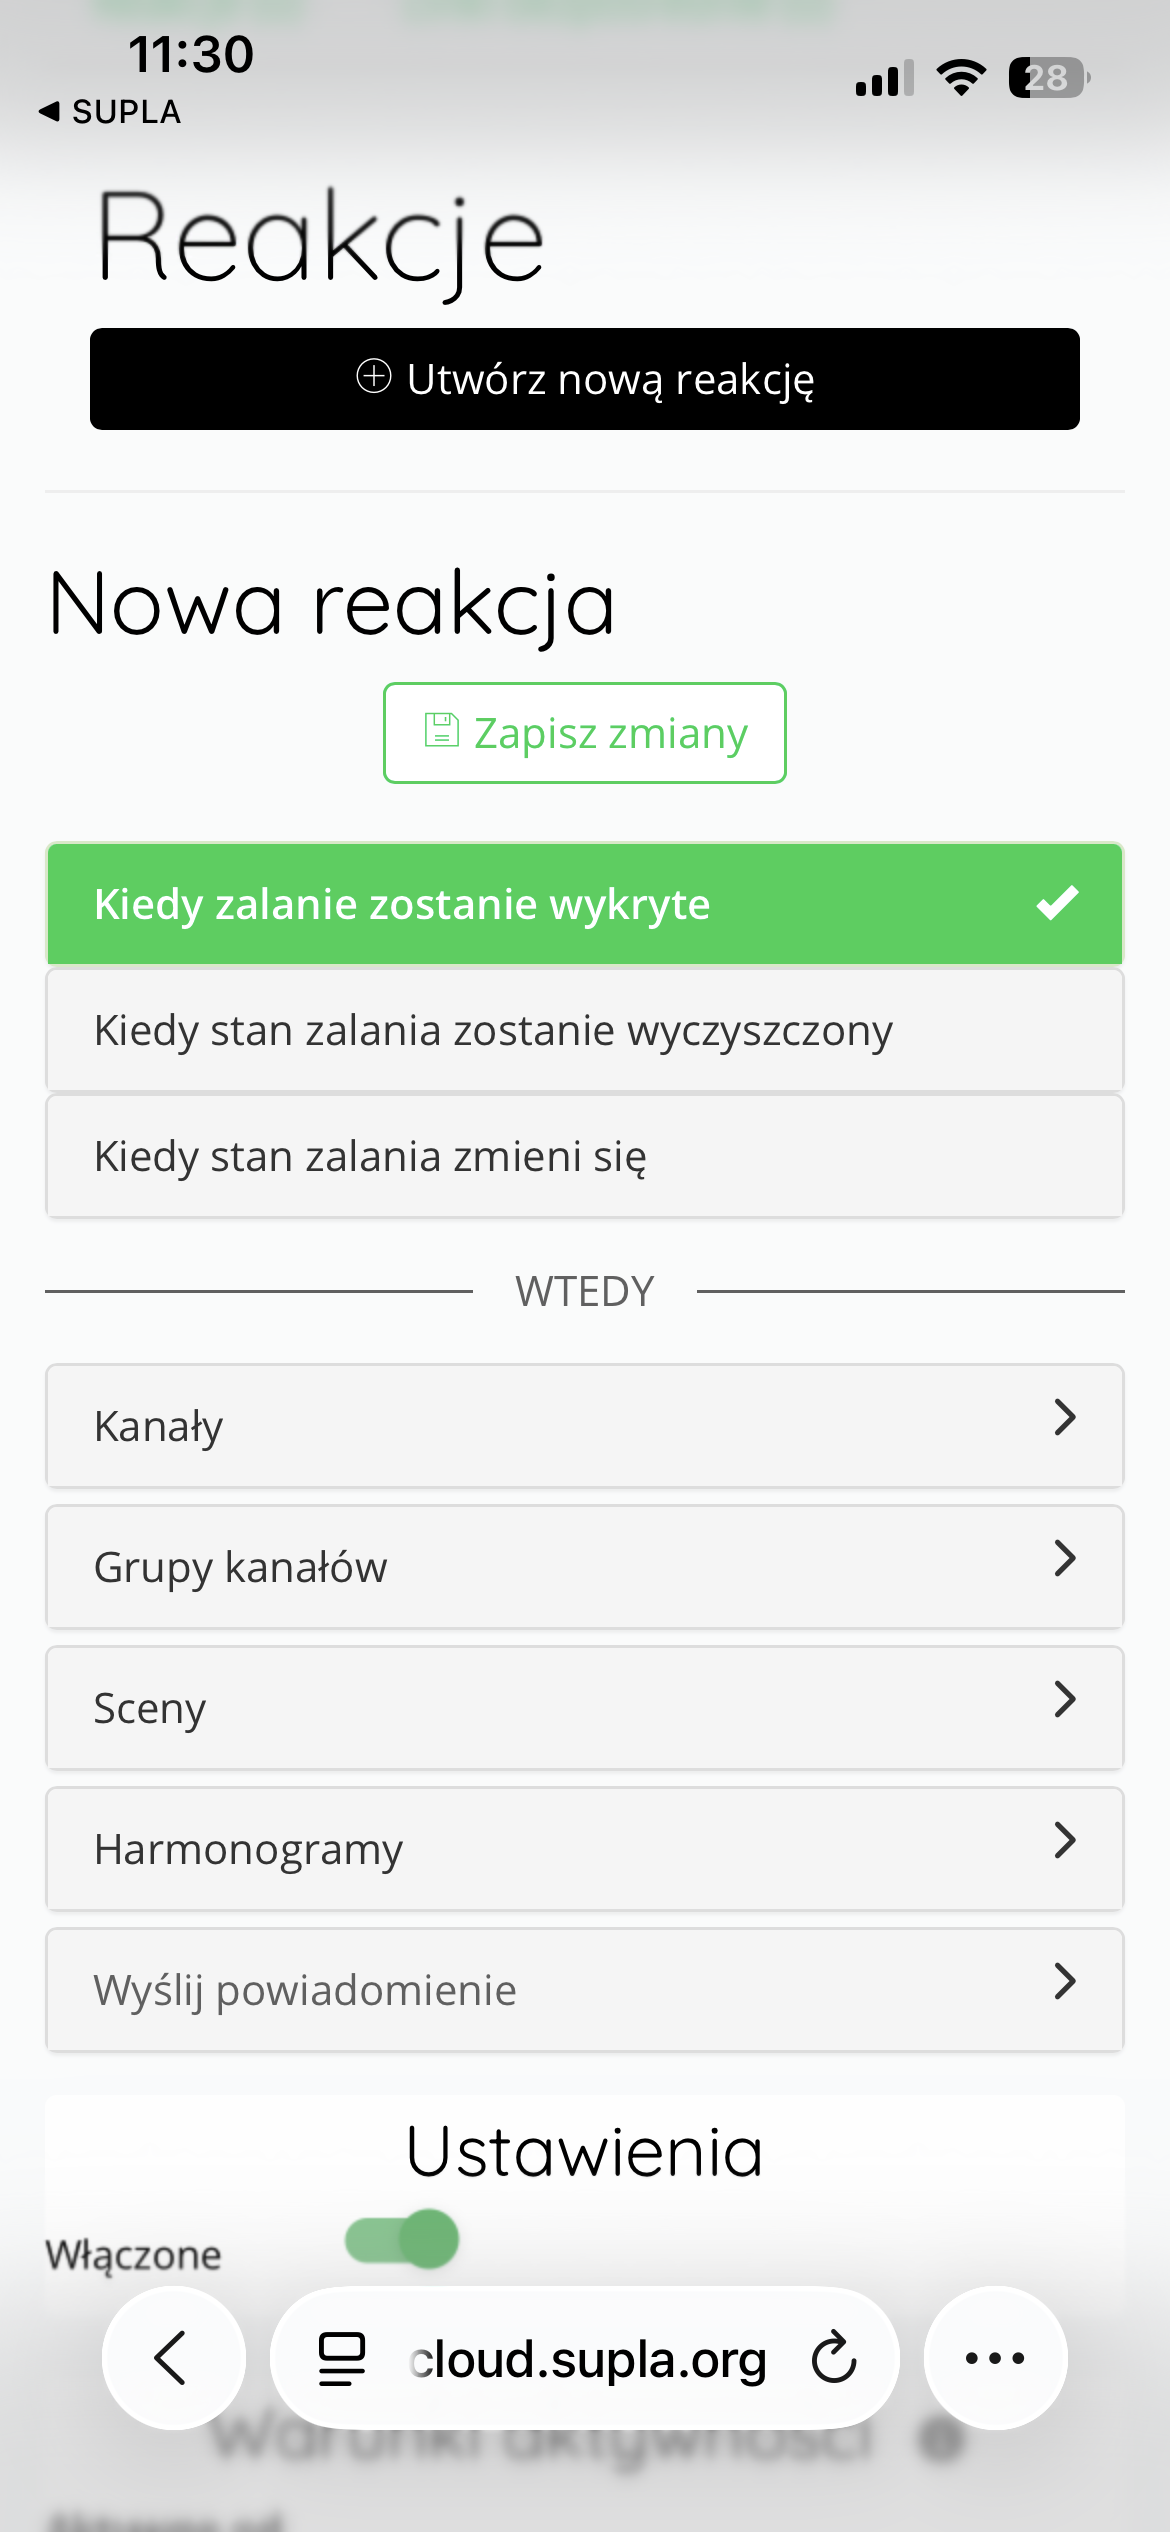
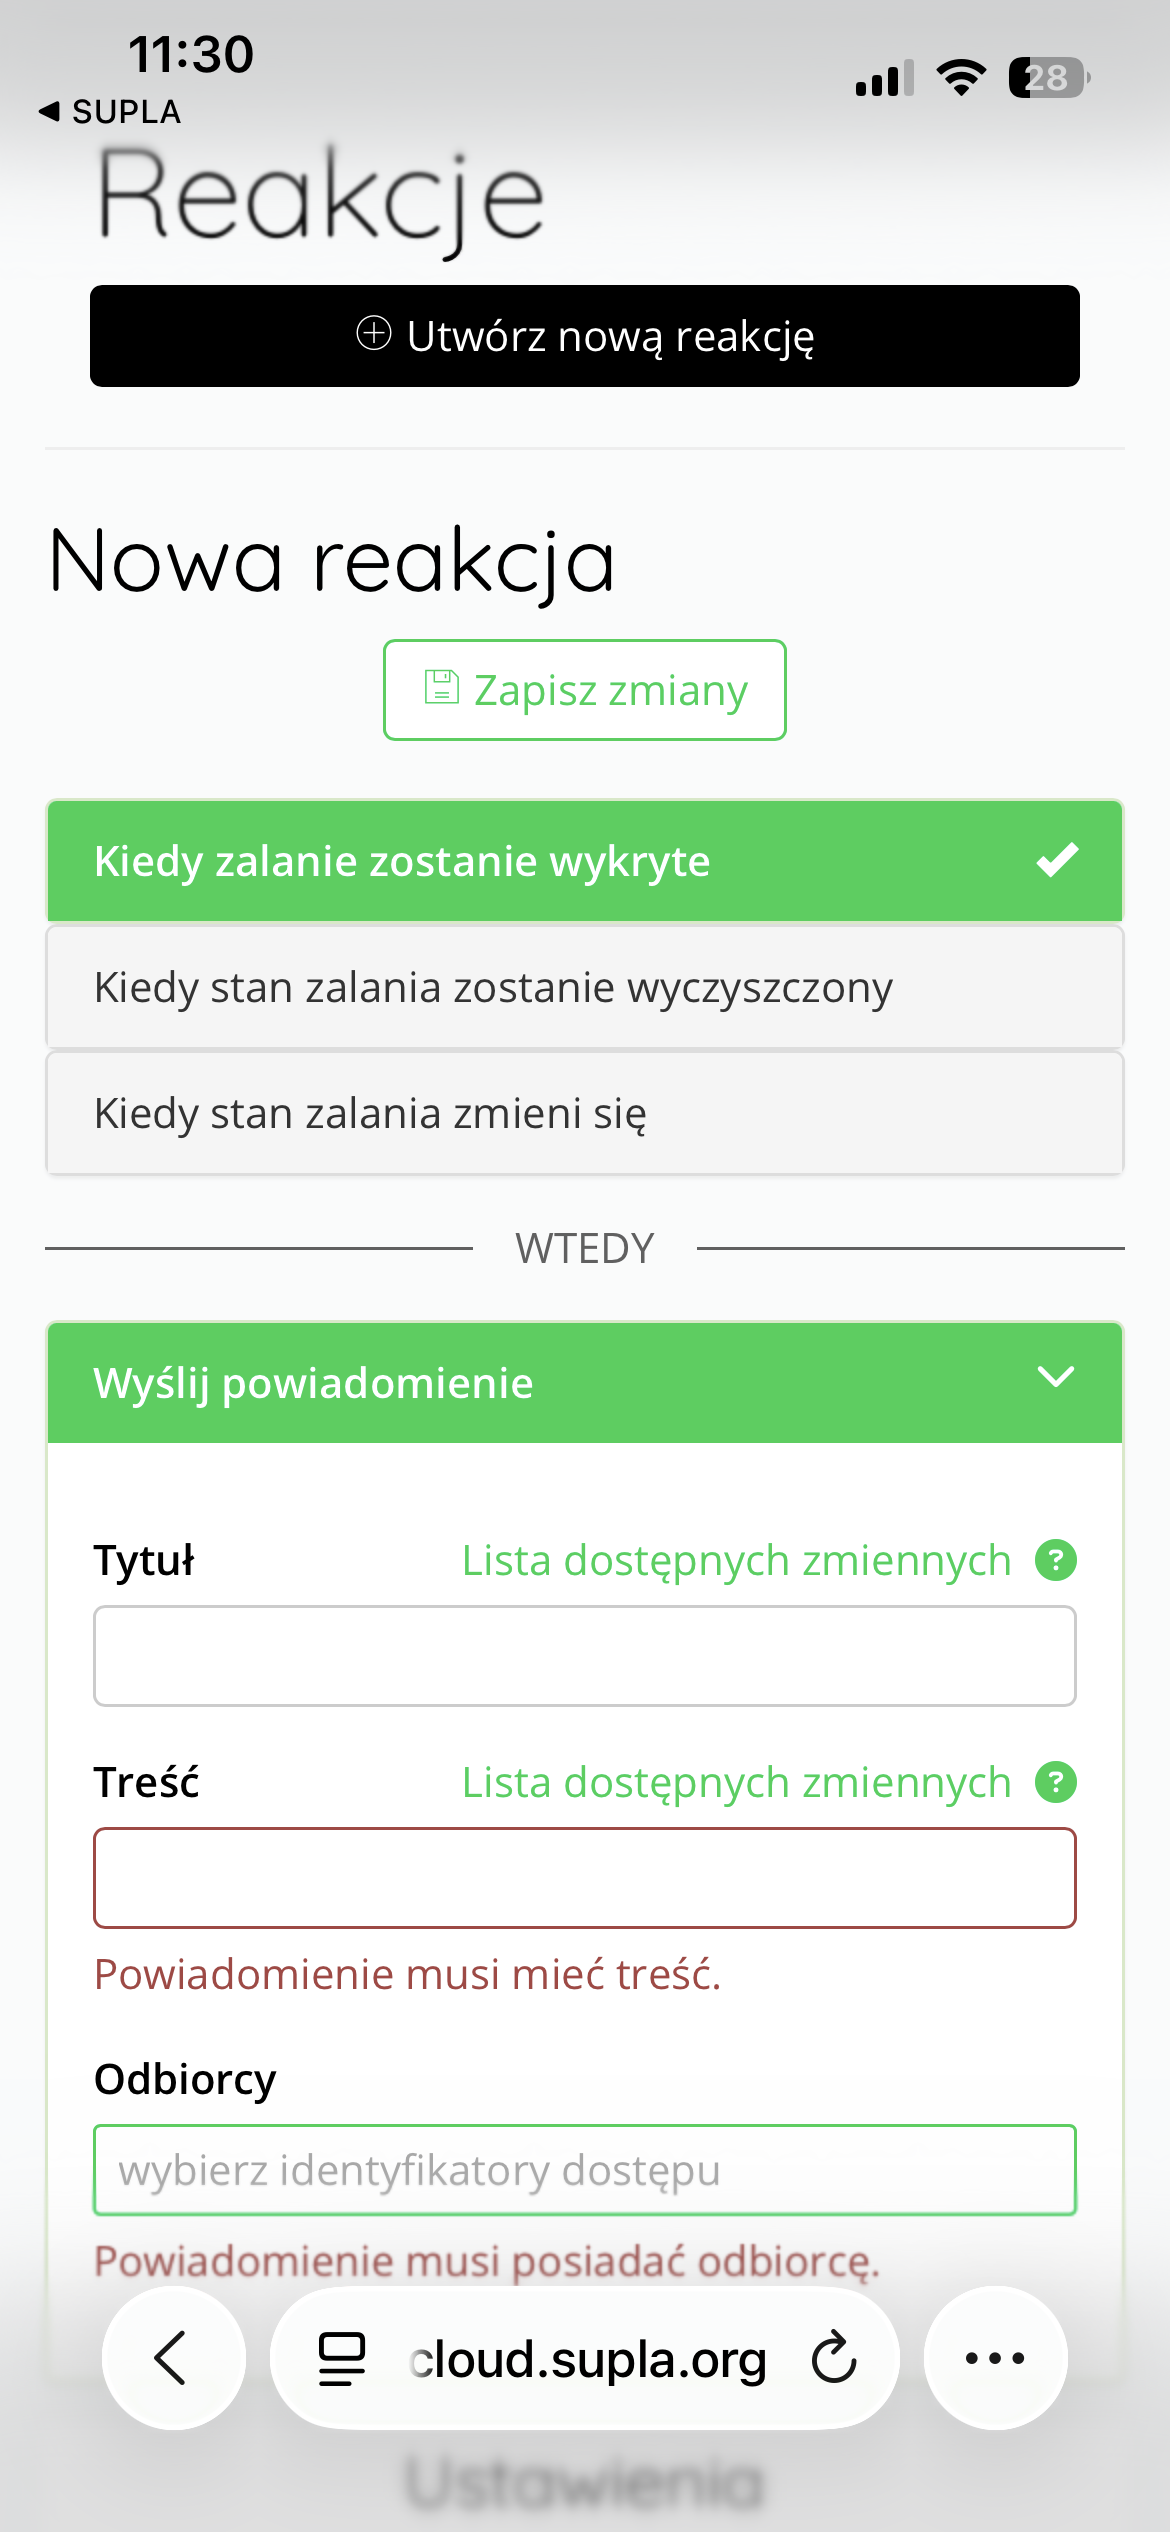
PUSH notifications and automations
Additionally, the SUPLA system allows you to create responses (Supla Cloud), which allow users to receive push notifications when flooding is detected. Simply log into Supla Cloud, go to the Responses , and add a new response based on a specific event.
This system also allows for other actions to be performed automatically – e.g., activating a scene, triggering a light or sound signal, or sending a notification to the installer.
Thanks to this, the sensor + valve set can be not only a simple protection against flooding, but a full-fledged element of a smart home or office .
Technical data
| Model: | Auraton Flood Sensor |
| Operating temperature range: | 1°C – 45°C |
| Humidity: | ≤85% non-condensing |
| Operating status check: | LED diode, sound signal |
| Maximum number of paired devices: | 2 (Auraton Flood Sensor Valve + Auraton Box gateway) |
| Power supply: | CR2450 3V non-replaceable |
| Cooperation with the internet gateway | Auraton Box |
| Degree of protection: | IP67 |
| Radio frequency: | 865.500MHz 867.200MHz 868.150MHz 868.450MHz 869.800MHz |
| Radio signal strength: | 11 dBm |
| Radio receiver category: | 2 |
| Range of action: | in a typical building with standard wall construction – up to 50 m in open space – up to 150 m |
Disposing of the device
O
Devices are marked with a crossed-out waste bin symbol. In accordance with European Directive 2012/19/EU and the Waste Electrical and Electronic Equipment Act, this marking indicates that this equipment, after its useful life, must not be disposed of with other household waste.
Users are obligated to dispose of it at a collection point for used electrical and electronic equipment.