User manual ver. 20210407
This document collects information on the safety, installation and use of the AURATON Flood Sensor Valve device.

The valve has two openings and a shut-off ball to control water flow. Never insert fingers or other body parts into the openings, as this may result in permanent injury, including severing body parts by the valve!
Basic information
The AURATON Flood Sensor Valve is designed to provide an emergency shutoff when flooding is detected in the monitored room. The device can shut off the water circulation in the system when the AURATON Flood Sensor detects flooding. For proper operation, an AURATON Flood Sensor Valve and at least one AURATON Flood Sensor (maximum 10 sensors) are required.
The system will minimize damage resulting from water damage only if*:
- the Flood Sensor Valve was correctly installed in the water system by the installer
- the FSV valve has been correctly associated with at least one Flood Sensor
- radio communication between FS and FSV devices is correct and stable, and has been previously checked (the devices should not operate at the limits of their range)
- The Flood Sensor is placed close to a point with access to water, e.g. a washing machine, dishwasher, sink, and has a real possibility of detecting a leak
- The FSV valve remains permanently powered via the included power supply or the battery is regularly recharged to maintain continuous operation of the device.
- the valve only minimizes the risk within the scope of the installation connected to it and cannot prevent damage resulting from the action of water outside the system to which it is connected, e.g. damage resulting from leaky roofs, windows or the operation of external installations (flooded by a neighboring premises)
*The manufacturer is not responsible for losses and damages resulting from flooding and other unforeseen events.
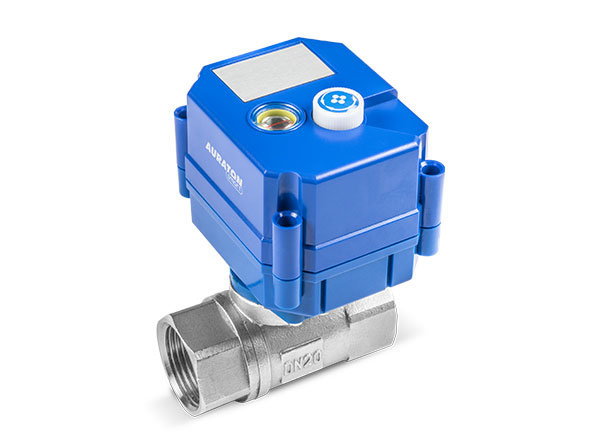
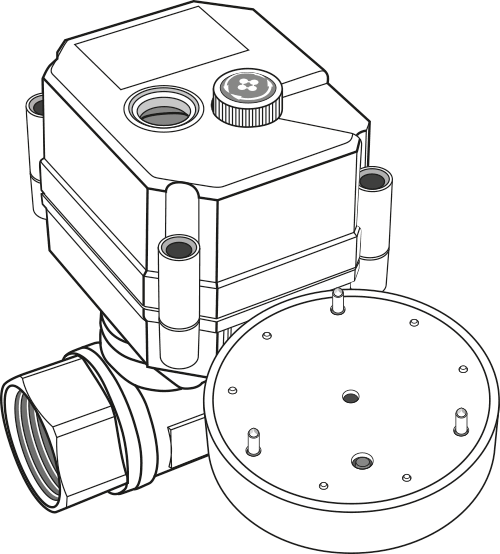
Device description

Fig. 1.
1 – Connector (1/2″, 3/4″, 1″)
2 – Charging indicator light
3 – Knob

Fig. 2.
1 – Power socket
2 – Magnet/Flood Sensor application point for triggering the pairing/deleting function ( @ )
3 – End cap
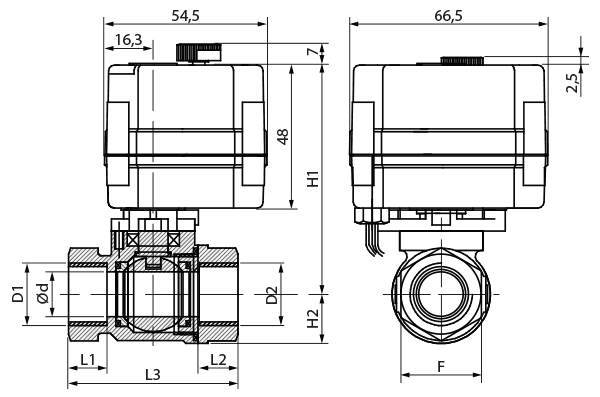
Fig. 3. Dimensions
All dimensions are given in mm.
| DN15 | DN20 | DN25 | |
| D1/D2 | G 1/2″ | G 3/4″ | G 1″ |
| d | 15 | 20 | 20 |
| L1/L2 | 13 | 16 | 18 |
| L3 | 57 | 70 | 76 |
| F | 27 | 32 | 38 |
| H2 | 16,5 | 21,5 | 21,5 |
| H1 | 77 | 81 | 81 |
| Weight (kg) | 0,37 | 0,52 | 0,52 |
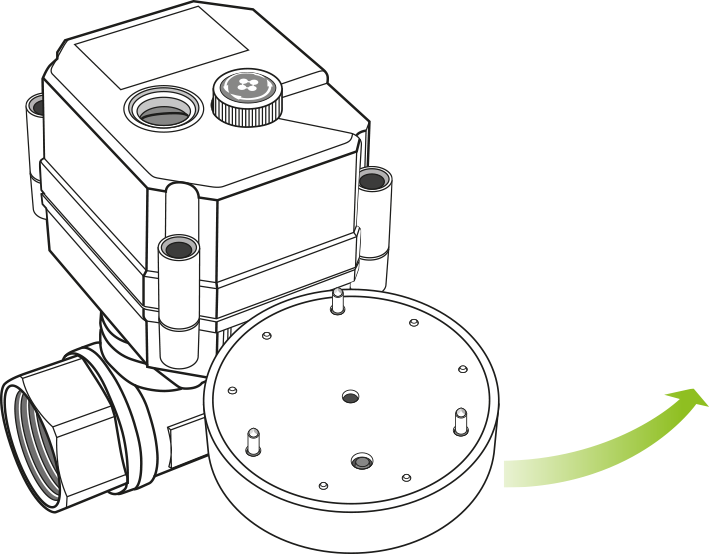
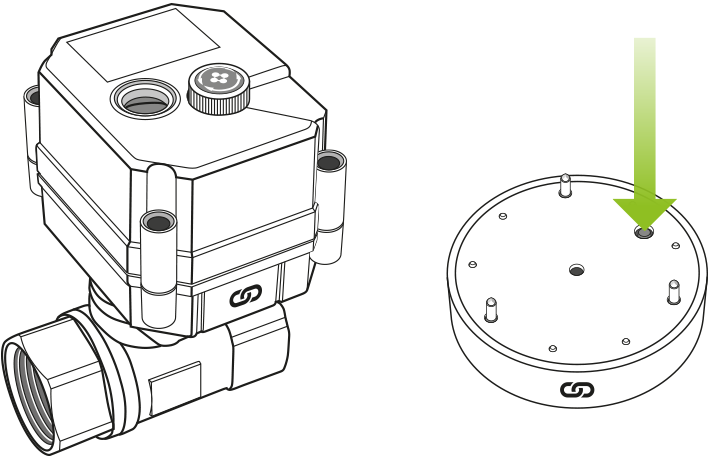
Installation
Fig. 4. Assembly/disassembly
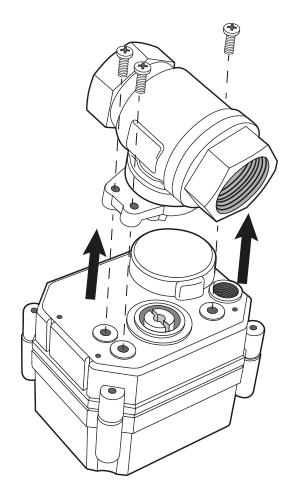
The valve should be installed in a location that will isolate a specific area or the entire system (depending on the user's needs) if flooding is detected. The valve should be installed on the water pipe so that the magnetic sensor (Fig. 2, point 2), the power/charging socket (Fig. 2, point 1), and the manual opening knob (Fig. 1, point 3) are accessible. If problems occur during installation, the electronics housing can be separated from the valve housing as shown in Fig. 4.
The distance between the AURATON Flood Sensor and the AURATON Flood Sensor Valve should be no less than 1.5 meters to avoid communication problems. If there is a lack of radio communication range, try rotating the valve on the pipe 90 degrees to better align the valve and sensor antennas, or reduce the distance between the devices.
Power supply
The valve has its own power source (a built-in battery), allowing for six months of monitoring a given room without external power. The internal battery can be charged using the included charger and power cord, or left permanently connected to the mains (the indicator light glows red while charging and turns off when fully charged). It is also possible to charge the battery using a power bank.
The water valve is factory-set to "sleep" mode for shipping.
Before first use, it must be "wakened." The "wake-up" procedure is performed by placing a magnet at the pairing/deleting point ( @ ) until a single short beep is heard (this may take several seconds).
After "waking up," the valve is ready for further configuration (pairing devices).
In sleep mode, the valve assist function does not function when attempting to manually open or close the valve. Do not manually open or close the valve abruptly.
Before using the AURATON Flood Sensor Valve for the first time, it is recommended to connect it to a power source for 24 hours to fully charge the internal battery and to manually open or close the valve.
Pairing devices
To activate pairing on the AURATON Flood Sensor Valve, place the FS flood sensor (or, if unavailable, a regular magnet) and the FSV valve on the side with the pairing symbol (@).
A moment after application, the valve will emit a short sound signal (BEEP), keep the sensor applied until another longer sound signal (BEEP) is heard.
After a long beep, move both devices apart. The device should be in pairing mode.
Long beeps (BEEP) indicate successful completion of the function, while short beeps (BEEP) indicate an error.
After completing the appropriate function, the device returns to its previous state.
Enabling pairing – AURATON Flood Sensor
To enable pairing on the AURATON Flood Sensor, press and hold the button. A short beep will sound after pressing . Continue holding the button until you hear another longer beep , then release the button. Pairing is enabled by a flashing red LED.
Enabling pairing – AURATON Pulse control panel
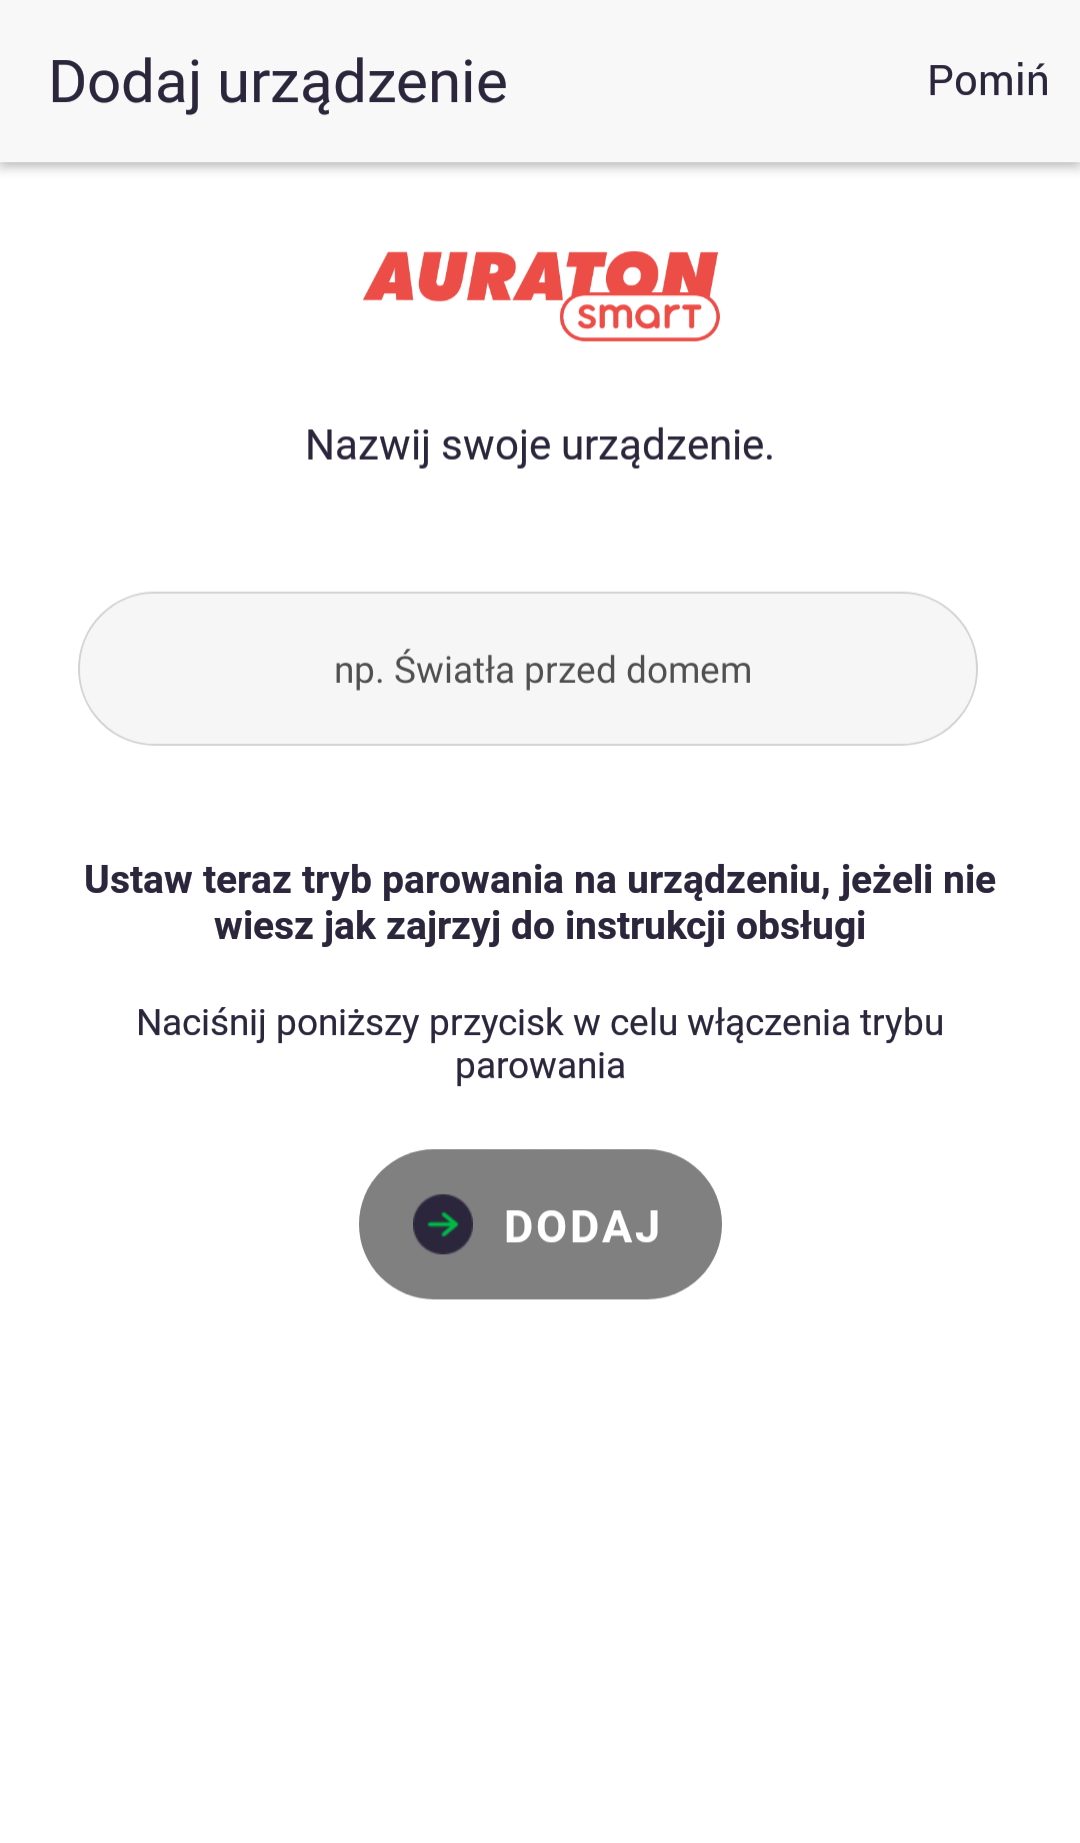
Pairing in AURATON Pulse is enabled using the AURATON Smart App. After launching the app, press the green plus button in the center of the screen. When the next screen appears, tap the house icon labeled "Devices." On the next screen, name the device you're adding. After entering the name, press the "Add" button. Once successfully paired, you can place the device in any previously added room and add it to your favorites.
Factory reset
To restore the factory settings on the AURATON Flood Sensor Valve, place the FS flood sensor (or, if unavailable, use a standard magnet) and the FSV valve together on the pairing symbol ( @ ). A moment after contact, the valve will emit a short beep . Keep the sensor pressed until you hear two longer beeps , and then move the two devices apart. At this point, a continuous beep will sound for 10 seconds. To confirm the operation, manually change the valve status by turning the control knob on the valve within 10 seconds. This will turn off the beep and initiate the factory settings restore.
Long beeps (BEEP) indicate successful completion of the function, while short beeps (BEEP) indicate an error.
After completing the appropriate function, the device returns to its previous state.
Device functions
Manual opening and closing of the valve
To open or close the valve:
- Lift the knob up.
- Turn the knob to the right or left until automatic operation occurs.
- Lower the knob again after opening or closing the valve.
Do not open or close the valve abruptly by hand.
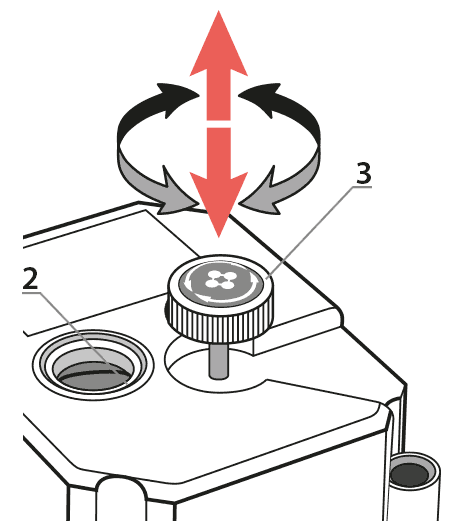 Fig. 5.:
2 – indicator light
3 – knob
Remote device operation
The valve is compatible with the AURATON Pulse internet control unit (AURATON Smart App available for Android and iOS), which allows remote control of the entire system. You can then remotely close or open the valve, monitor any flooding alarms, check the battery charge level, and more.
Anti-stop function
The AURATON Flood Sensor Valve is equipped with a built-in automatic mechanism that helps remove dirt from the valve mechanism. The valve performs short movements of the valve orifice every 14 days, cleaning the orifice and preventing the mechanism from blocking. Dirt buildup is a natural process, especially in valves that are rarely used. Therefore, it is important to prevent this phenomenon when we need to close the valve quickly due to flooding, and to ensure nothing prevents it from happening.
Automatic shutdown due to low battery
The AURATON Flood Sensor Valve signals battery discharge. When powered by a battery without a charger connected, the valve begins signaling at 4% capacity (3 short beeps every 10 minutes). Additionally, it automatically closes the valve at 1% battery capacity to prevent the valve from becoming inoperable and unresponsive to signals from the AURATON Flood Sensors during a flood event. After discharge, the valve can only be opened manually using the knob. The charger should then be connected immediately to recharge the valve's battery, as the valve will no longer close automatically due to the battery's low battery condition. This protection will reactivate after 24 hours or when the battery reaches a level greater than 4% capacity.
Function to restore the previous software
To change the software on the AURATON Flood Sensor Valve, place the FS flood sensor (or, if unavailable, use a standard magnet) and the FSV valve next to each other, facing the pairing symbol ( @ ). A moment after application, the valve will emit a short beep . Keep the sensor applied until three longer beeps are heard , and then separate the two devices. The valve will emit a continuous beep for 10 seconds. To confirm that you want to restart the device, you must manually change the valve status by turning the control knob on the valve without delay and within 10 seconds. After turning, place the flood sensor (magnet) again against the valve until you hear three beeps. After this signal, you can separate the two devices. The device will then restart and the previous software version will be restored (in the event of malfunctions after the update). The entire process may take up to a minute. The previous version of the program is always loaded, if the program was previously changed from version 1.6 to 1.5, the previous version of the program in this case is 1.6.
Transport mode
The AURATON Flood Sensor Valve features a battery-saving mode that allows for extended storage without complete discharge. This mode allows the valve to be stored for up to 2 years without complete discharge. In this mode, the valve will not operate normally, will not communicate, and will not respond to any controls.
To activate this mode, place the FS flood sensor (or, if unavailable, a standard magnet) against the FSV valve on the pairing symbol ( @ ). A moment after contact, the valve will emit a short beep . Keep the sensor pressed against the valve until you hear four longer beeps , and then separate the two devices. At this point, a continuous beep will begin for 10 seconds. To confirm that you want to activate transport mode, you must manually change the valve's status by turning the control knob on the valve without delay and within 10 seconds. To exit this mode, place the flood sensor (or magnet) against the valve ( @ ).
Device operating modes
The AURATON Flood Sensor Valve together with the AURATON Flood Sensor can operate in two modes.
Mode I (Local):
In this mode, the valve and sensor can operate independently without the need for the AURATON Pulse internet control unit. The sensor must be correctly assigned to the valve. Up to 10 sensors can be assigned to a single valve. If flooding is detected by one of the sensors, the valve will automatically close. Opening the valve is not automatic and must be done manually using the knob located on the top of the valve housing.
Mode II (remote):
In remote mode, you can use the AURATON Pulse internet control unit, giving you access to the entire system while away from home.
This allows you to remotely open or close the valve, check the battery levels of both the valve and the sensor itself, receive notifications of potential flooding, create schedules, and much more. Of particular importance is the ability to link valve closures to specific flood sensors, enabling automatic valve closure when flooding is detected via the AURATON Pulse control unit. This also allows you to receive remote notifications of flooding events.
For proper remote operation, Internet access is required both from the control unit itself and from the phone or tablet with the application (Android, iOS).
When using Mode II (remote), it is recommended to first pair the sensor with the valve itself . Pairing the valve and sensor will ensure correct operation of the set even in the event of a power outage to the AURATON Pulse control unit itself (e.g. power outage).
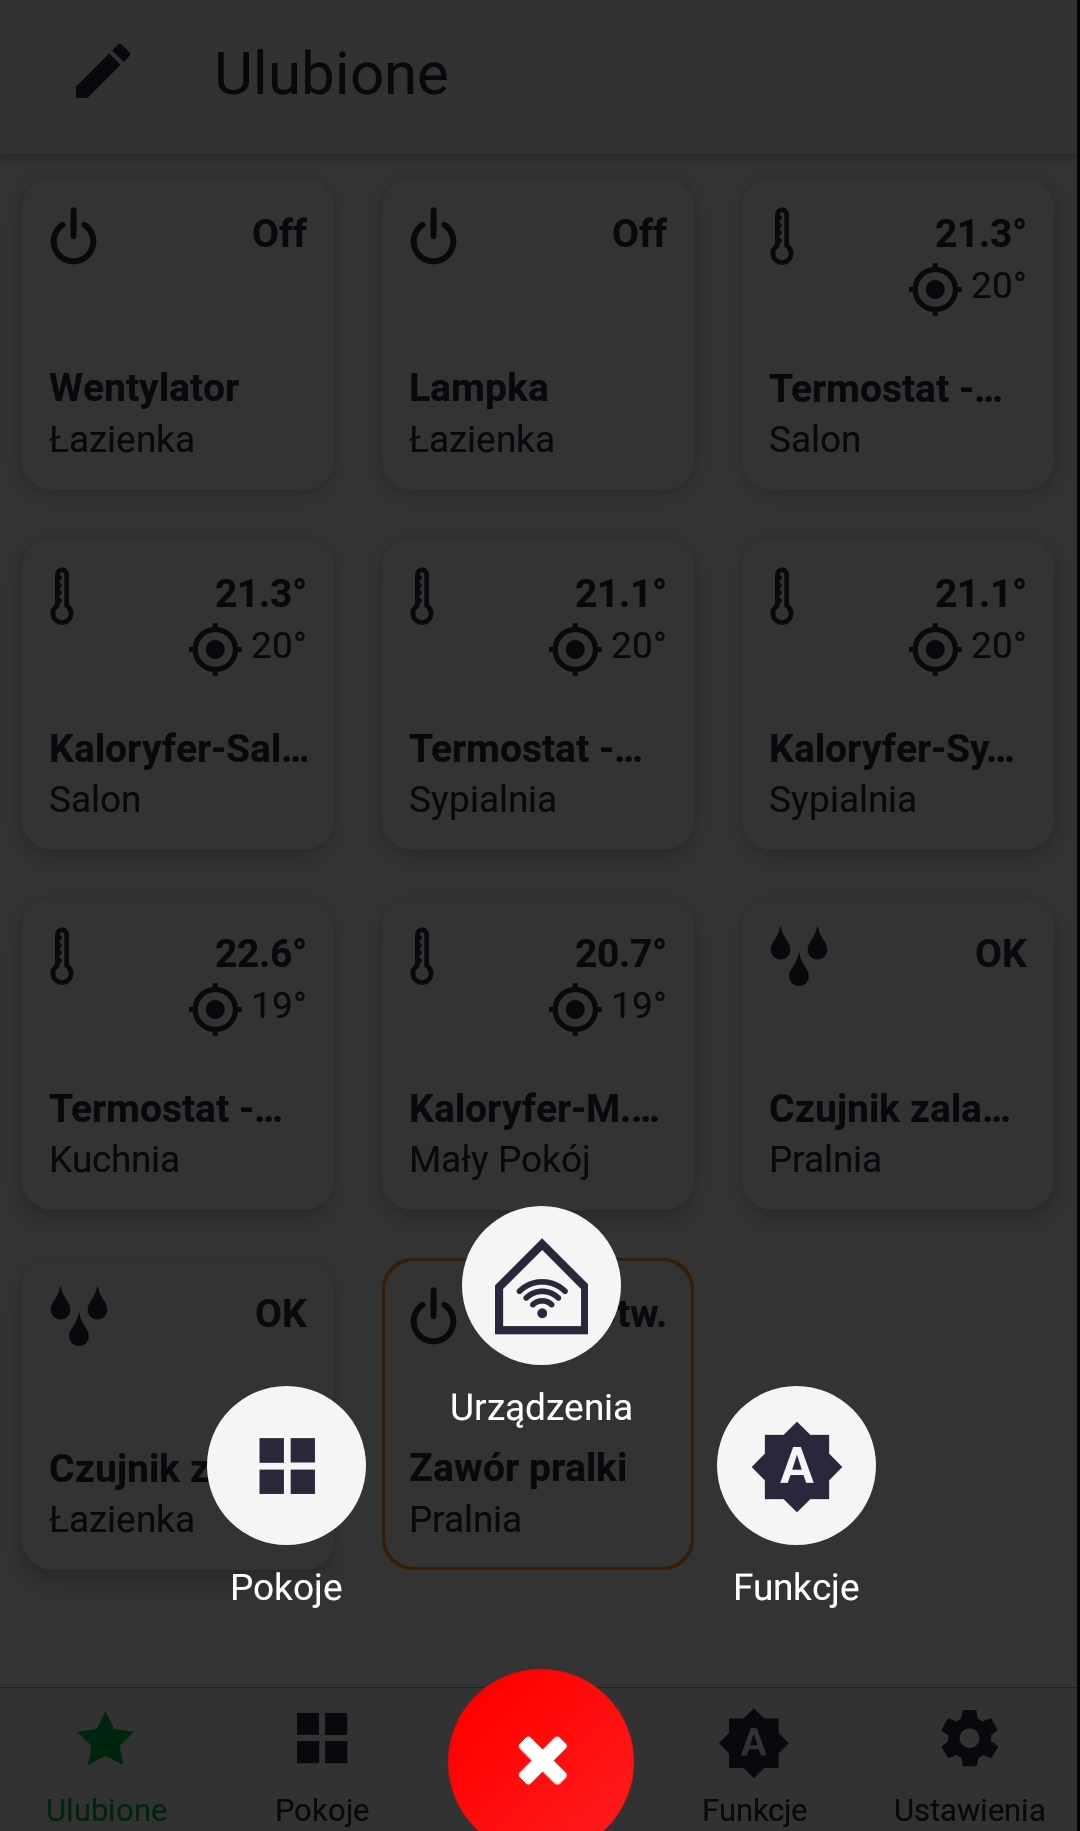
Cooperation with the AURATON Pulse headquarters
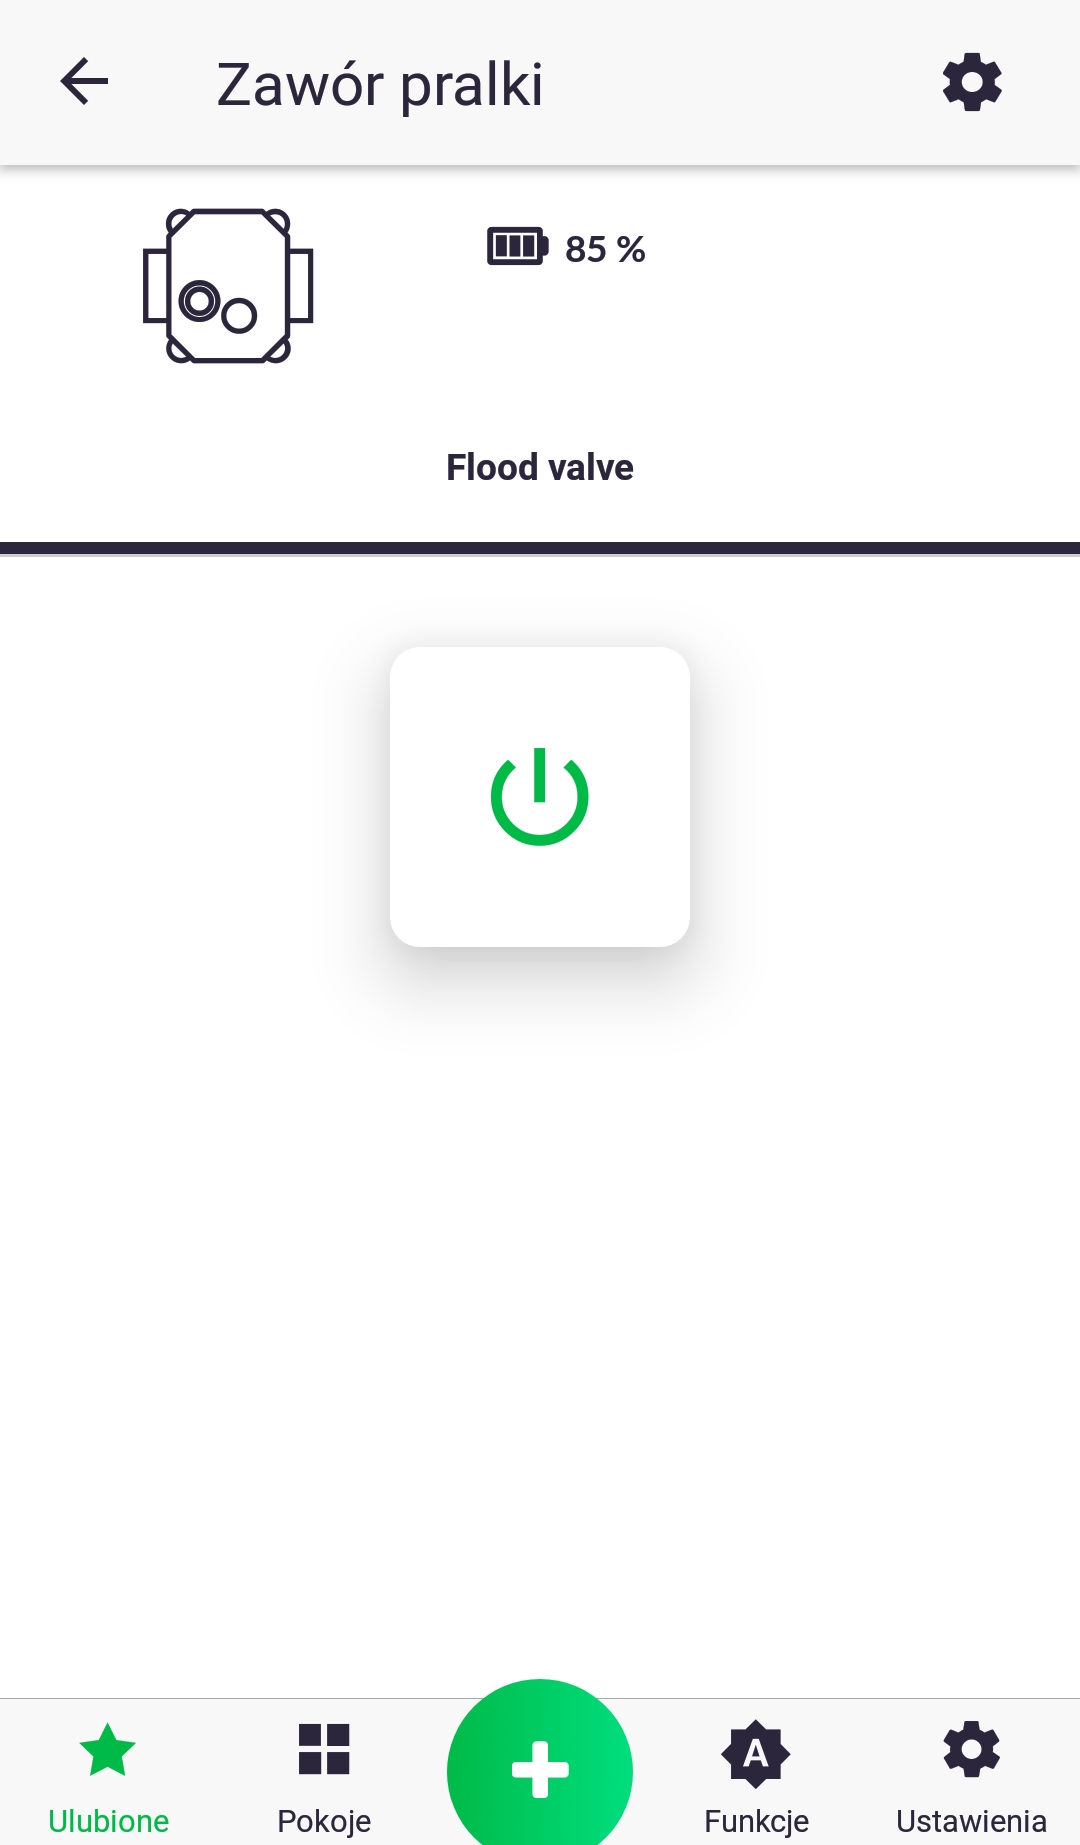
The AURATON Flood Sensor Valve is paired with the AURATON Pulse control unit just like with other devices (as described in the section on pairing devices). The only difference is that pairing mode is activated on the control unit through the app by tapping the green plus sign at the bottom of the screen and then clicking the "Devices" icon. Details are described in the app's user manual. The image below shows the device's screen in the app, showing the valve's status (open/closed) and battery charge percentage. You can remotely open/close the valve by tapping the icon in the center of the screen. Green indicates that the FSV is open, and red indicates that it is closed.
The FSV valve is designed to work with the AURATON Flood Sensor. These sensors can be linked in the app using the If-Do function. For example, if flooding occurs, set the FloodValveLevel to 0% (i.e., close the valve). You can also implement preventative protection by setting the "Schedule" function so that the valve always closes at specific times when no one is home. You can also use the AURATON Flood Sensor Valve to control garden watering at specific times of the day.
Technical data
| Model: | AURATON Flood Sensor Valve |
| Torque: | 2 Nm |
| Opening/Closing Time: | about 5 seconds |
| Operating voltage: | 5V |
| Power consumption: | 3 in |
| Maximum medium pressure: | 1.0 MPa |
| Medium temperature range: | 0-100 °C |
| Operating temperature range: | from 1 °C to 45 °C |
| Humidity: | ≤85% non-condensing |
| Operating status check: | LED diode, sound signal |
| Maximum number of paired devices: | 10 |
| Power supply | Li-ion/5V DC battery (USB) |
| Cooperation with the Internet switchboard | AURATON Pulse |
| Degree of protection: | IP67 |
| Radio frequency: | 865.500MHz 867.200MHz 868.150MHz 868.450MHz 869.800MHz |
| Radio signal strength: | 11 dBm |
| Radio receiver category: | 2 |
| Range of action: | in a typical building with standard wall construction – up to 50 m in open space – up to 150 m |
Disposing of the device
O
Devices are marked with a crossed-out waste bin symbol. In accordance with European Directive 2012/19/EU and the Waste Electrical and Electronic Equipment Act, this marking indicates that this equipment, after its useful life, must not be disposed of with other household waste.
Users are obligated to dispose of it at a collection point for used electrical and electronic equipment.