
User manual ver. 20201102
This document collects information regarding the safety, installation and use of the AURATON Heat Monitor device.
| U | The "FrostGuard" function protects the room from freezing. |
| & | Possibility of cyclically lowering the programmed temperature from 1°C to 10°C for a period of 1 to 12 hours. |
| LCD | Illuminated LCD display The illuminated display allows you to monitor the device's operation even in poorly lit rooms. |
| HOTEL | Hotel mode allows you to block almost all thermostat functions except for simple lowering and raising the temperature within certain limits |
| OTA | Software update It is possible to update the device software using the AURATON Pulse control unit and the AURATON Smart application |
Basic information
The AURATON Heat Monitor heating regulator is designed to work with the Radiator Controller head, the Heater Controller furnace attachment and the AURATON Pulse internet control unit, which allows you to control operating parameters using an application on your phone or tablet.
Description of the regulator
The front of the housing has a backlit LCD display and three function buttons.
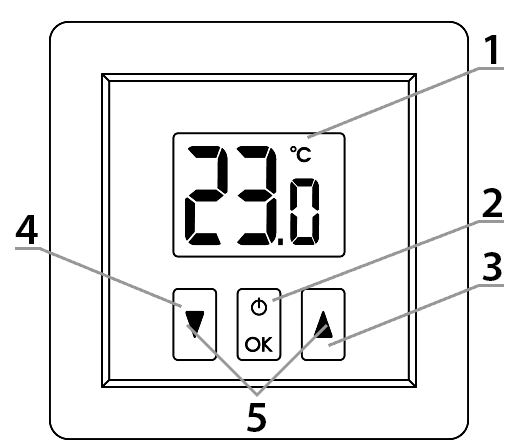
Explanations for the diagram:
- – LCD display
- – confirmation button or controller on/off
- – temperature increase button
- – temperature reduction button
- – “temporary temperature reduction” mode buttons
| d |
|
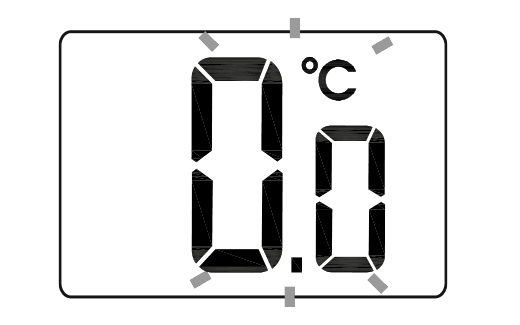
Display
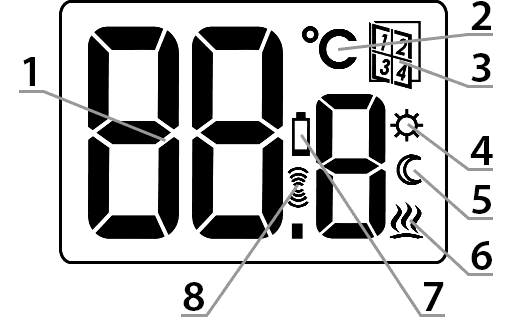
Explanations for the diagram:
- – Temperature
In normal operation mode, the controller displays the temperature of the room in which it is currently installed. - – Temperature unit (R )
Indicates that the temperature is displayed in degrees Celsius. - – Hotel mode
Indicates that hotel mode is enabled. - – Temporary temperature reduction mode programming indicator (S )
Indicates that the user has scheduled a temporary temperature reduction mode. This appears when the mode is not currently running, but the temporary temperature reduction function is active (for more information, see the section "Setting the temporary temperature reduction mode"). - – “Temporary temperature reduction” mode indicator (T )
Appears when the “temporary temperature reduction” program is running. - – Controller On Indicator (a )
Informs about the device's operating status. Visible when the controlled device is turned on. - – Low Battery (X )
This indicator appears when the battery voltage has exceeded the minimum allowable level. The battery must be replaced as soon as possible. - – Transmit symbol (W )
Indicator visible after radio communication.
Choosing the right location
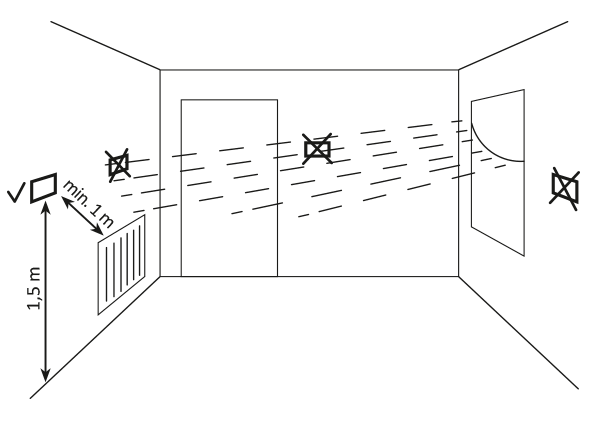
The proper operation of the thermostat is largely influenced by its location. Siting it in a location without air circulation or in direct sunlight will result in incorrect temperature control. To ensure proper operation, the thermostat should be mounted on an interior wall (partition wall). Choose a location where you spend most of your time, with free air circulation. Avoid proximity to heat-emitting devices (television, radiator, refrigerator) or locations exposed to direct sunlight. Avoid placing the thermostat directly next to a door to avoid vibration.
Battery installation/replacement
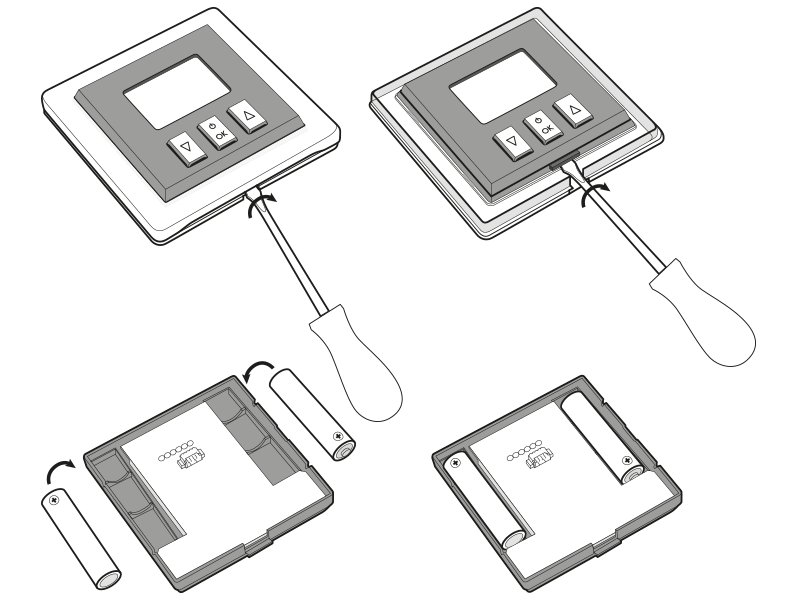
The battery compartments are located inside the controller on both sides of the display. To install the batteries, remove the controller's housing as shown in the figure.
Insert two 1.5V AAA batteries into the compartment, observing the correct polarity.
NOTE!
We recommend alkaline batteries to power AURATON controllers. Rechargeable batteries should not be used due to their low rated voltage.
Device assembly
Wall mounting
To attach the regulator to the wall:
- Remove the controller housing (as shown in the "Installation/Replacing the Battery" section).
- Drill two 6 mm diameter holes in the wall (mark the hole spacing using the rear part of the controller housing).
- Insert the expansion bolts into the drilled holes.
- Screw the rear part of the controller housing to the wall using the screws included in the kit.
- Install the batteries and put the regulator housing back on.
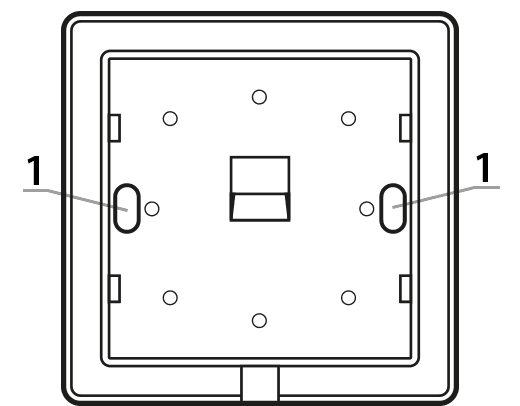
1 – Hole for mounting screw.
NOTE:
If you're building with a wooden wall, there's no need to use expansion bolts. Simply drill 2.7mm holes (instead of 6mm) and drive the screws directly into the wood.
Alternative mounting methods
The controller can be attached to a smooth surface using double-sided tape, for example. It can also be placed anywhere on a flat surface using the included stand.
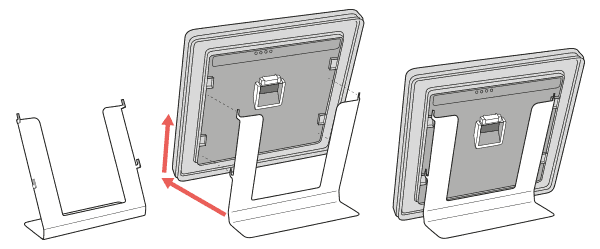
How to mount the support:
Device pairing
- On the AURATON Heat Monitor controller, press theb d orc d for 3 seconds until the transmission symbol (W ) lights up on the display. The AURATON Heat Monitor controller waits 30 seconds for pairing. After this time, it will automatically return to normal operation.
- Turn on pairing mode on the second device you want to pair (examples described below).
- Wait for confirmation from the other device
If an error occurs during pairing, repeat steps 1 and 2. If further errors occur, restore the AURATON Heat Monitor device to factory settings and try pairing the devices again..
Enabling pairing – Radiator Controller head
First, remove the battery cover (preferably with a flat screwdriver), wait for the motor to stop moving and press the black button located on the electronics board between the batteries 3 times (quickly).
Enabling steaming – Heater Controller attachment
Pairing the AURATON Heater Controller is initiated by pressing the right pairing button – a single beep (D ) – and holding it for at least 3 seconds until the LED flashes green (double beep), then releasing the button. The Heater Controller unit waits 30 seconds for pairing. After this time, it will automatically return to normal operation.
Enabling pairing – AURATON Pulse control panel
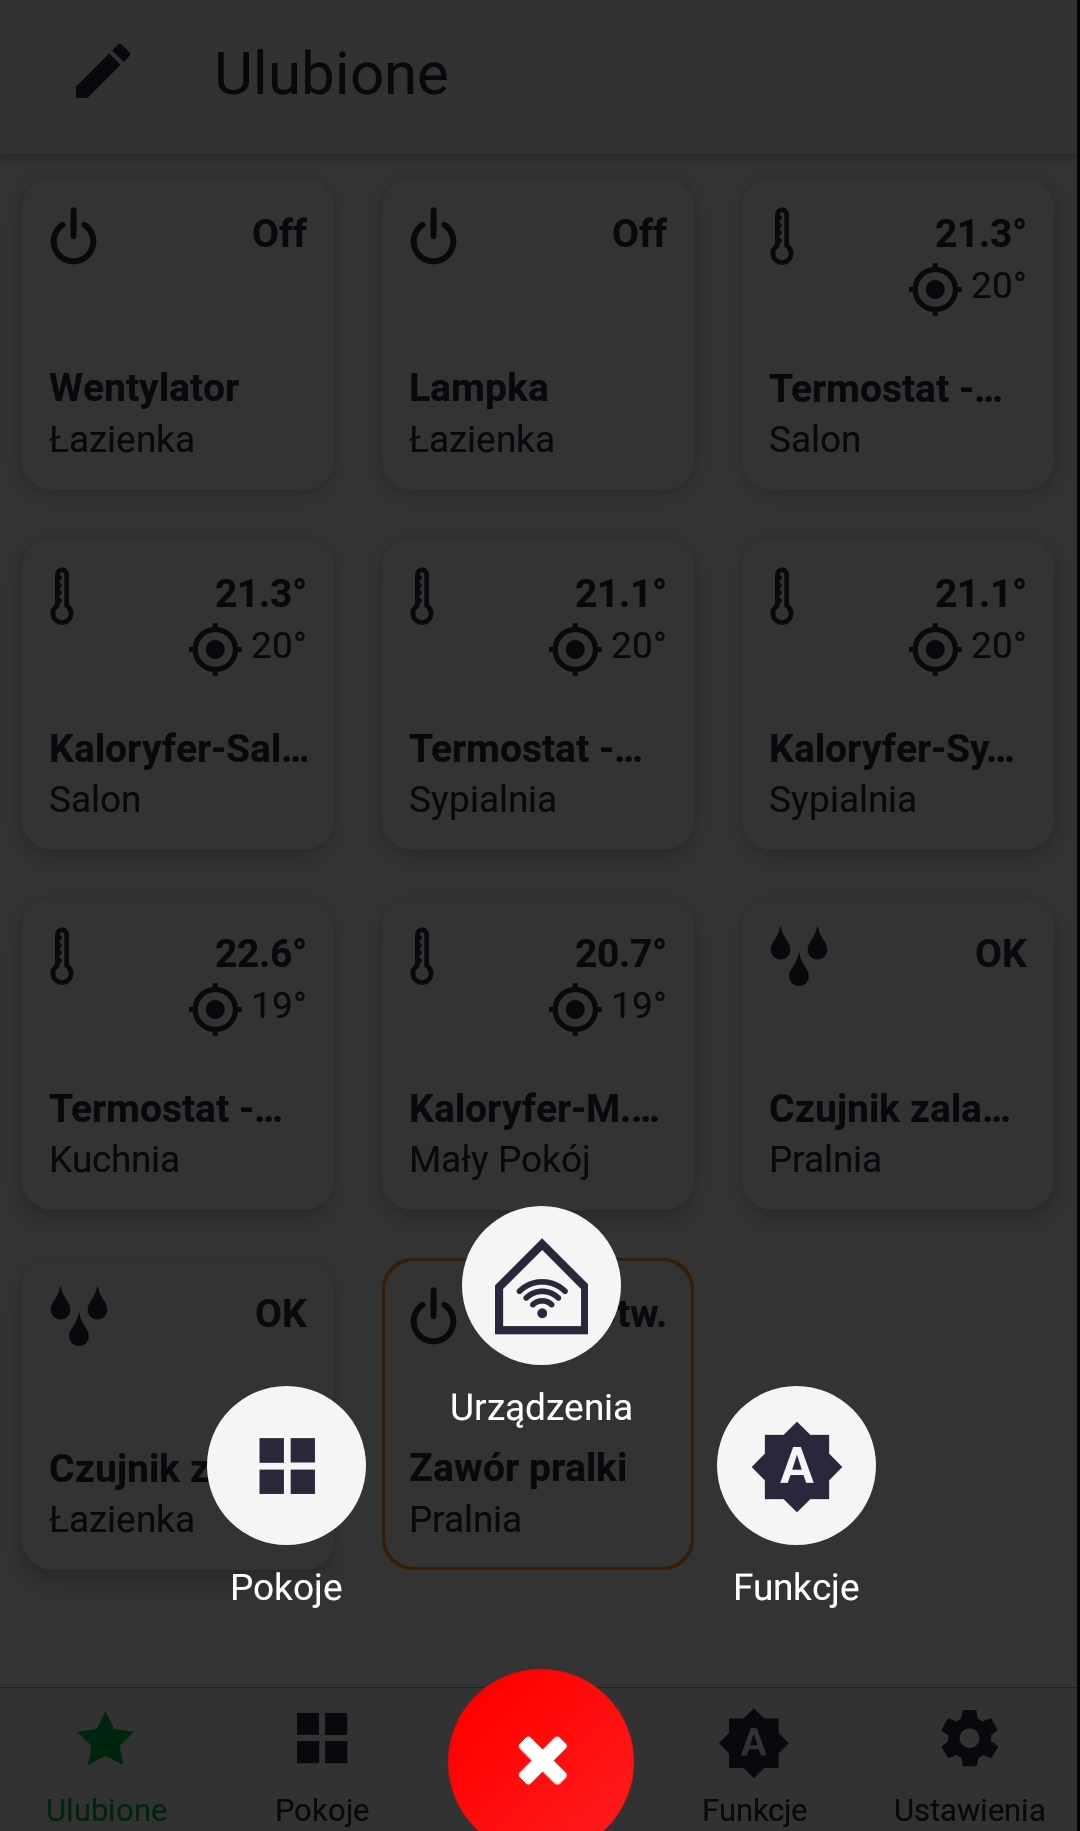
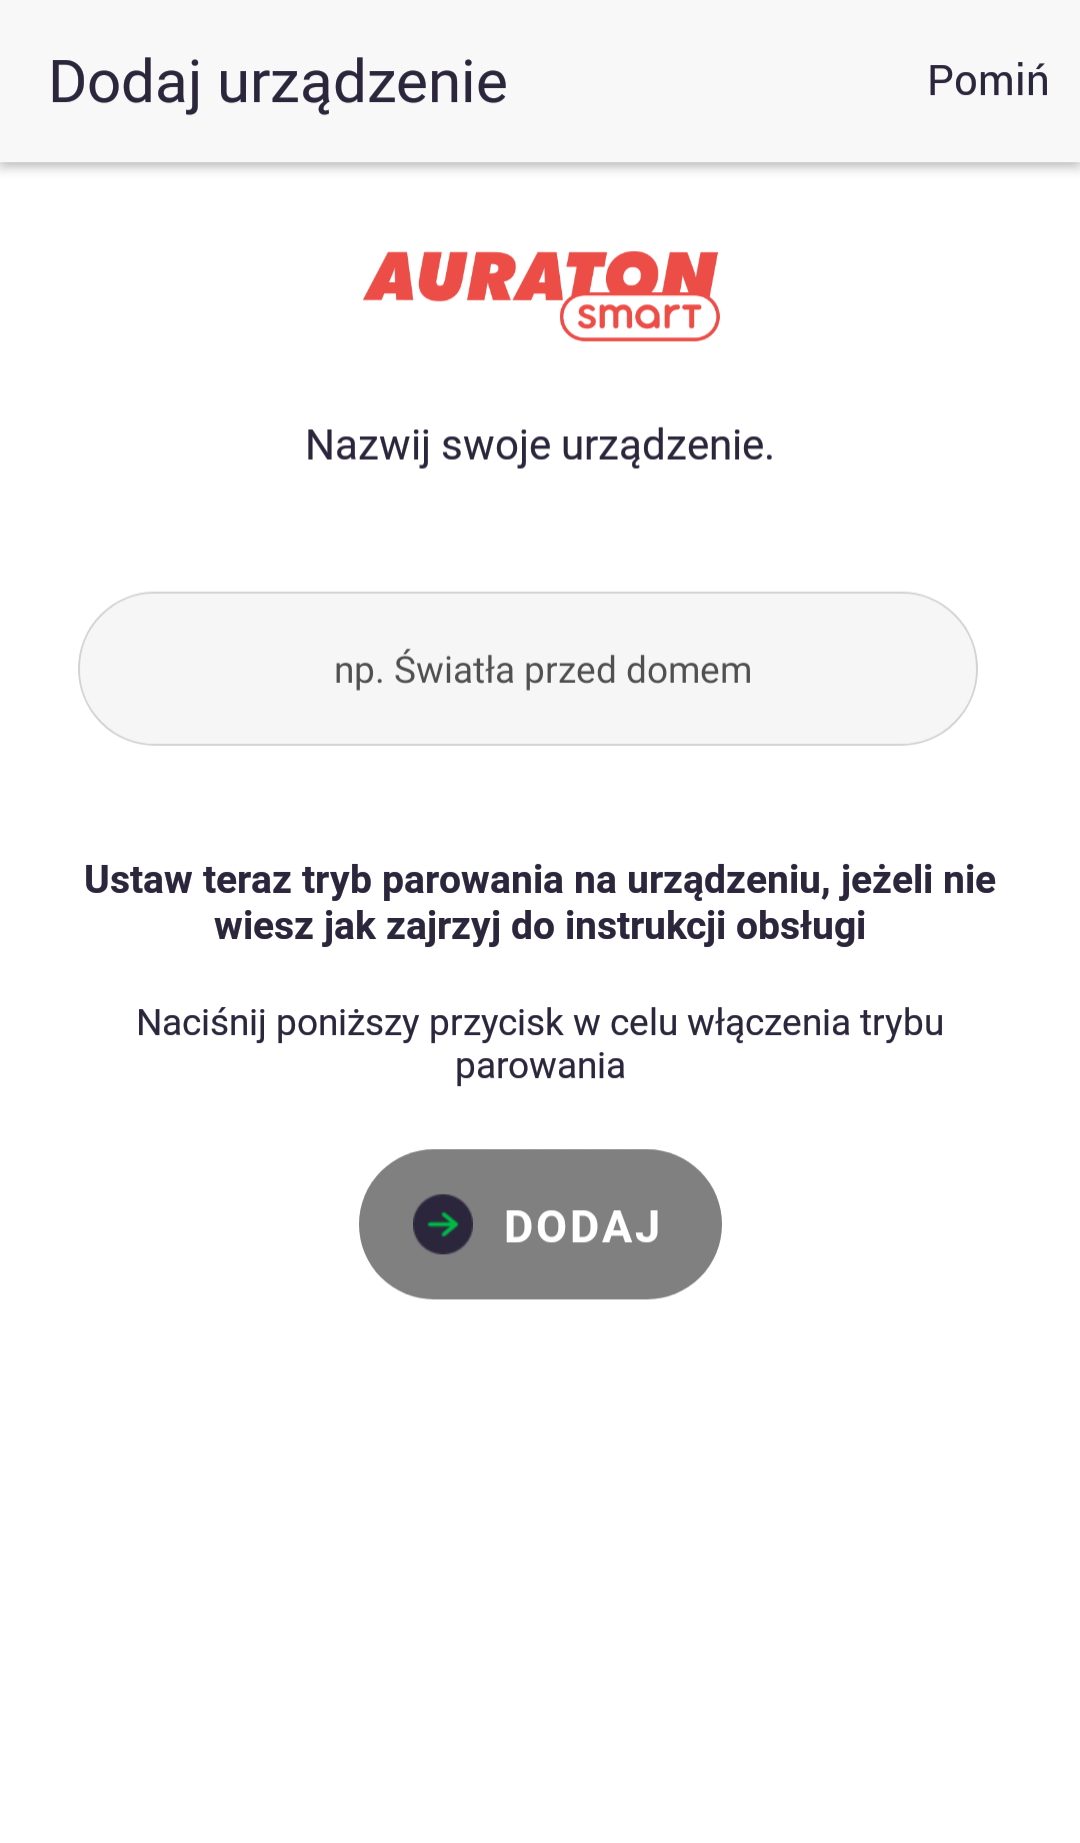
Pairing in AURATON Pulse is enabled using the AURATON Smart App. After launching the app, press the green plus button in the center of the screen. When the next screen appears, tap the house icon labeled "Devices." On the next screen, name the device you're adding. After entering the name, press the "Add" button. Once successfully paired, you can place the device in any previously added room and add it to your favorites.
Factory reset
Remove the AURATON Heat Monitor controller's casing (as shown in the "Installation/Battery Replacement" section), remove one battery, pressd and hold the button while reinserting the batteries. While the device is starting up, hold the button for 3 seconds until the countdown ends. The controller should restart (all display segments will appear for one second), and only then should you release the buttond . The controller will resume normal operation, and all settings will be restored to factory defaults, including clearing all data for paired devices. If the current temperature screen appears instead of the countdown, it means there is no data left to delete.
You can check if the AURATON Heat Monitor controller has any paired devices by changing the target temperature using the buttons and observing whether the transmitting symbol (W ) lights up on the display. If the transmitting symbol does not appear, it means the device has not sent any radio messages and the paired devices have been deleted.
Device functions
How does the heating function work?
The AURATON Heat Monitor can decide when the heating should be turned on (e.g., when working with a Heater Controller), but it can also simply serve as a temperature sensor with the ability to set a target temperature on a second device (e.g., when working with a Radiator Controller). In the first case, when the Heat Monitor turns on the heating, the heating algorithm has a hysteresis of 0.2°C, meaning, for example, if the target temperature is 21°C, the device will turn on the heating when the room temperature drops to 20.8°C and turn it off when it rises to 21.2°C. According to this algorithm, the heating symbol (a ) is displayed.
Temperature setting
To set the desired temperature in normal operation mode:
- Press theb orc . The temperature display segment will enter edit mode and start flashing.
- bandc buttons to set the desired temperature with an accuracy of 0.1°C (holding down the button changes the temperature value faster).
- Confirm your selection by briefly pressing the keyd .
FrostGuard function
AURATON Heat Monitor regulator is equipped with a special "FrostGuard" function that protects the room from freezing. This function activates when the regulator is turned off. With the regulator off, when the room temperature drops to 4°C, the current temperature will appear on the display and a signal will be sent to the receiver, which will turn on the heating. When the temperature rises to 4.2°C, the display will turn off again and a signal will be sent to the receiver, which will turn off the heating.
"Temporary temperature reduction" function
If, for various reasons, you'd like to lower the room temperature by, say, 3°C at the same time each day, you can temporarily reduce it for a period of 1 to 12 hours. Specific values can be set in the configuration menu. To enable this feature:
- Press and hold both buttons for 3 secondsb c T) will appear on the display
- The controller switches to the "temporary temperature reduction" mode and every day at the same time it will lower the temperature programmed in the normal mode by e.g. 3°C for the previously set period.
After the previously set number of hours, the thermostat will return to the basic temperature setting. Instead of the moon symbol (T ), the sun symbol ( ) will appear on the screenS .
The "temporary temperature reduction" mode always begins when the function is activated. This means that any temporary temperature reduction must be programmed at the time you want it to occur.
Deactivating the "temporary temperature reduction" function.
To deactivate the "temporary temperature reduction" mode, press and hold the buttons again for 3 secondsb c (countdown).
T) or sun (S symbol on the display will go out and the controller will return to normal operating mode.
Hotel mode
The AURATON Heat Monitor regulator is equipped with a function that allows you to block certain button combinations from being activated by unauthorized third parties (hotel mode), and it also allows you to limit the temperature setting.
To enable hotel mode:
After holding the right button (up) and inserting the batteries, a 3, 2, 1 countdown will be visible, followed by the maximum temperature setting (the factory setting of 40°C flashes for 10 seconds). If the user does not make changes using the and buttonsb andc does not confirmd , the controller returns to normal operation (hotel mode is disabled). However, if the user confirms the changes using the button,d the controller allows the minimum temperature setting (the factory setting of 0.0°C flashes for 10 seconds). If the value change is confirmed using the buttond , the controller saves the change and returns to normal operation (hotel mode is enabled). Failure to confirm the minimum temperature setting with the buttond will result in the changes not being saved, and the controller will return to normal operation without hotel mode enabled.
Temperature editing function (hotel mode enabled)
Theb orc starts editing the temperature within the range from
the minimum temperature (S ) to the maximum temperature (T ), and only within this range. The temperature value then flashes for 5 seconds. Set it using the up and down buttons and confirm with the buttond .
After enabling this function, the option to turn off the controller and enter the menu to change settings is blocked.
If you need to disable hotel mode, follow the same procedure as for enabling it. This means removing the batteries and reinserting them while holding the right (up) button until the controller completes the countdown: 3, 2, 1, mode off.
Function to restore the previous software
After holding down the left buttonb while inserting the battery, the screen will flash three times. Then, after restarting the controller, the previous software version will be restored (in the event of malfunctions after the update). The entire process can take up to a minute, and the device must remain powered on during this time. The previous version of the program is always loaded. If the program was previously updated from version 1.6 to 1.5, the previous version is 1.6.
Device operating modes
The AURATON Heat Monitor set together with the AURATON Heater Controller or Radiator Controller can operate in two modes.
Mode I (local):
In this mode, the controller and the heater can operate independently without the need for the AURATON Pulse internet control panel. The AURATON Heat Monitor controller simply needs to be properly assigned to the AURATON Heater Controller or Radiator Controller.
Mode II (remote):
In remote mode, you can use the AURATON Pulse internet control unit to access the entire system from outside your home.
This allows you to remotely control your heating, check battery charge levels, receive notifications about potential events, create schedules, and much more.
For proper remote operation, Internet access is required both from the control unit itself and from the phone or tablet with the application (Android, iOS).
When using Mode II (remote), it is recommended to first pair the Heat Monitor with the Heater Controller or Radiator Controller. This pairing ensures the system will operate correctly even in the event of a power outage to the Auratron Smart control panel. Up to three devices can be added to a single Heat Monitor.
Configuration settings
Configuration settings are made sequentially:
measured temperature

(number of hours)
(number of degrees)
To enter the configuration settings change mode, hold down the and buttons simultaneouslyb forc 3d seconds (countdown) until the measured temperature correction mode becomes available.
Correction of measured temperature
The correction allows you to calibrate the temperature readings within a tolerance of ±3°C.
For example, a temperature controller indicates that the room temperature is 23°C, while a standard thermometer hanging nearby indicates 24°C. A +1-degree correction will ensure that the controller displays the same temperature as the room thermometer.
Use the buttonsb toc set the desired value in the range from -3.0°C to 3.0°C (factory setting – 0.0).
Confirm your selection with the buttond . The controller will move on to changing the next parameter.
Decrease (number of hours and degrees)
- The moon symbol ( ) will be visible on the displayT and the segment responsible for showing the number of hours (h) will go into edit mode and start flashing.
- Use theb andc to set the desired value in the range from 1 to 12 hours (factory setting – 6 hours).
Confirm with the buttond .
The controller will move on to changing the next parameter. - The temperature field on the display will enter edit mode and begin flashing. Again, use theb andc to set the desired temperature value. You can choose from 1°C to 10°C (factory setting – 3°C).
Confirm by pressing the buttond .
Failure to confirm with the buttond will automatically save the changes made and the controller will return to normal operation.
- The controller can be turned on or off at any time by briefly holding the buttond .
- The first press of any function key always turns on the backlight, and only the next press activates the key function.
- When programming any function, not pressing any button for 5 seconds is equivalent to pressing the buttond .
Cooperation with the AURATON Pulse headquarters
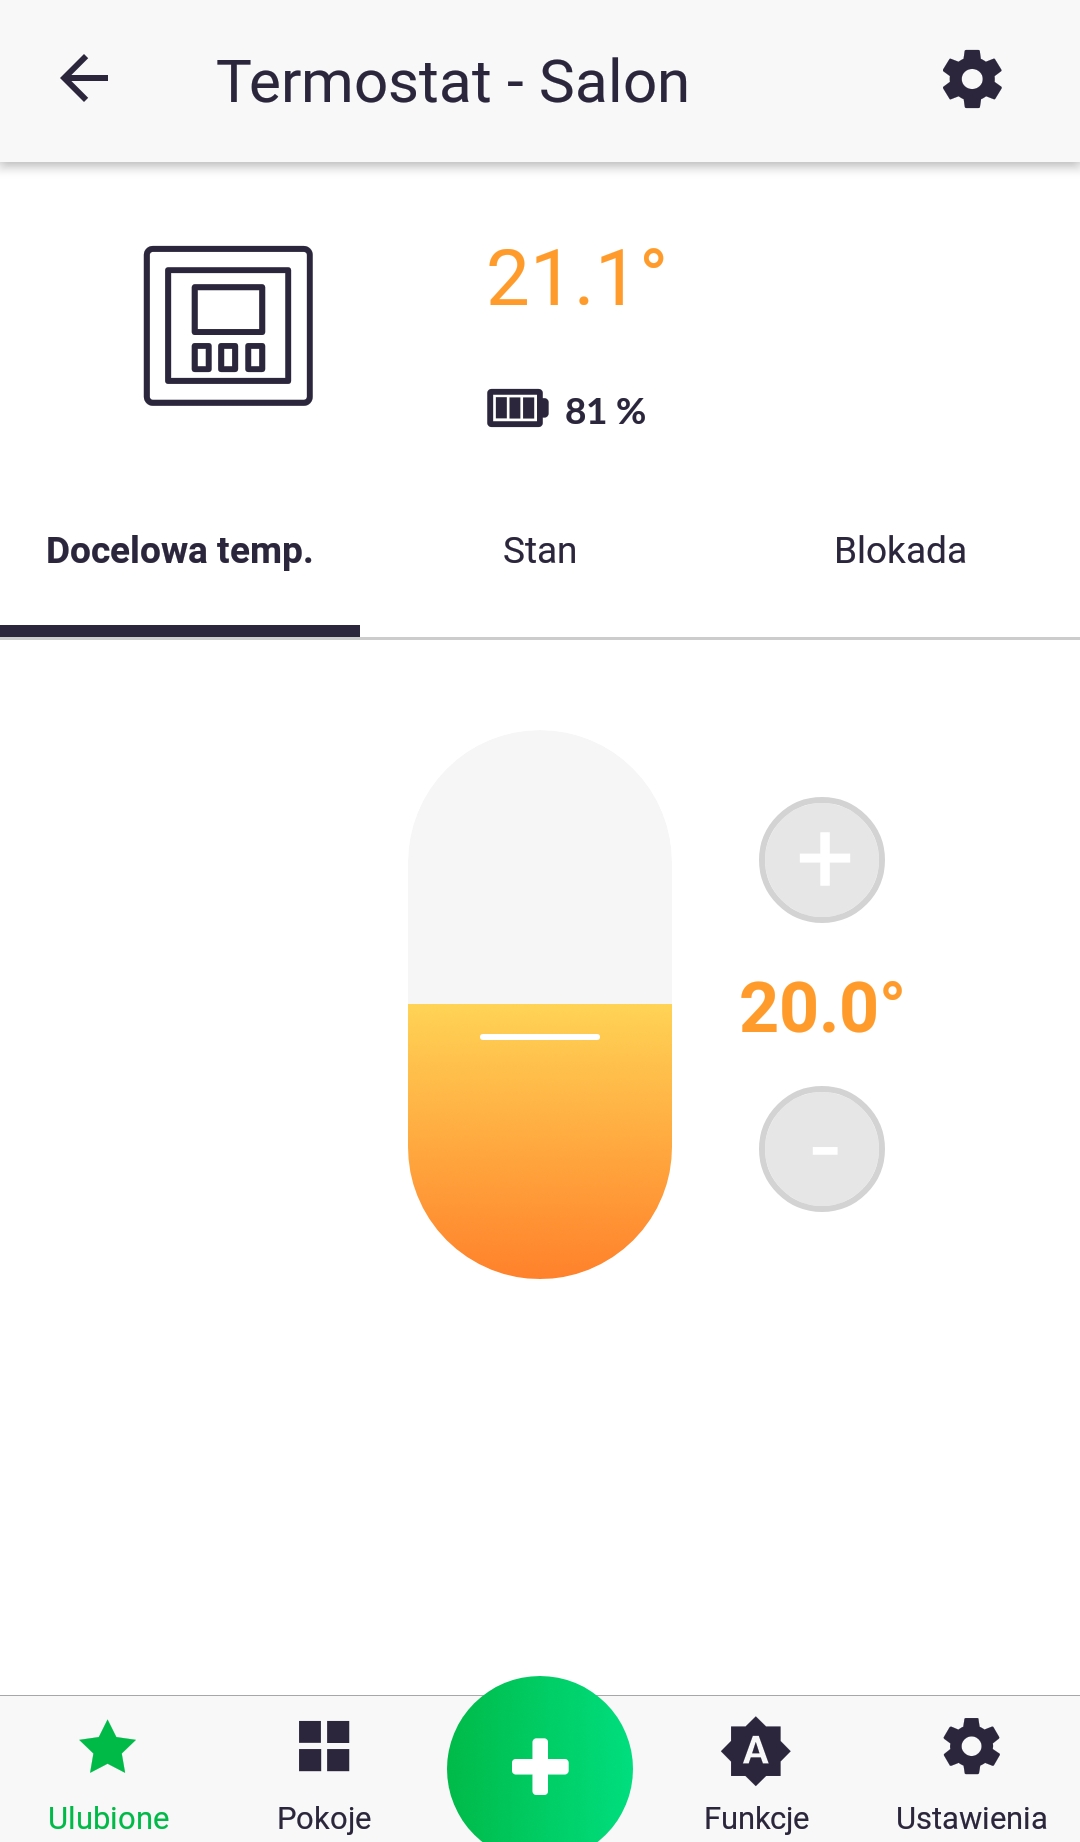
The Heat Monitor thermostat is paired with the AURATON Pulse control unit just like with other devices (as described in the section on pairing devices). The only difference is that pairing mode is activated on the control unit through the app by pressing the green plus sign at the bottom of the screen and then clicking the "Devices" icon. Details are described in the app's user manual. The image below shows the thermostat control screen in the app, which displays the following parameters: current measured temperature, target temperature, battery charge percentage, device status (on/off), and button lock (the device cannot be controlled locally). The last two parameters can be changed in separate tabs, which are accessed by pressing the "Status" or "Lock" icons.
The Heat Monitor thermostat is primarily designed to work with a thermostatic head (Radiator Controller) and a thermostatic heater control unit (Heater Controller). The app allows you to easily link the thermostat to any of these devices by creating two "Group" functions. One function should group the current temperature, and the other the target temperature. Any changes made to each device will then be communicated to the others. The thermostat has a built-in temperature sensor, so the temperature parameter measured on the device is read-only, preventing it from being saved by other devices.
Technical data
| Operating temperature range: | 0 – 45°C |
| Temperature measurement range: | 0 – 45°C (measurement error +/- 1°C) |
| Temperature control range: | 0 – 40°C |
| Hysteresis: | ±0.2°C |
| Temperature setting accuracy: | 0.1°C |
| Temperature measurement resolution: | ±0.1°C |
| Default temperature setting: | 21°C |
| Additional features: | FrostGuard/Hotel Mode |
| Duty cycle: | daily |
| Operating status check: | LCD |
| Maximum number of paired devices: | 3 |
| Power supply |
2x AAA 1.5V alkaline batteries |
| Cooperation with the Internet switchboard | AURATON Pulse |
| Degree of protection | IP20 |
| Radio frequency: | 868.150MHz 868.450MHz 869.800MHz |
| Radio signal strength: | 11 dBm |
| Radio receiver category: | 2 |
| Range of action: | in a typical building, with standard wall construction – up to 30 m in open space – up to 300 m |
Disposing of the device
O
Devices are marked with a crossed-out waste bin symbol. In accordance with European Directive 2012/19/EU and the Waste Electrical and Electronic Equipment Act, this marking indicates that this equipment, after its useful life, must not be disposed of with other household waste.
Users are obligated to dispose of it at a collection point for used electrical and electronic equipment.