User manual ver. 20250527
This document collects information on the safety, installation and use of the Auraton Radiator Controller.
Basic information
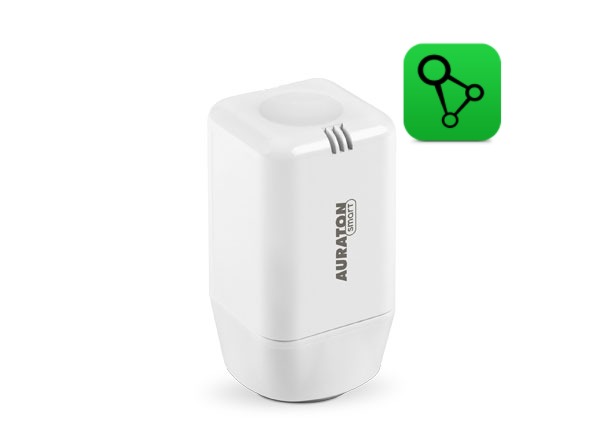
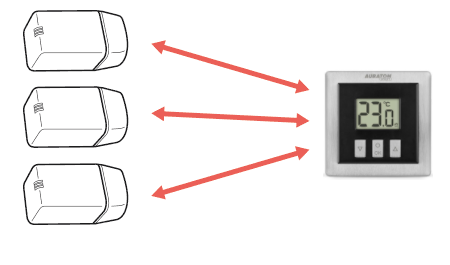
The Auraton Radiator Controller head, along with the Auraton Heat Monitor, is a programmable, electronic room thermostat. The head is designed for installation on M30x1.5 radiator inserts and, using a special adapter, on Danfoss RA-N valves (adapter included). The head communicates wirelessly with the Auraton Heat Monitor, collecting information about the current room temperature and the setpoint temperature. It is possible to control up to three radiators in a single room with Auraton Radiator Controller heads, but all of them must be paired with the same Auraton Heat Monitor.
Optional system components
The Auraton Radiator Controller head is designed to work with the Auraton Heat Monitor regulator and the Auraton Box internet gateway, which allows you to control operating parameters using an application on your phone or tablet.
Head description
The head is mounted directly on the radiator or on the underfloor heating manifold.
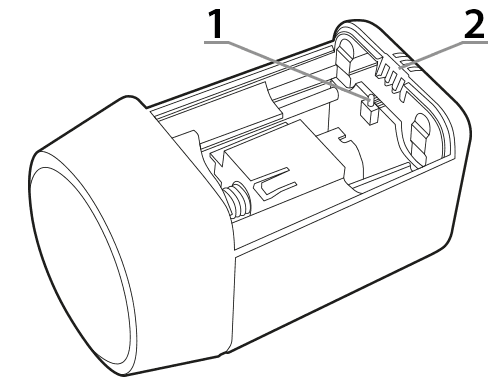
- – Battery cover closing, pairing and reset button.
- – Indicator diode.
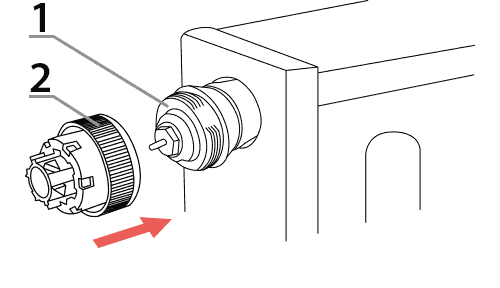
Head assembly
Radiator with M30x1.5 insert
To mount the Auraton Radiator Controller head on a radiator with the most popular M30x1.5 insert on the market, perform the following steps:
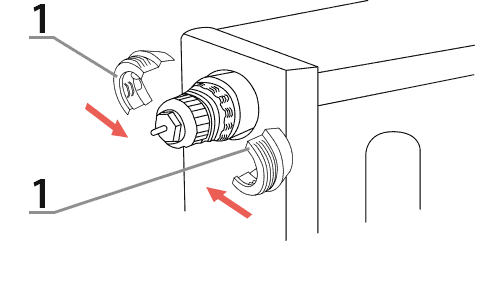
- Screw the reduction A (1) included in the head set onto the insert (as far as it will go).

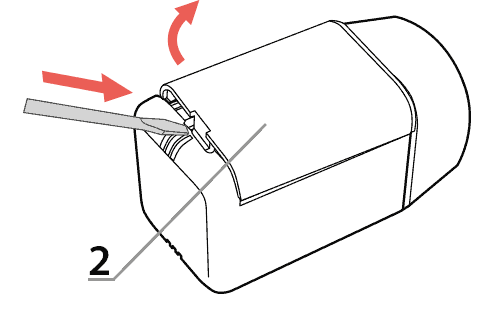
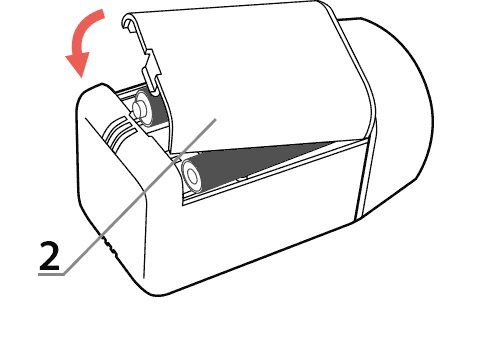
- Remove the battery cover (2) from the head using a flat screwdriver.
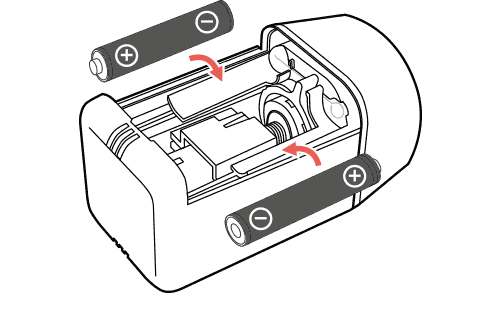
- Install two AAA batteries into the head, observing polarity. The head's stem will move to the fully open position, which is necessary to mount the head on the adapter.
- Move the locking ring (3) to the “unlocked” position.
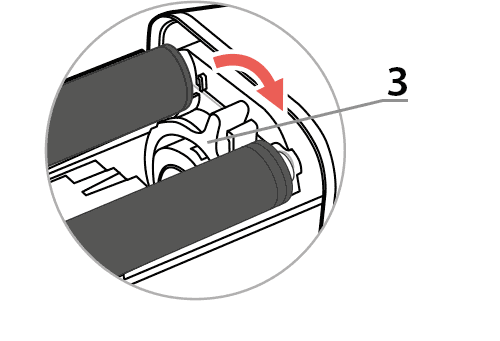
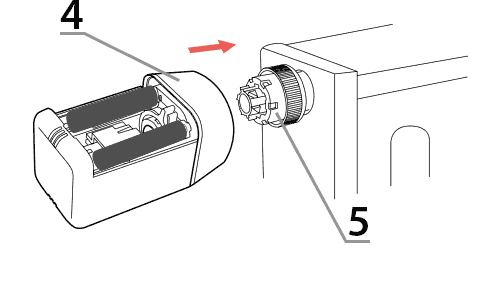
- Slide the head (4) onto the reduction A (5) as far as it will go.
- Turn the locking ring (3) to the “secured” position.

- Perform the pairing procedure with the Auraton Heat Monitor or Auraton Box if this procedure has not been performed previously.
- Close the battery cover (2) of the head.
Radiator with Danfoss RA-N insert
To mount the Auraton Radiator Controller head on a radiator with a Danfoss RA-N insert:
- Place 2 halves of the B reduction (1)
- On the assembled reduction B (1), tighten the reduction A (2)
- Carry out steps 2 to 8 in the Radiator with M30x1.5” insert section
Assembly instructions
The Auraton Heat Monitor should be placed in the room where the radiator controller is located. It should not be placed near the radiator, near a door, or in direct sunlight. The controller should be mounted on the radiator insert, a maximum of 20 cm from the radiator. In almost all cases, this requirement is met, as manufacturers integrate the inserts with the radiators. If the controller is located further away from the radiator (the radiator is not directly heating it), the temperature control will be less dynamic. Larger room temperature fluctuations may occur. However, mounting the Auraton Radiator Controller controller on inserts located at the bottom of the radiator (common bathroom towel rails) is permitted.
Factory reset
Restoring factory settings erases all configuration data from the Auraton Radiator Controller, including all associated devices. The procedure is as follows:
- Remove the head battery cover.
- Remove one battery.
- Press the battery cover close button (located on the electronics board between the batteries).
- While holding the button down, install the battery.
- When you hear three beeps, release the button.
The device paired with the AURATON Box gateway must also be removed from SUPLA Cloud.
Device functions
How does the heating function work?
The Auraton Radiator Controller smoothly controls heating based on its own temperature measurement (less precise control) or an external temperature sensor, such as the Heat Monitor (more precise control). Based on the external temperature measurement (recommended), the algorithm decides the percentage by which a valve, such as a radiator valve, must be opened to achieve the set temperature after taking into account a certain amount of thermal inertia.
Valve descaling function
To prevent scale buildup in the radiator valve, the Radiator Controller head opens it periodically. Once opened, all accumulated scale is flushed out, allowing the head to operate properly. This function is activated once every two weeks. Additionally, a mode is added that partially opens the valve each time the target temperature changes to flush out any minor scale that may have accumulated.
Function to restore the previous software
The purpose of this function is to downgrade the software to the previous version if it malfunctions after an update. The entire process can take up to a minute, and the device must remain powered on during this time. The previous version of the program is always loaded. If the program was previously downgraded from version 1.6 to 1.5, the previous version is 1.6.
- Remove the head battery cover, preferably with a flat screwdriver.
- Remove one battery.
- Press the battery cover close button (located on the electronics board between the batteries).
- While holding the button down, install the batteries.
- After hearing the three beeps, do not release the button until the next audio information (four beeps), then release the button.
Signaling after starting the head
After inserting the batteries, the head signals its readiness with an audible signal and an LED. Two scenarios are possible:
-
- A single beep indicates that the thermostatic head is paired with another device. Simply mount the thermostatic head on the radiator insert and close the battery cover. After approximately 30 seconds, the thermostatic head will begin regulating the temperature.
- A triple beep indicates that no device is associated with the head. The head will stabilize its internal temperature at 20 degrees Celsius. This operation is not recommended due to the temperature difference between the head operating near a radiator and the room temperature. Furthermore, a Radiator Controller head operating without an associated Auraton Heat Monitor will draw more current and drain the batteries more quickly.
Calibration error indication
After mounting on the radiator and closing the battery cover, the head calibrates the mechanical system. If an error occurs during calibration, it is signaled audibly by the speaker turning on for 1 second every 1 second. If a calibration error occurs, check the following:
-
-
- Is the A reduction properly screwed to the radiator insert?
- Is the B reduction (in the case of Danfoss inserts) correctly fastened to the insert and is the A reduction correctly screwed into the B reduction?
- Is the locking ring correctly set to the “secured” position?
- Are the installed batteries discharged?
-
Battery life and low battery indication
The declared operating time on a single set of AAA alkaline batteries is one year. Discharging the batteries does not affect temperature control. The head signals low battery by flashing the LED twice every 8 seconds. Additionally, when the battery becomes even more depleted, the head will begin to beep twice every 8 minutes. To turn off the audible signal for 1 day, press any button on the Auraton Heat Monitor associated with the head, or lift the head cover for 2 seconds and reinstall it.
Device operating modes
The Auraton Heat Monitor set together with the Auraton Radiator Controller head can operate in two modes:
Mode I (local):
In this mode, the controller and the radiator head can operate independently without the need for an Auraton Box internet gateway. The Auraton Heat Monitor controller must be correctly assigned to the Auraton Radiator Controller head. Up to three radiator heads can be assigned to a single controller.
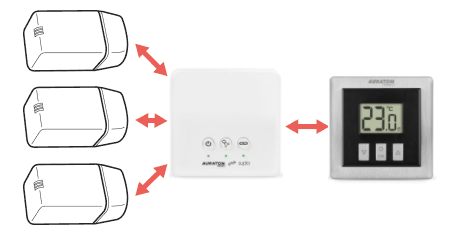
Mode II (remote):
In remote mode, you can use the Auraton Box internet gateway, allowing you to access the entire system remotely while away from home.
This allows you to remotely control your heating, check battery charge levels, receive event notifications, create schedules, and much more. In this mode, there is no limit to the number of AURATON Radiator Controllers paired with a single AURATON Heat Monitor.
For proper remote operation, Internet access is required both from the gateway itself and from a phone or tablet with the application (Android, iOS).
When using Mode II (remote), it is recommended to first pair the Radiator Controller with the Heat Monitor. This pairing will ensure the set will work properly even if the Auraton Box gateway itself is powered down.
Device pairing
Even if you plan to control your devices exclusively using the SUPLA app, it is recommended to perform two-way pairing of AURATON devices.
-
First, pair your devices directly with each other – this will provide a backup form of communication in case the app crashes or there is no internet access.
-
Then pair the devices with the AURATON Box gateway to enable remote control via the SUPLA application on your phone, tablet or computer.
For the Auraton Radiator Controller to function correctly, it must be paired with the Auraton Heat Monitor or Auraton Box internet gateway. Pairing mode is enabled and is indicated by a flashing red LED on the controller. A maximum of three Radiator Controllers can be paired with a single Heat Monitor. The pairing process is as follows:
- Remove the battery cover (preferably with a flat screwdriver).
- Wait for the engine to finish moving.
- Press the black battery cover closing button on the electronics board 3 times (quickly).
- Enable pairing mode on the second device you want to pair (examples described below).
- Wait for the triple beep, which confirms successful pairing of the devices.
- Close the battery cover (if already mounted on the radiator).
If the first pairing fails, perform a factory reset , move closer to the gateway and pair again.
Enabling steaming – Heat Monitor controller
On the Auraton Heat Monitor controller, press theb d orc d for 3 seconds until the transmission symbol (W ) lights up on the display. The Auraton Heat Monitor controller waits 30 seconds for pairing. After this time, it will automatically return to normal operation.
Enabling pairing – AURATON Box gateway
Pairing the AURATON Radiator Controller head with the AURATON Box gateway can be done in two ways:
- On the AURATON Box gateway, briefly press the right "Auraton" pairing button (
 ) – the LED under the button will start flashing. Then, put the AURATON Radiator Controller into pairing mode.
or
- In Supla Cloud, enter the AURATON Box gateway channel and press the "Pair new devices or sensors" button – the LED under the right "Auraton" pairing button will start flashing. Then, enter the AURATON Radiator Controller head into pairing mode.
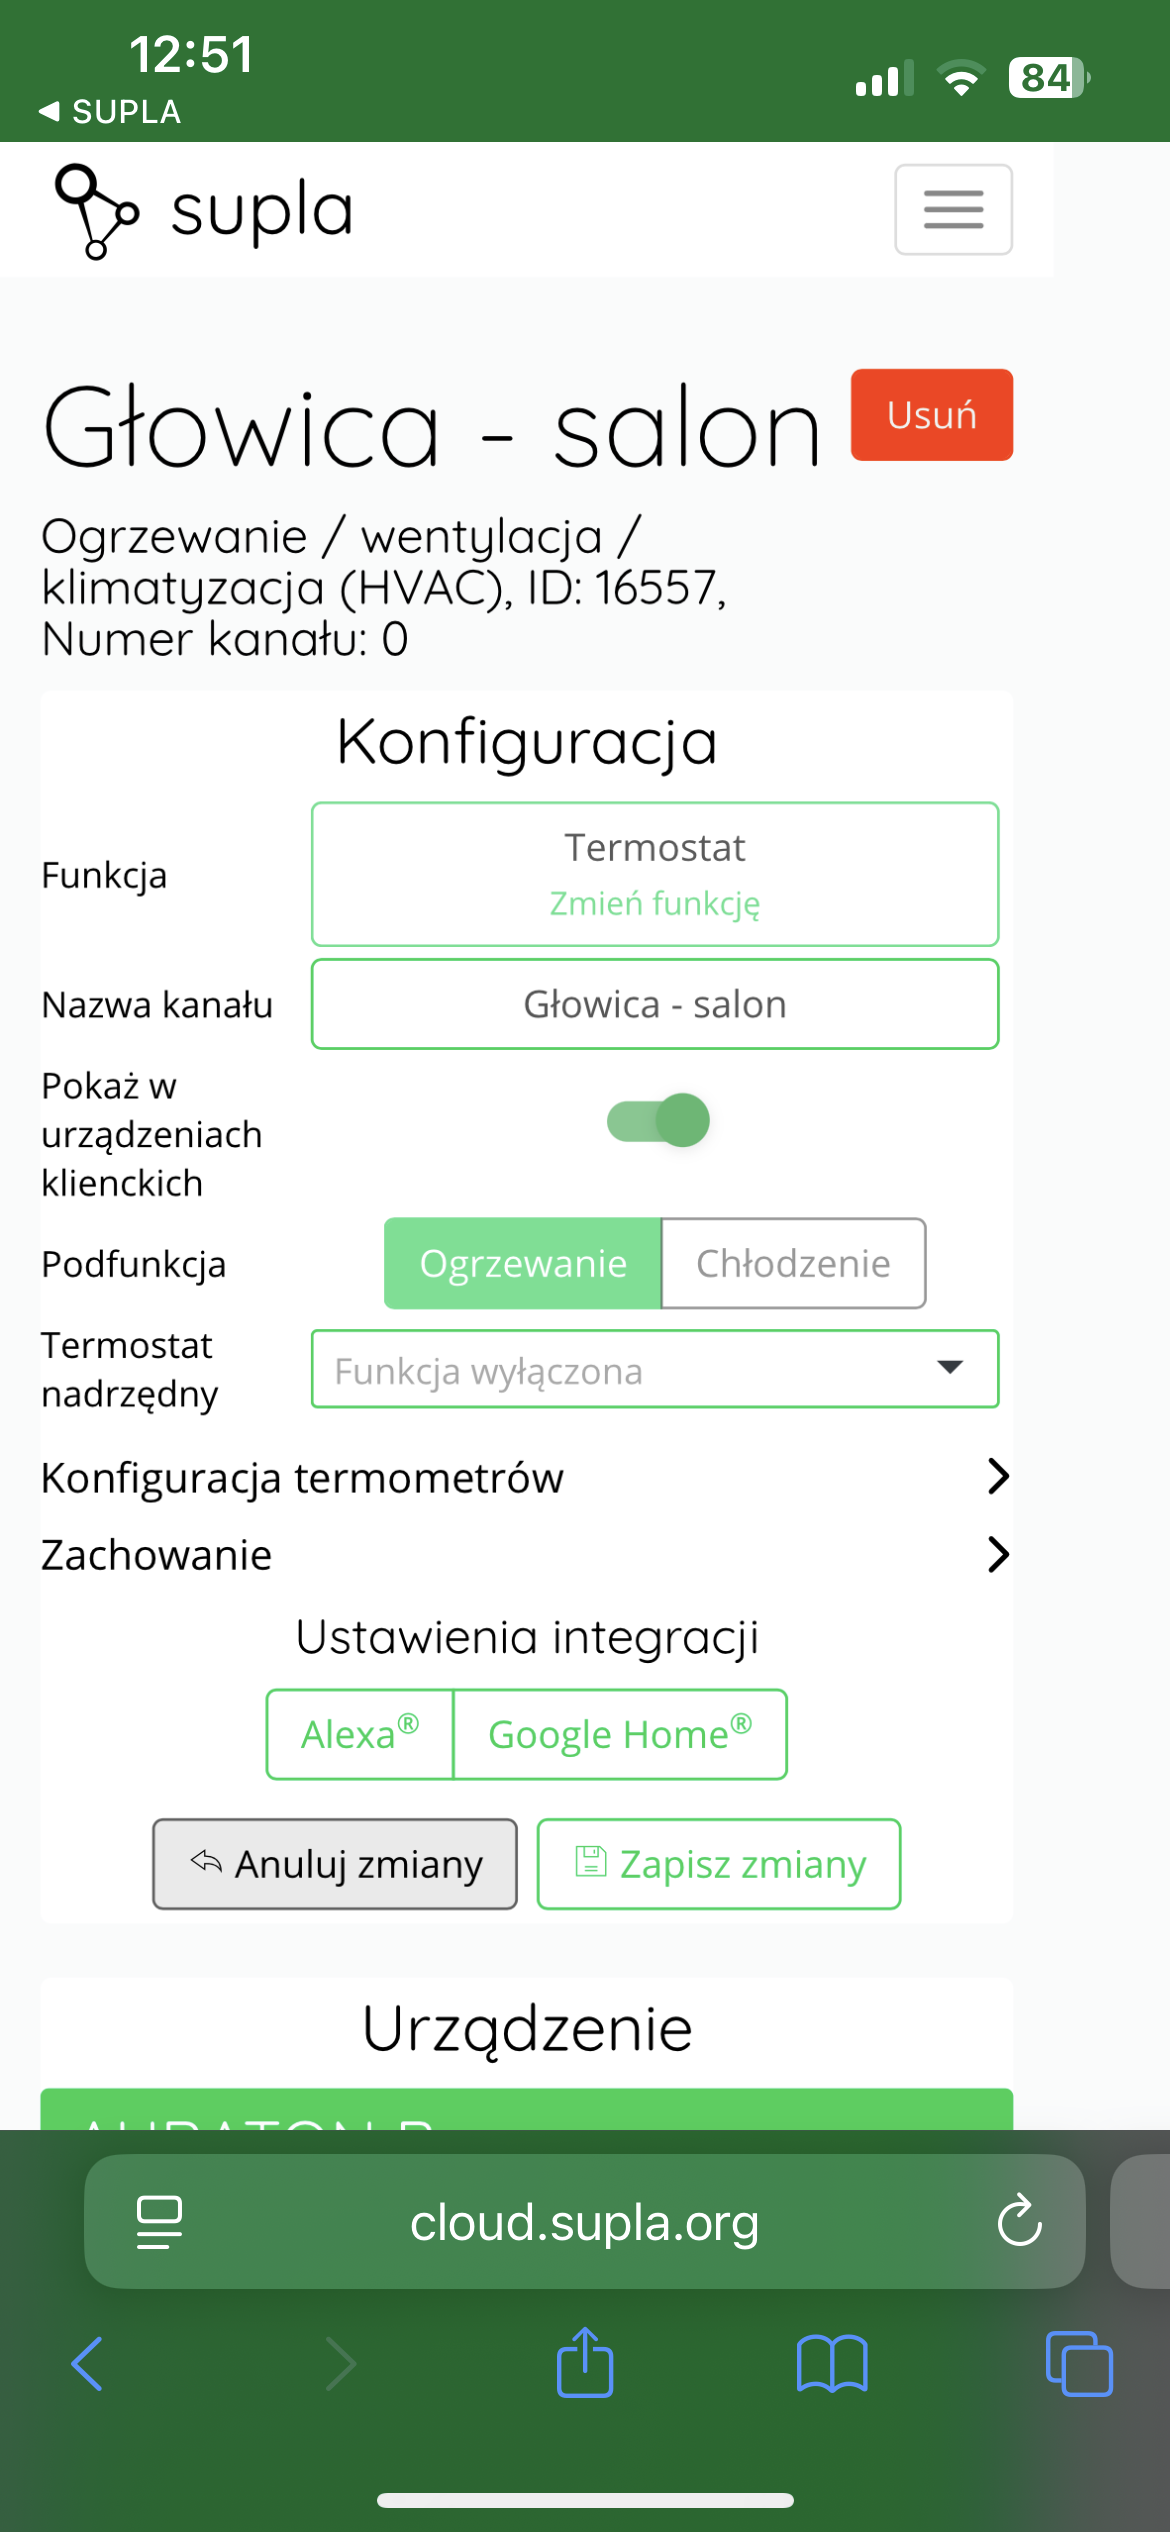
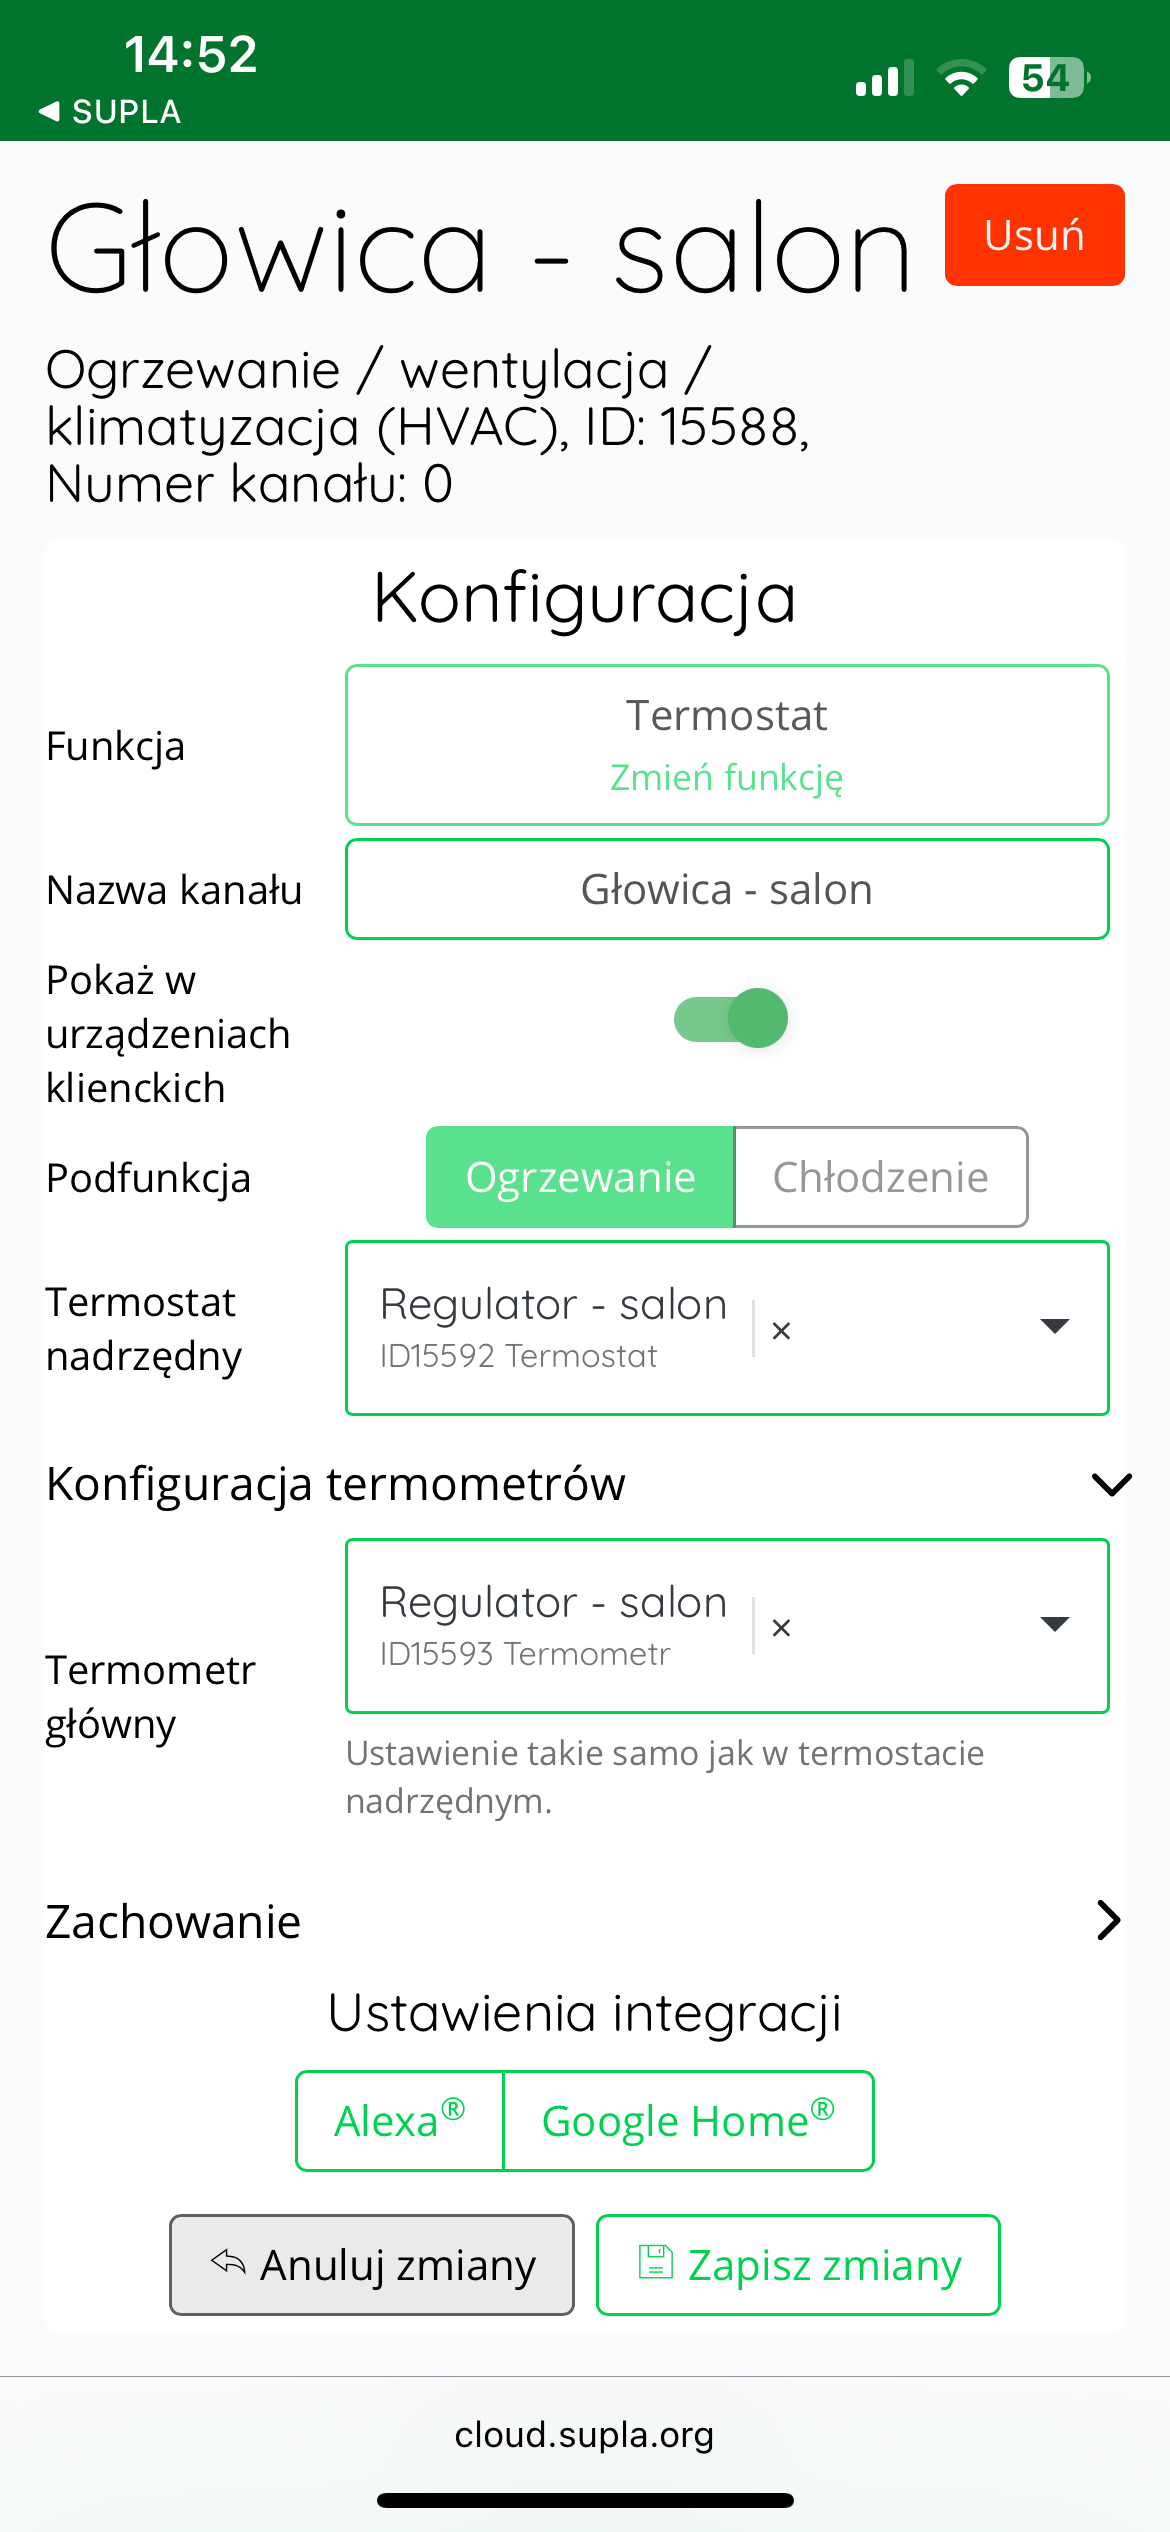
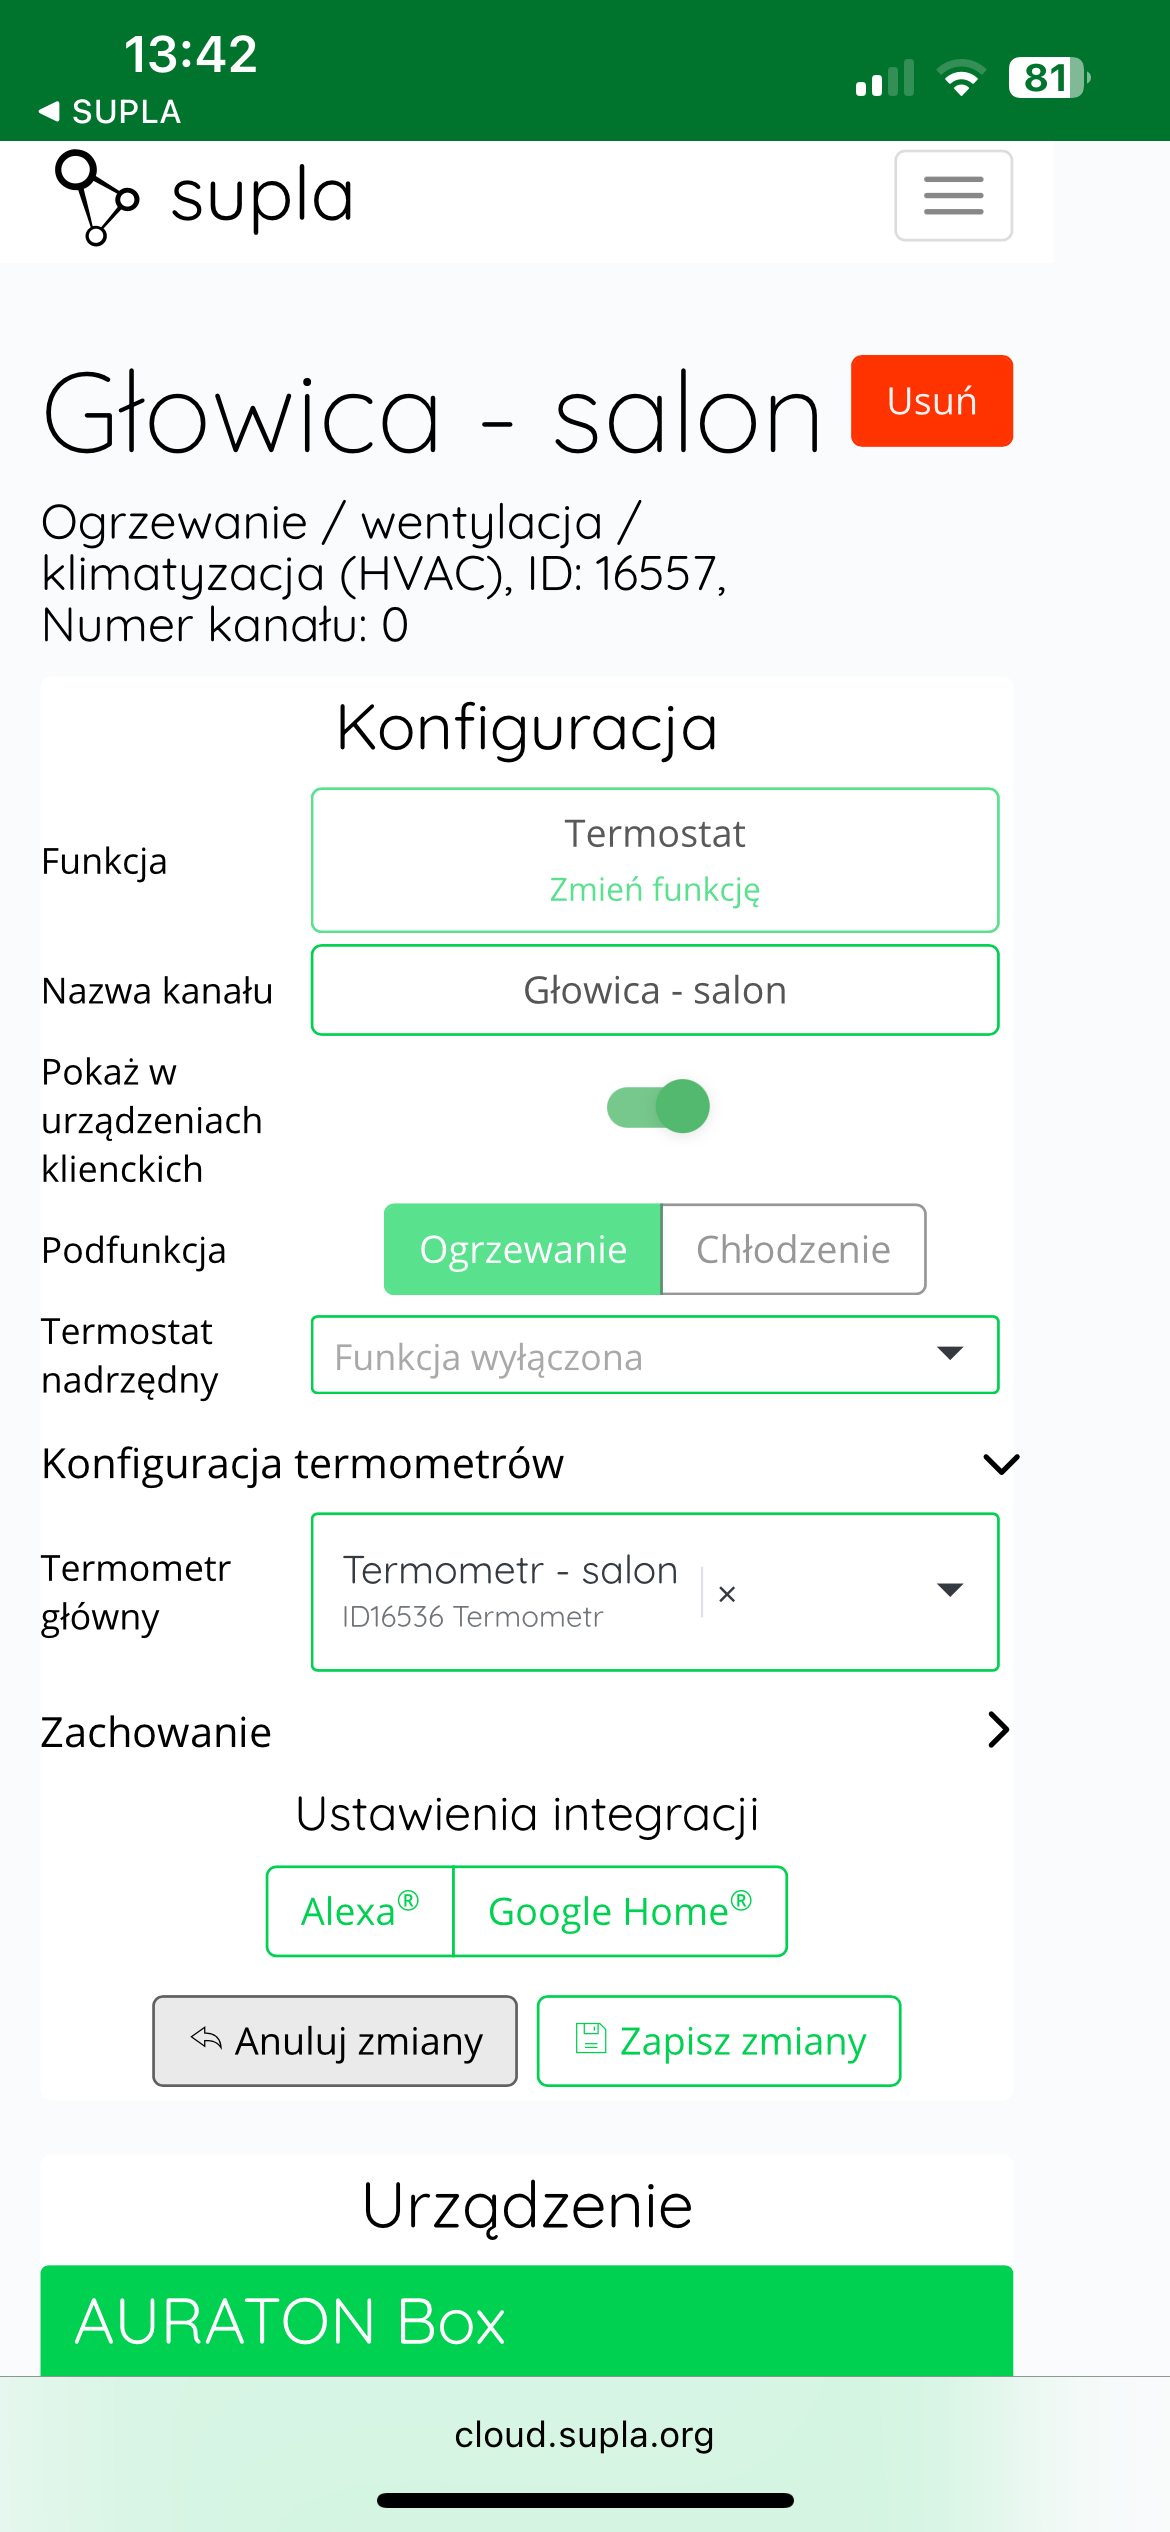
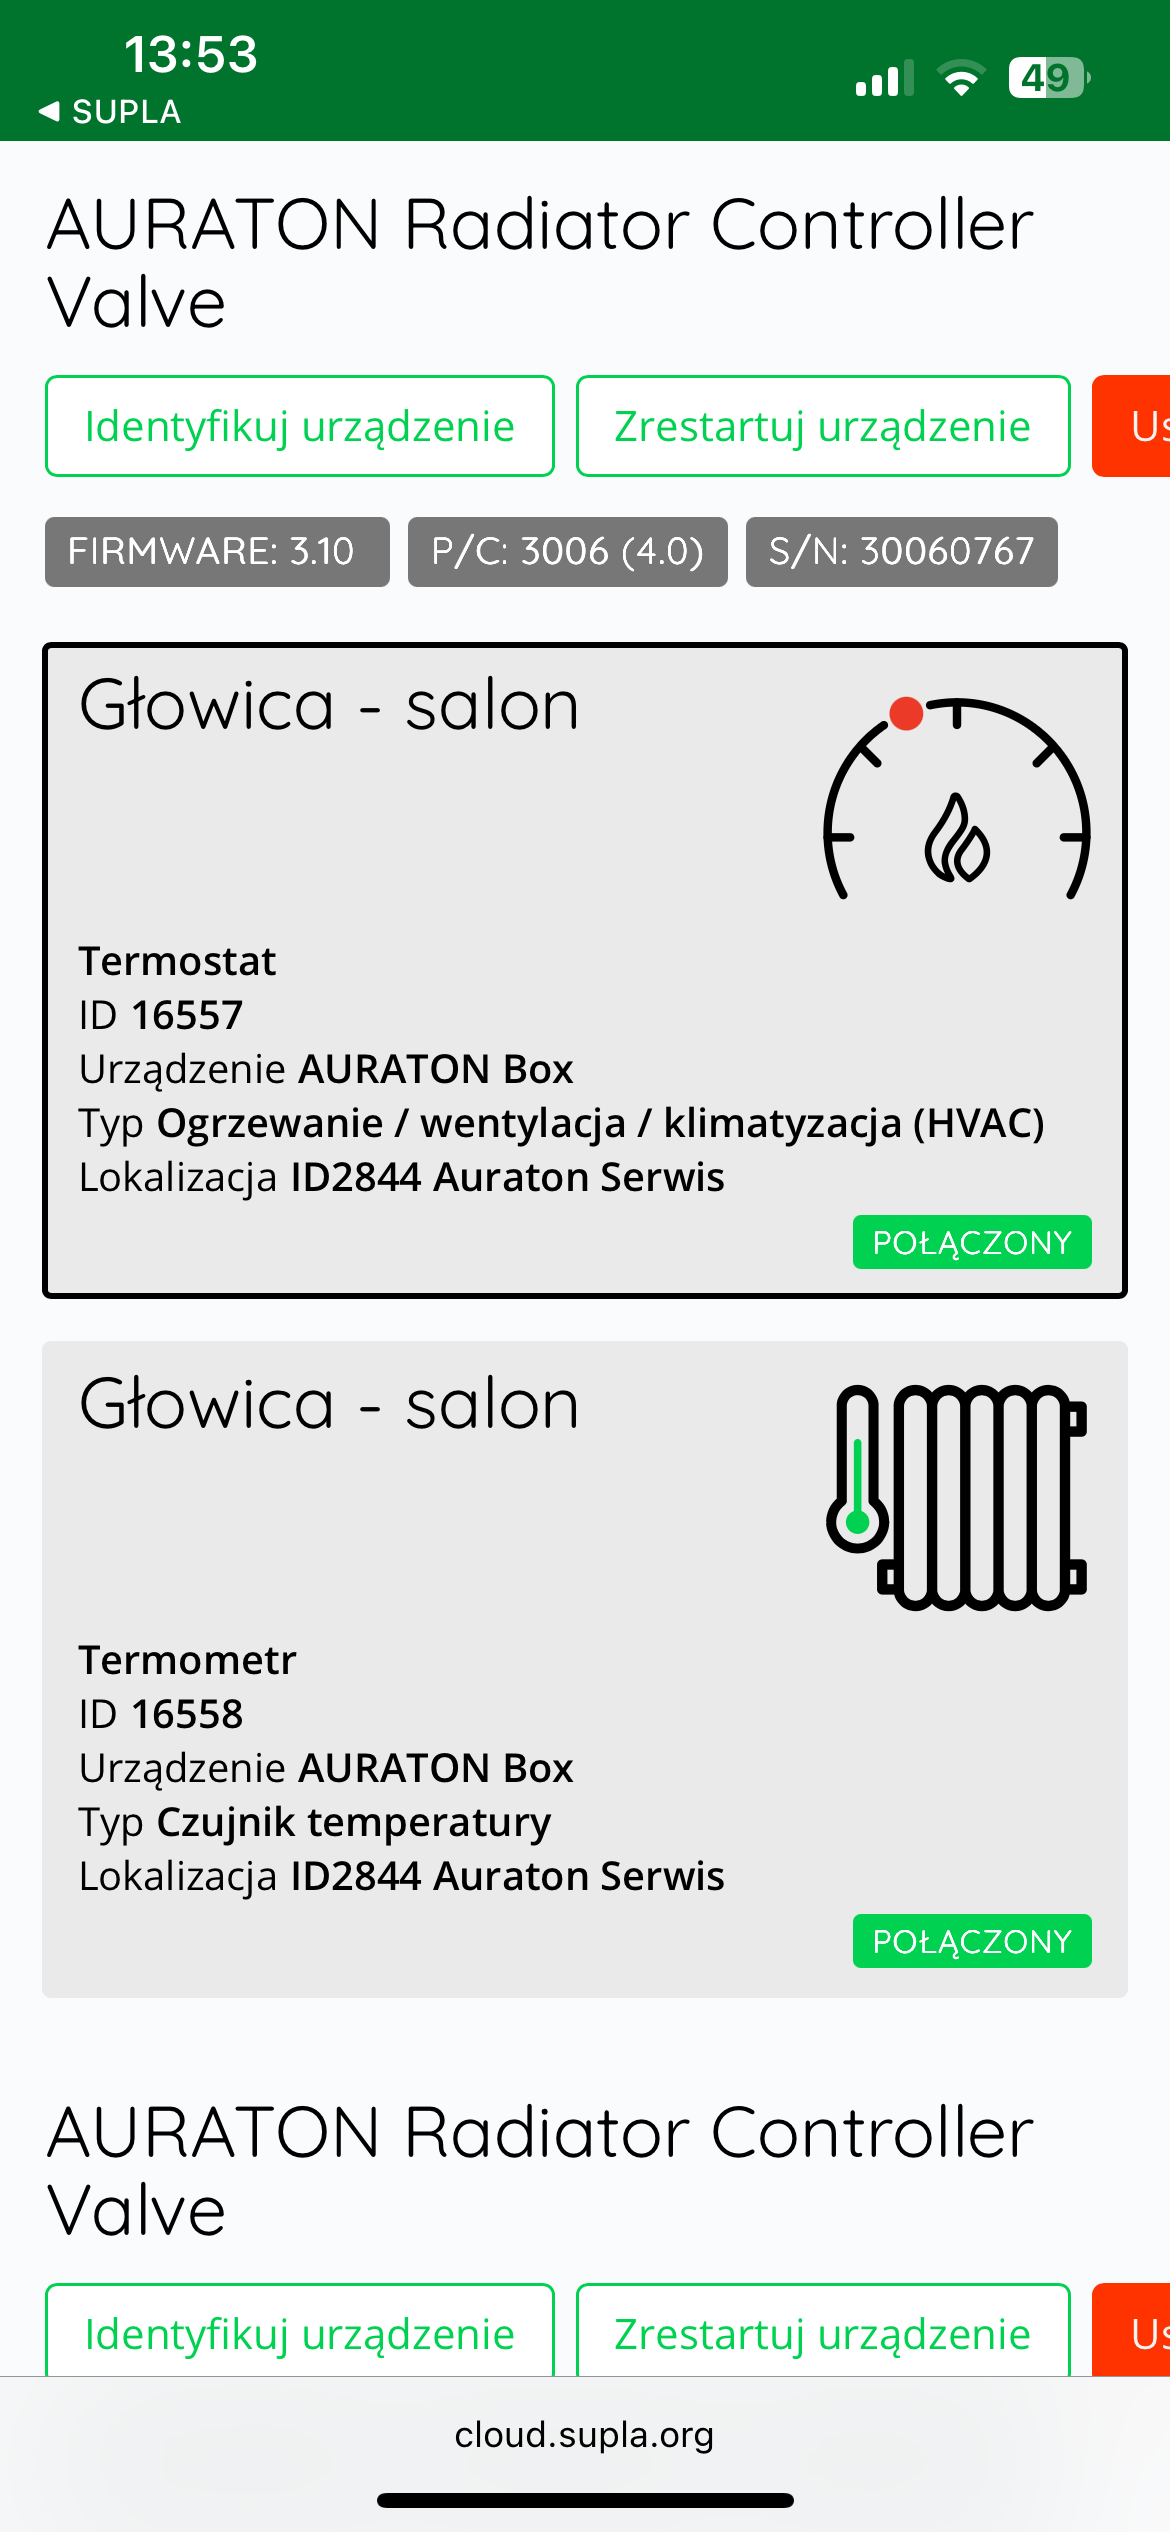
After pairing the AURATON Radiator Controller with the Auraton Box, it is recommended to immediately name the radiator valve in both channels (thermostat and thermometer) in Supla Cloud. By default, the device is named according to the model, e.g., "Radiator Controller," which can be confusing when using multiple devices of the same type. To facilitate identification, it is a good idea to give the radiator valve a unique name immediately after pairing. To do this, edit the "Channel Name" and confirm the changes by clicking " Save Changes ." Repeat this process for all channels assigned to the device in Supla Cloud .
Cooperation with the SUPLA application
Cooperation of the AURATON Radiator Controller head with the AURATON Heat Monitor regulator in the SUPLA application
Goal: We have radiator heating in our home. We want AURATON Radiator Controller radiator heads to control the radiators based not on temperature measurements from their own sensors, but on those from the assigned AURATON Heat Monitor temperature controllers. We also want the heating to be controlled from the temperature controllers as well.
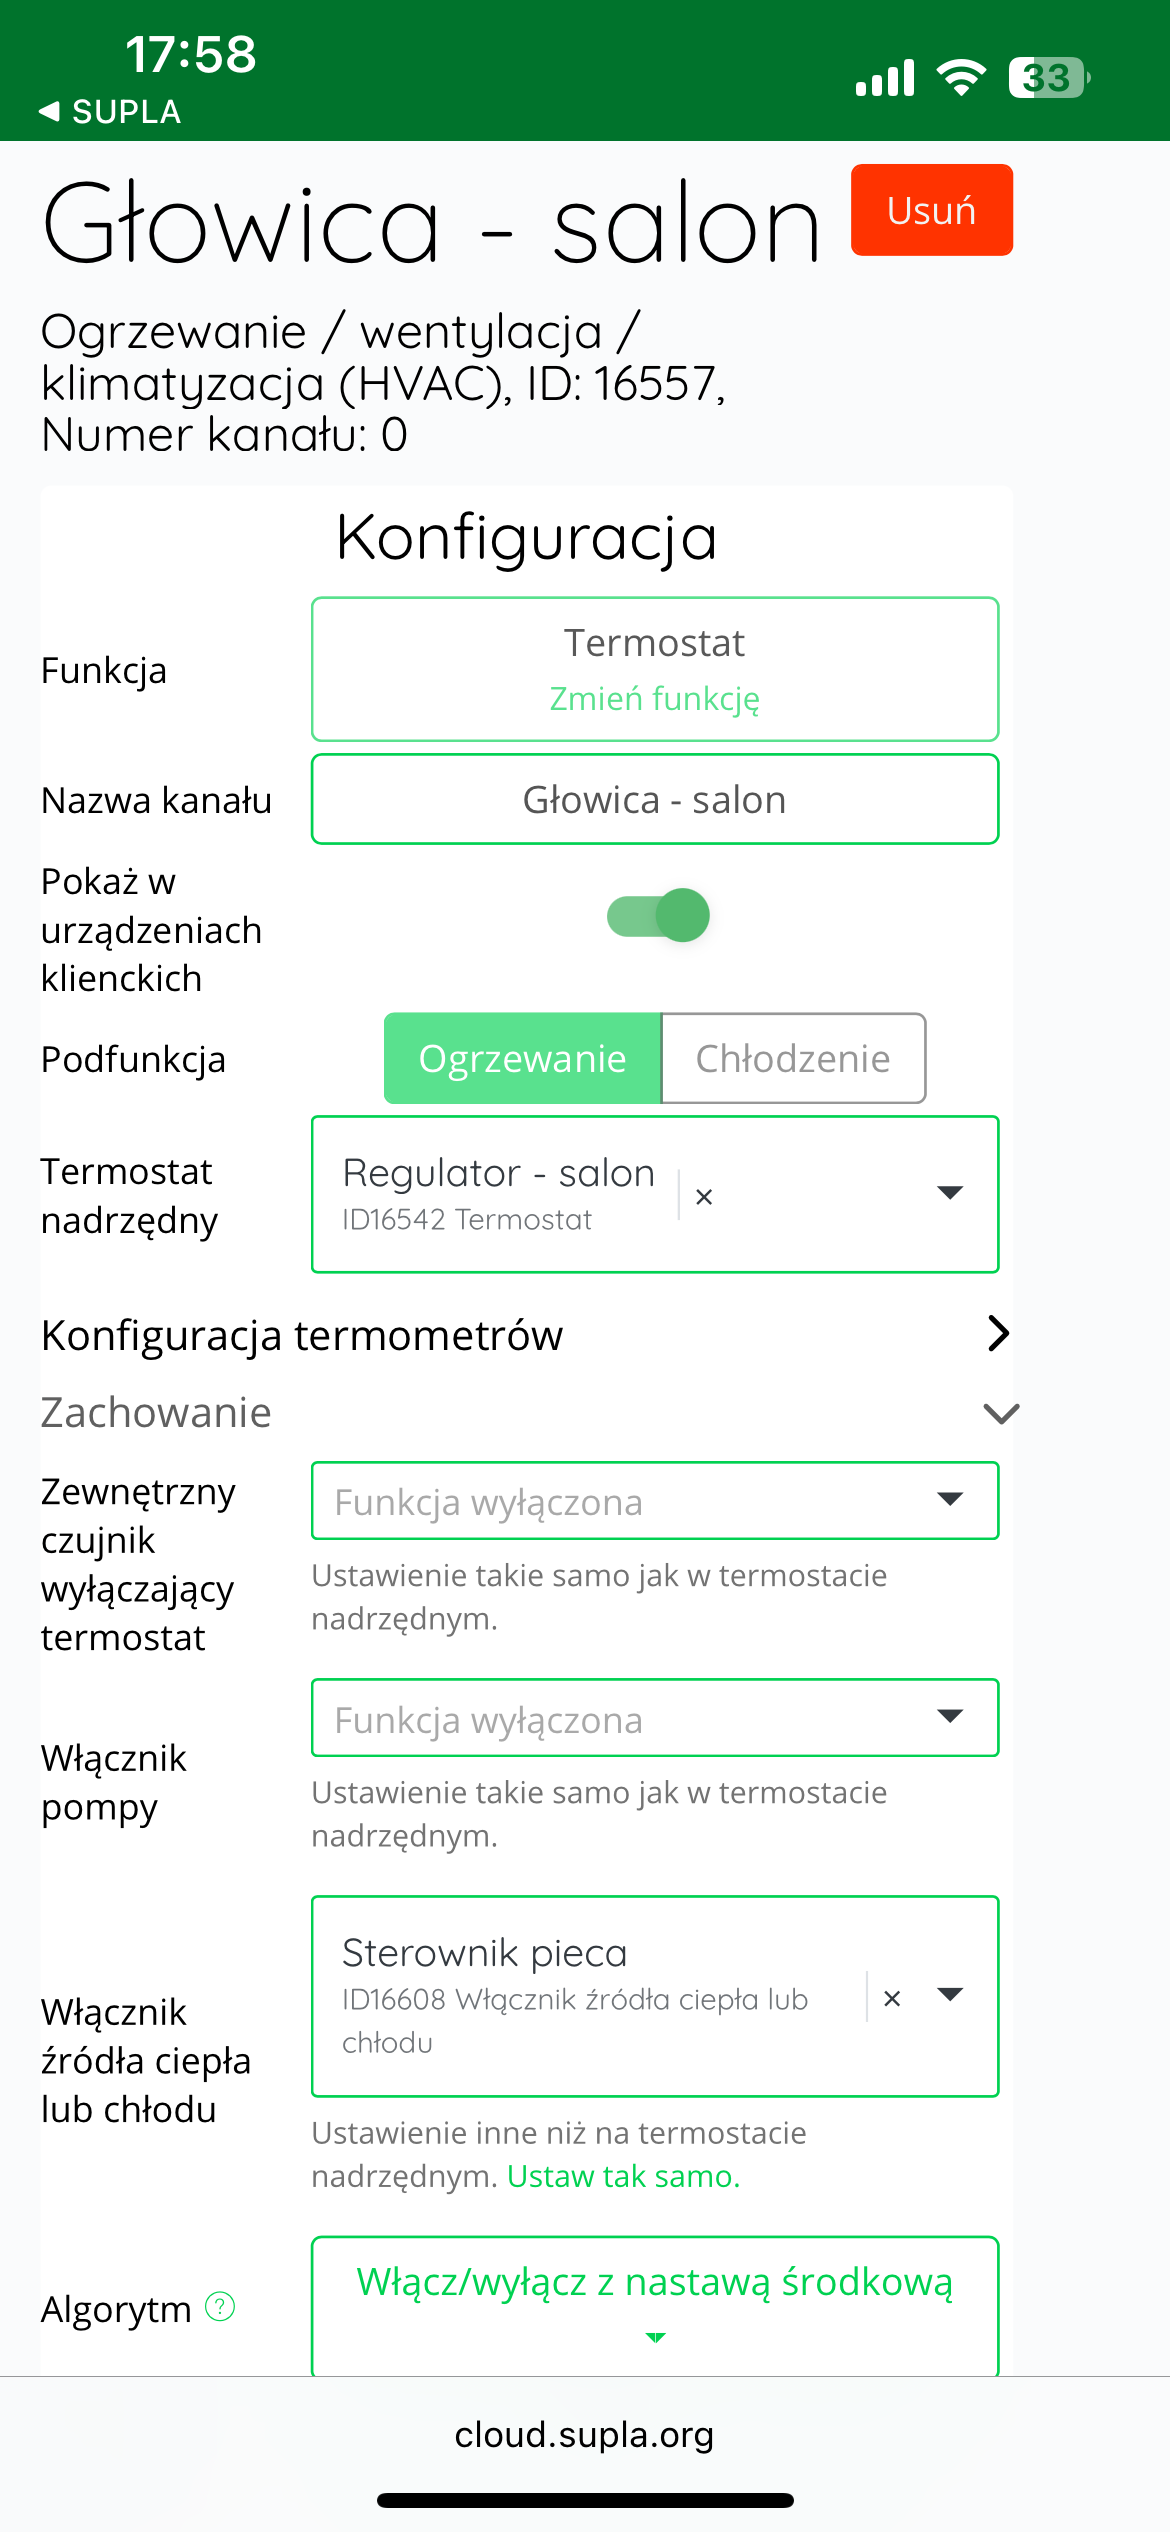
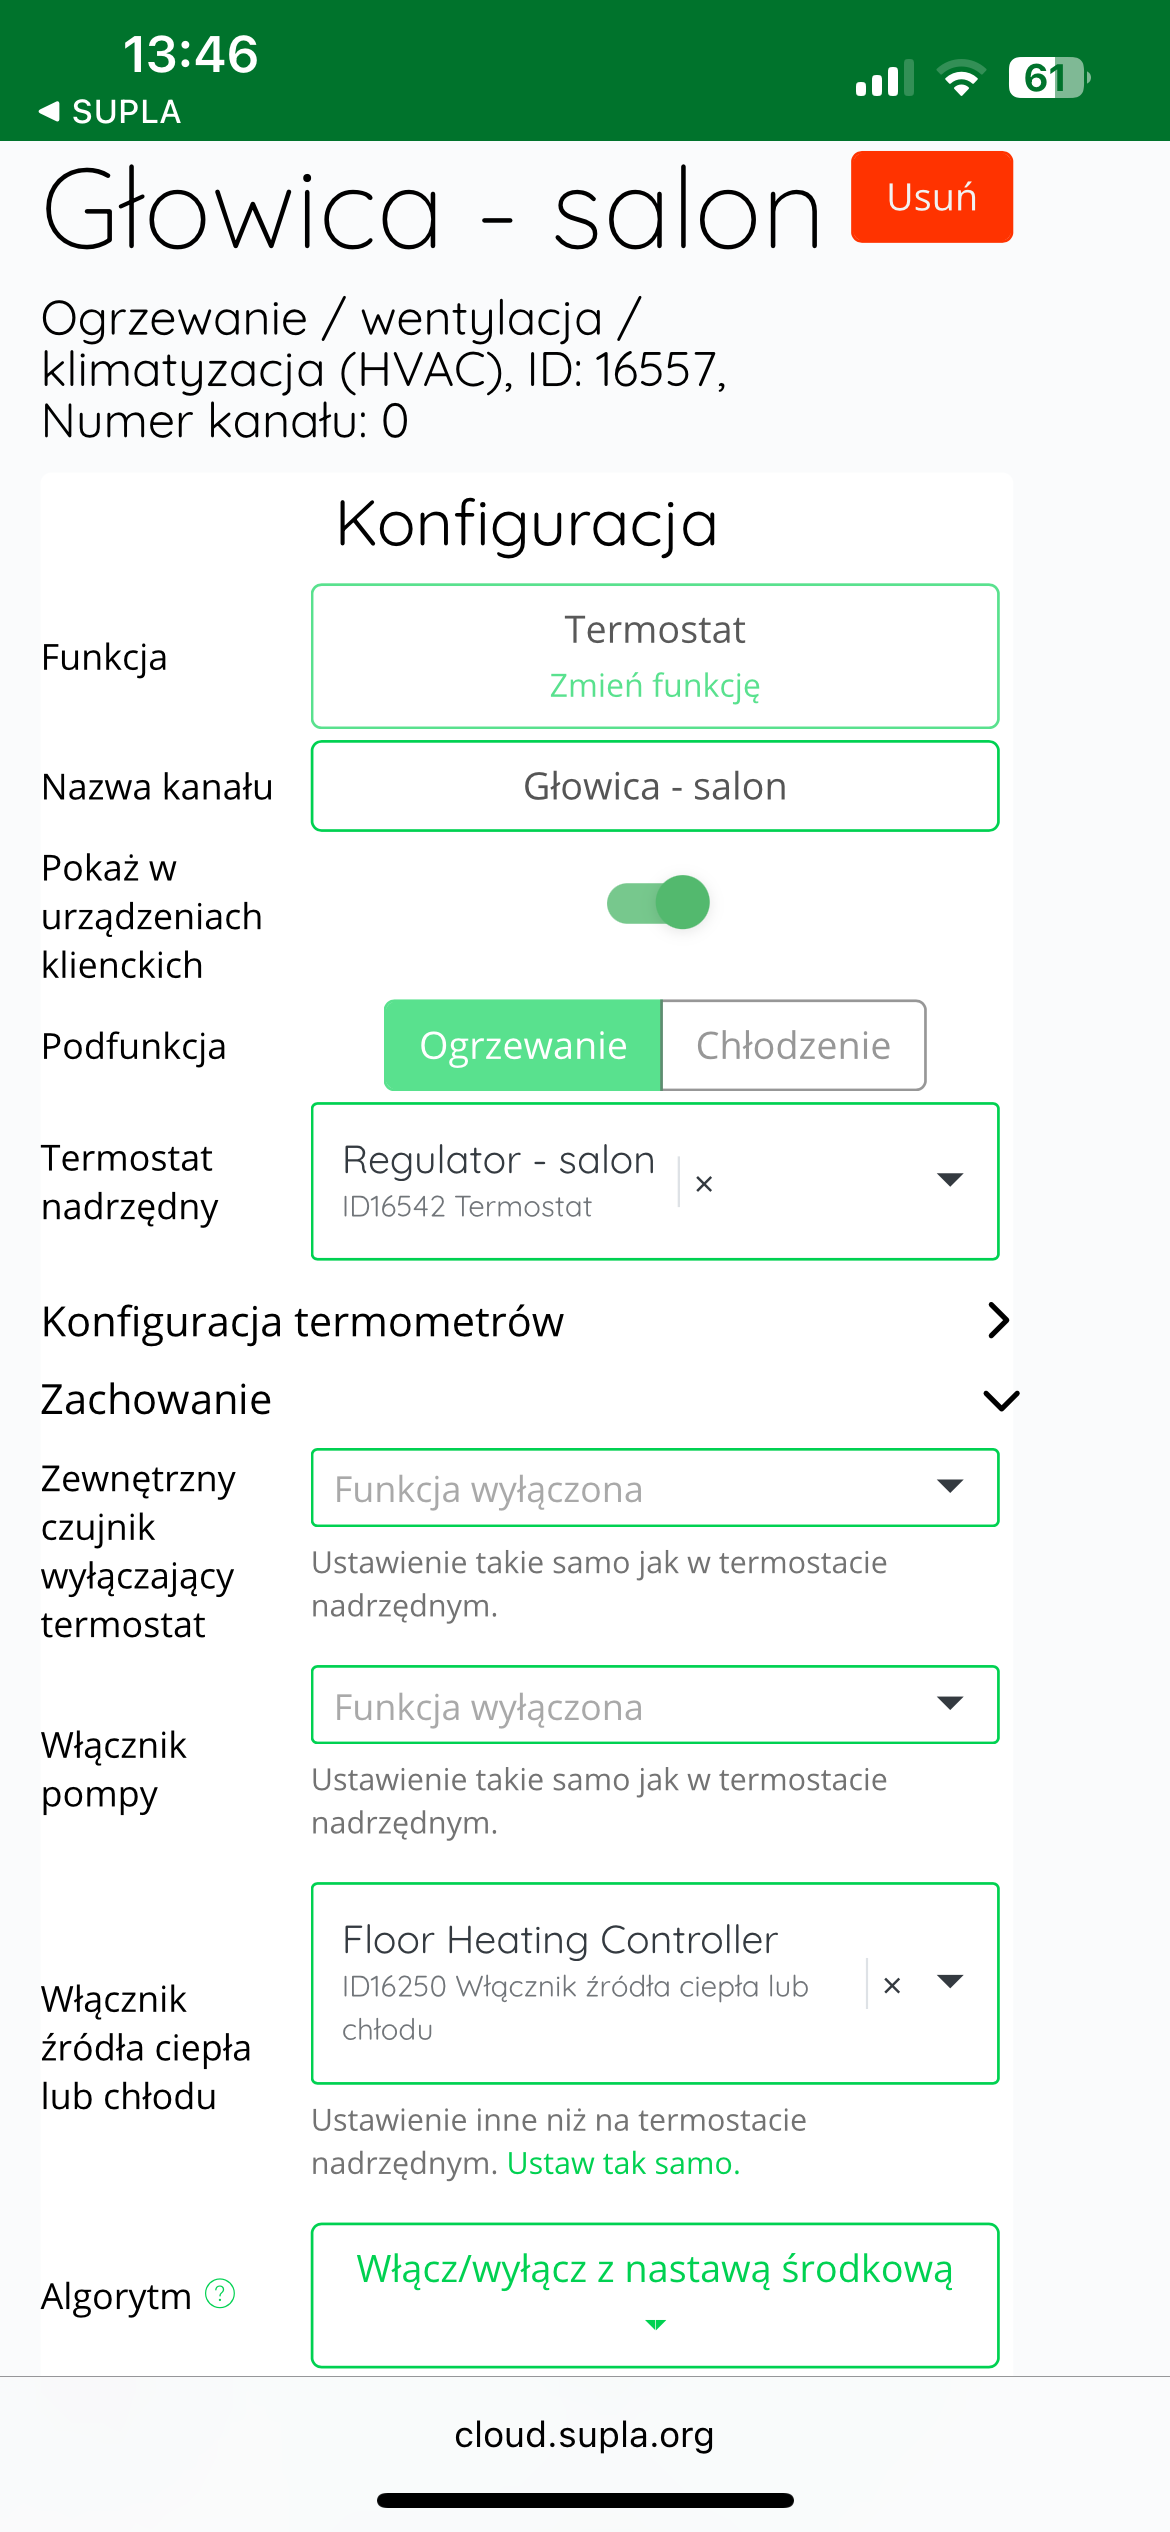
Solution: In the Supla app, select " Supla Cloud " from the Menu and log in. Then, enter the AURATON Box gateway channel. Then, enter the AURATON Radiator Controller thermostat channel (e.g., " Head - living room "Thermometer configuration" field , select the temperature controller assigned to the given head as the "Main thermometer" (e.g., "Regulator - living room" ). In the next step, select the same temperature controller as the " Master thermostat ." Finally, save everything by pressing the " Save changes " button. Proceed similarly for each pair of devices: AURATON Heat Monitor temperature controller + AURATON Radiator Controller radiator head. If one AURATON Heat Monitor temperature controller is to control more than one head in a room, select the same temperature controller as the "Main thermometer" and "Master thermostat" in the thermostat channels of the other controlled heads.
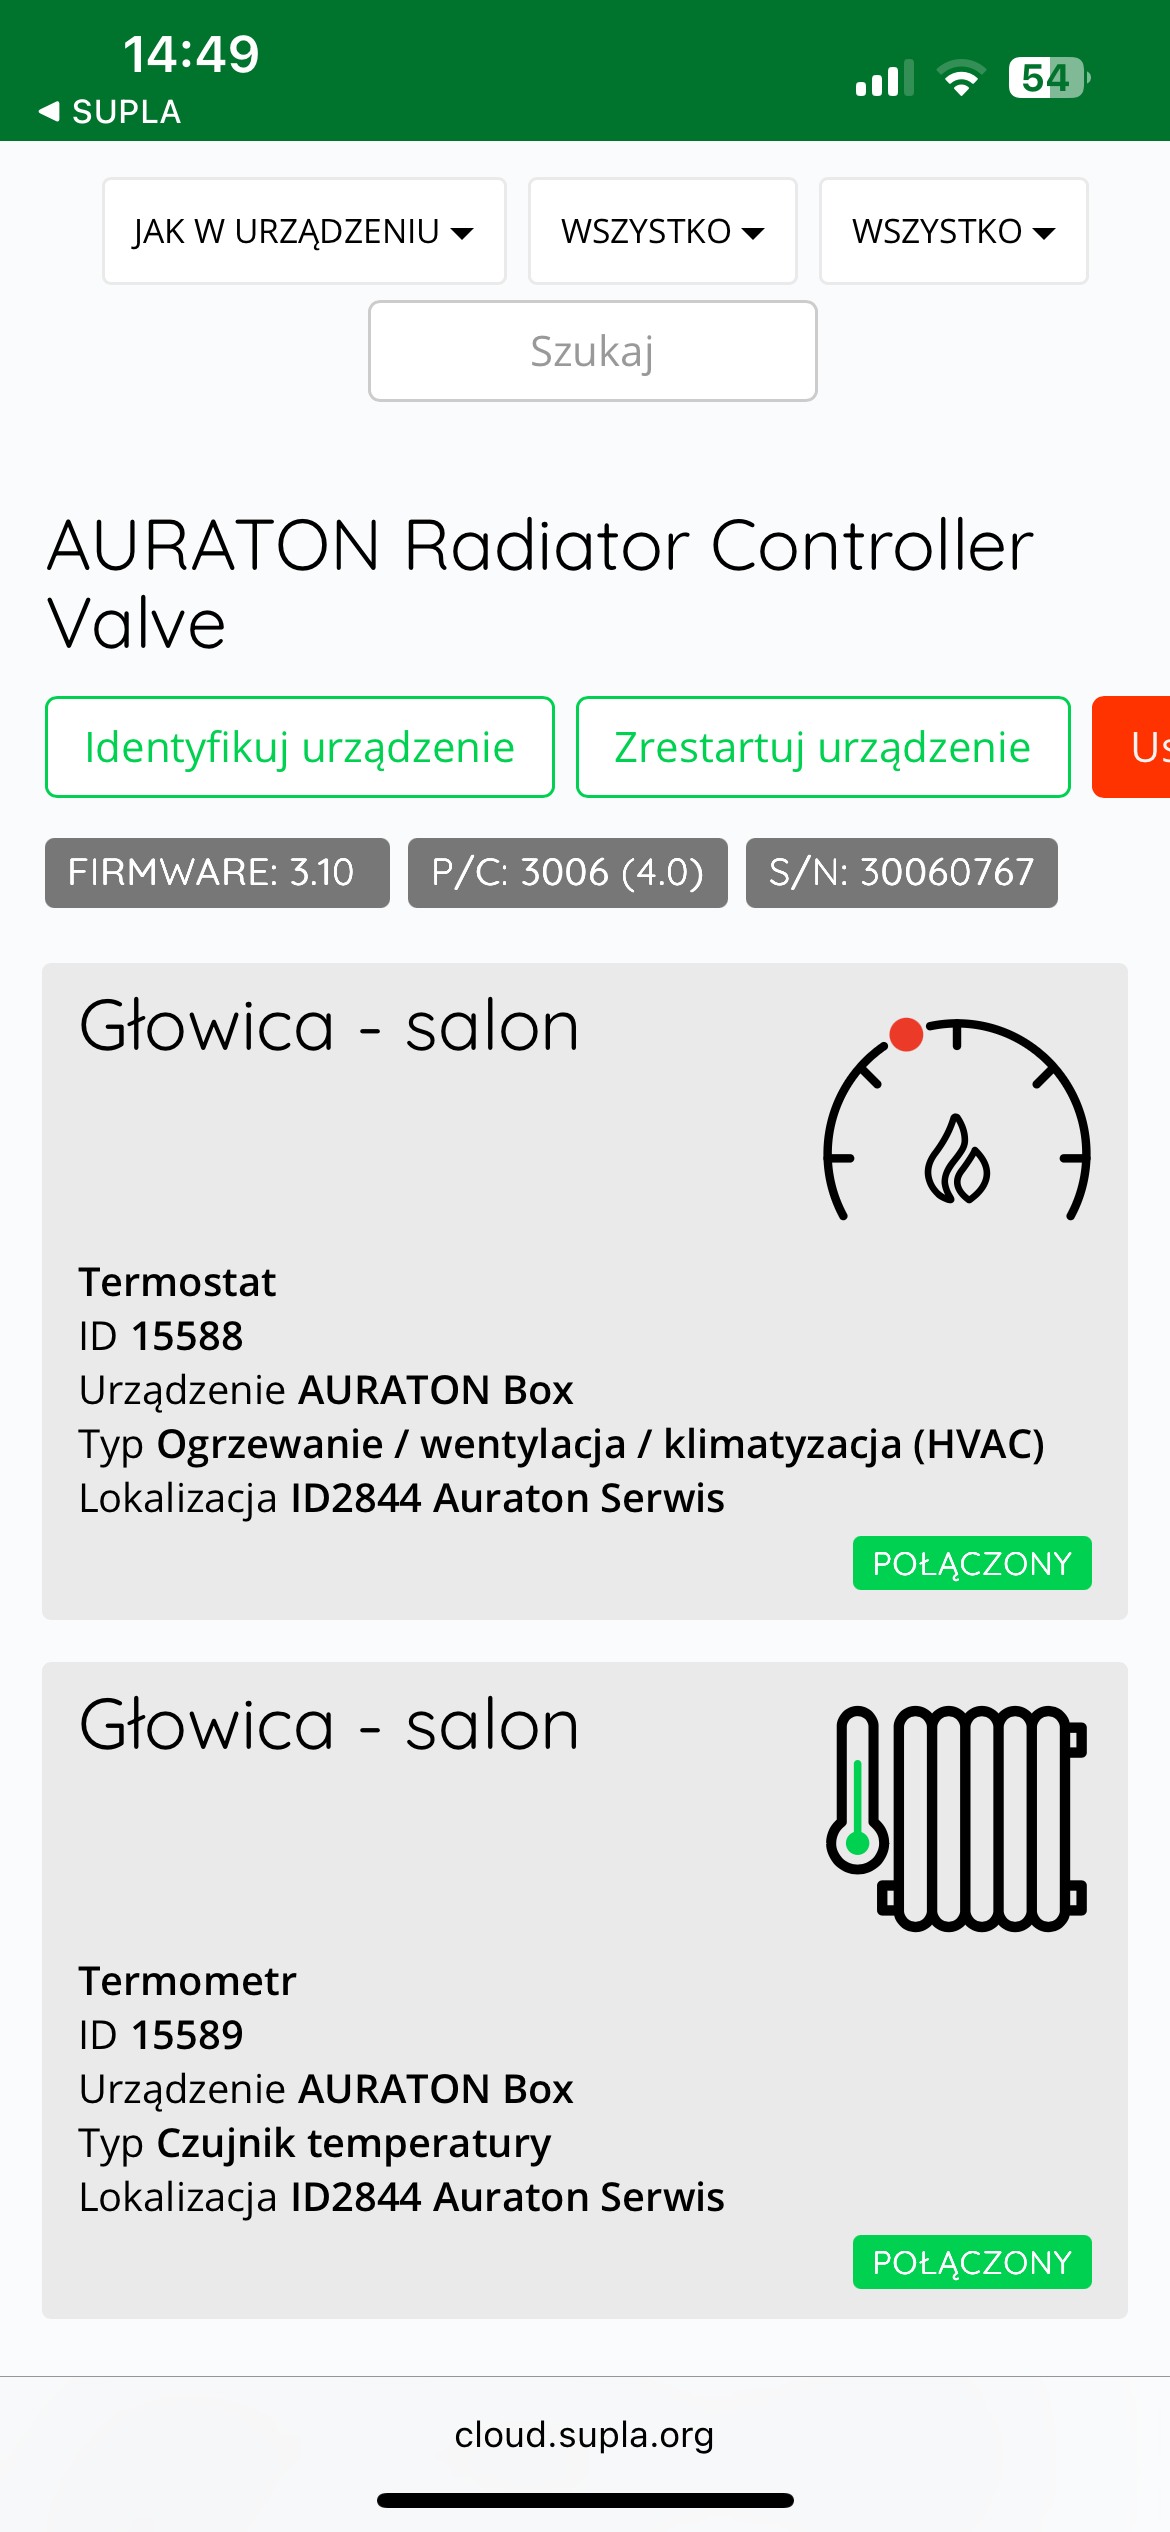
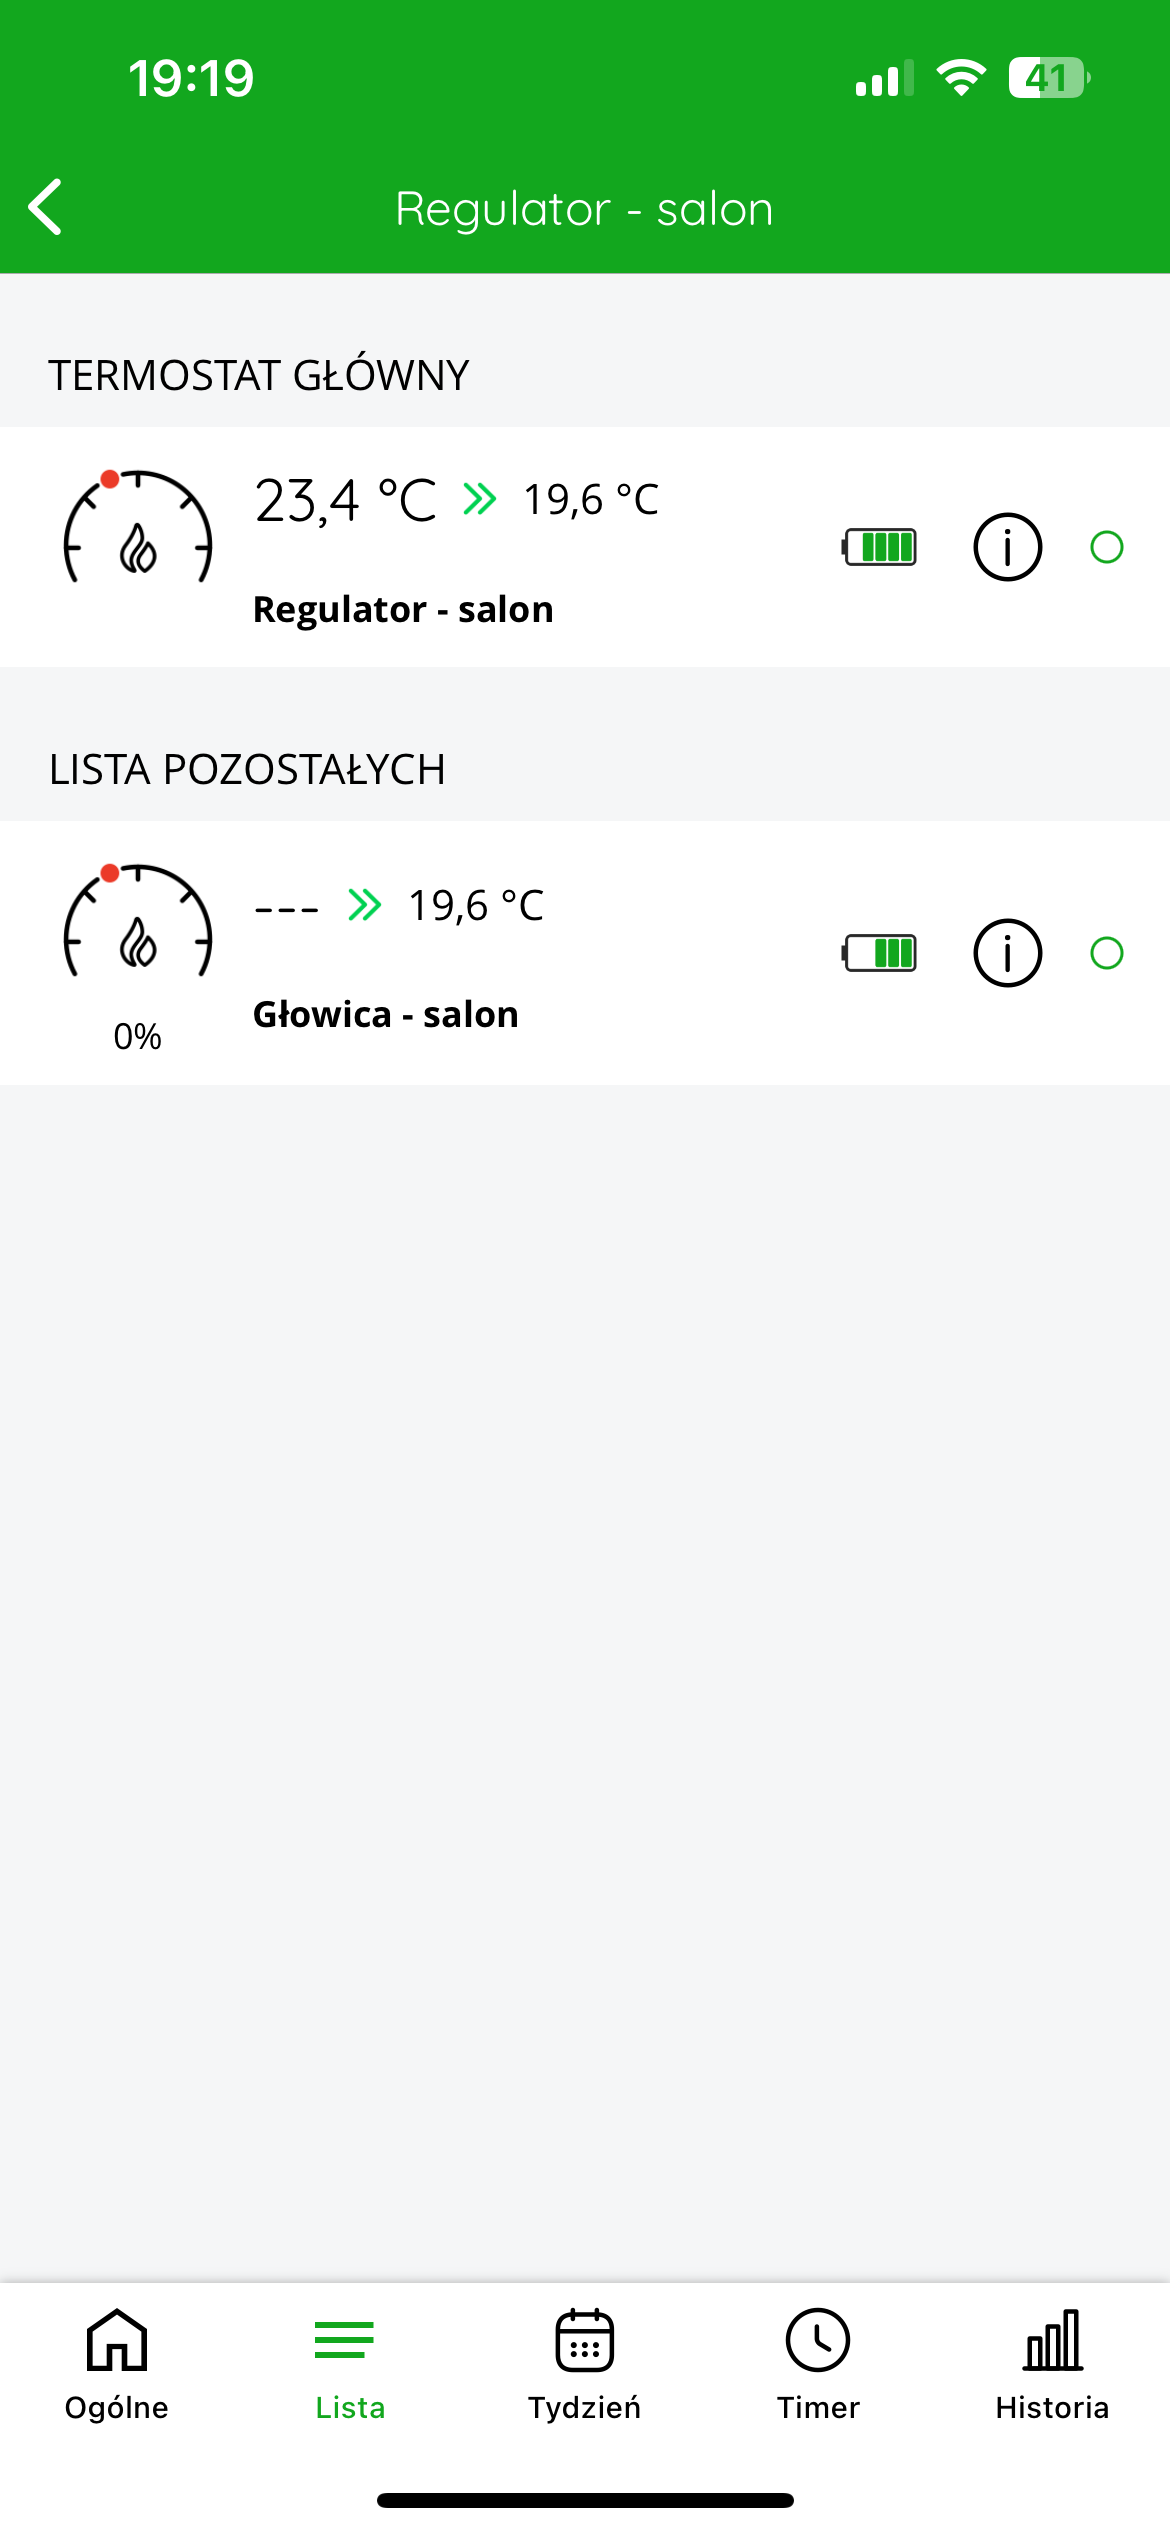
"List" tab will appear at the bottom of the screen , after clicking on which you can see which devices are connected to each other.
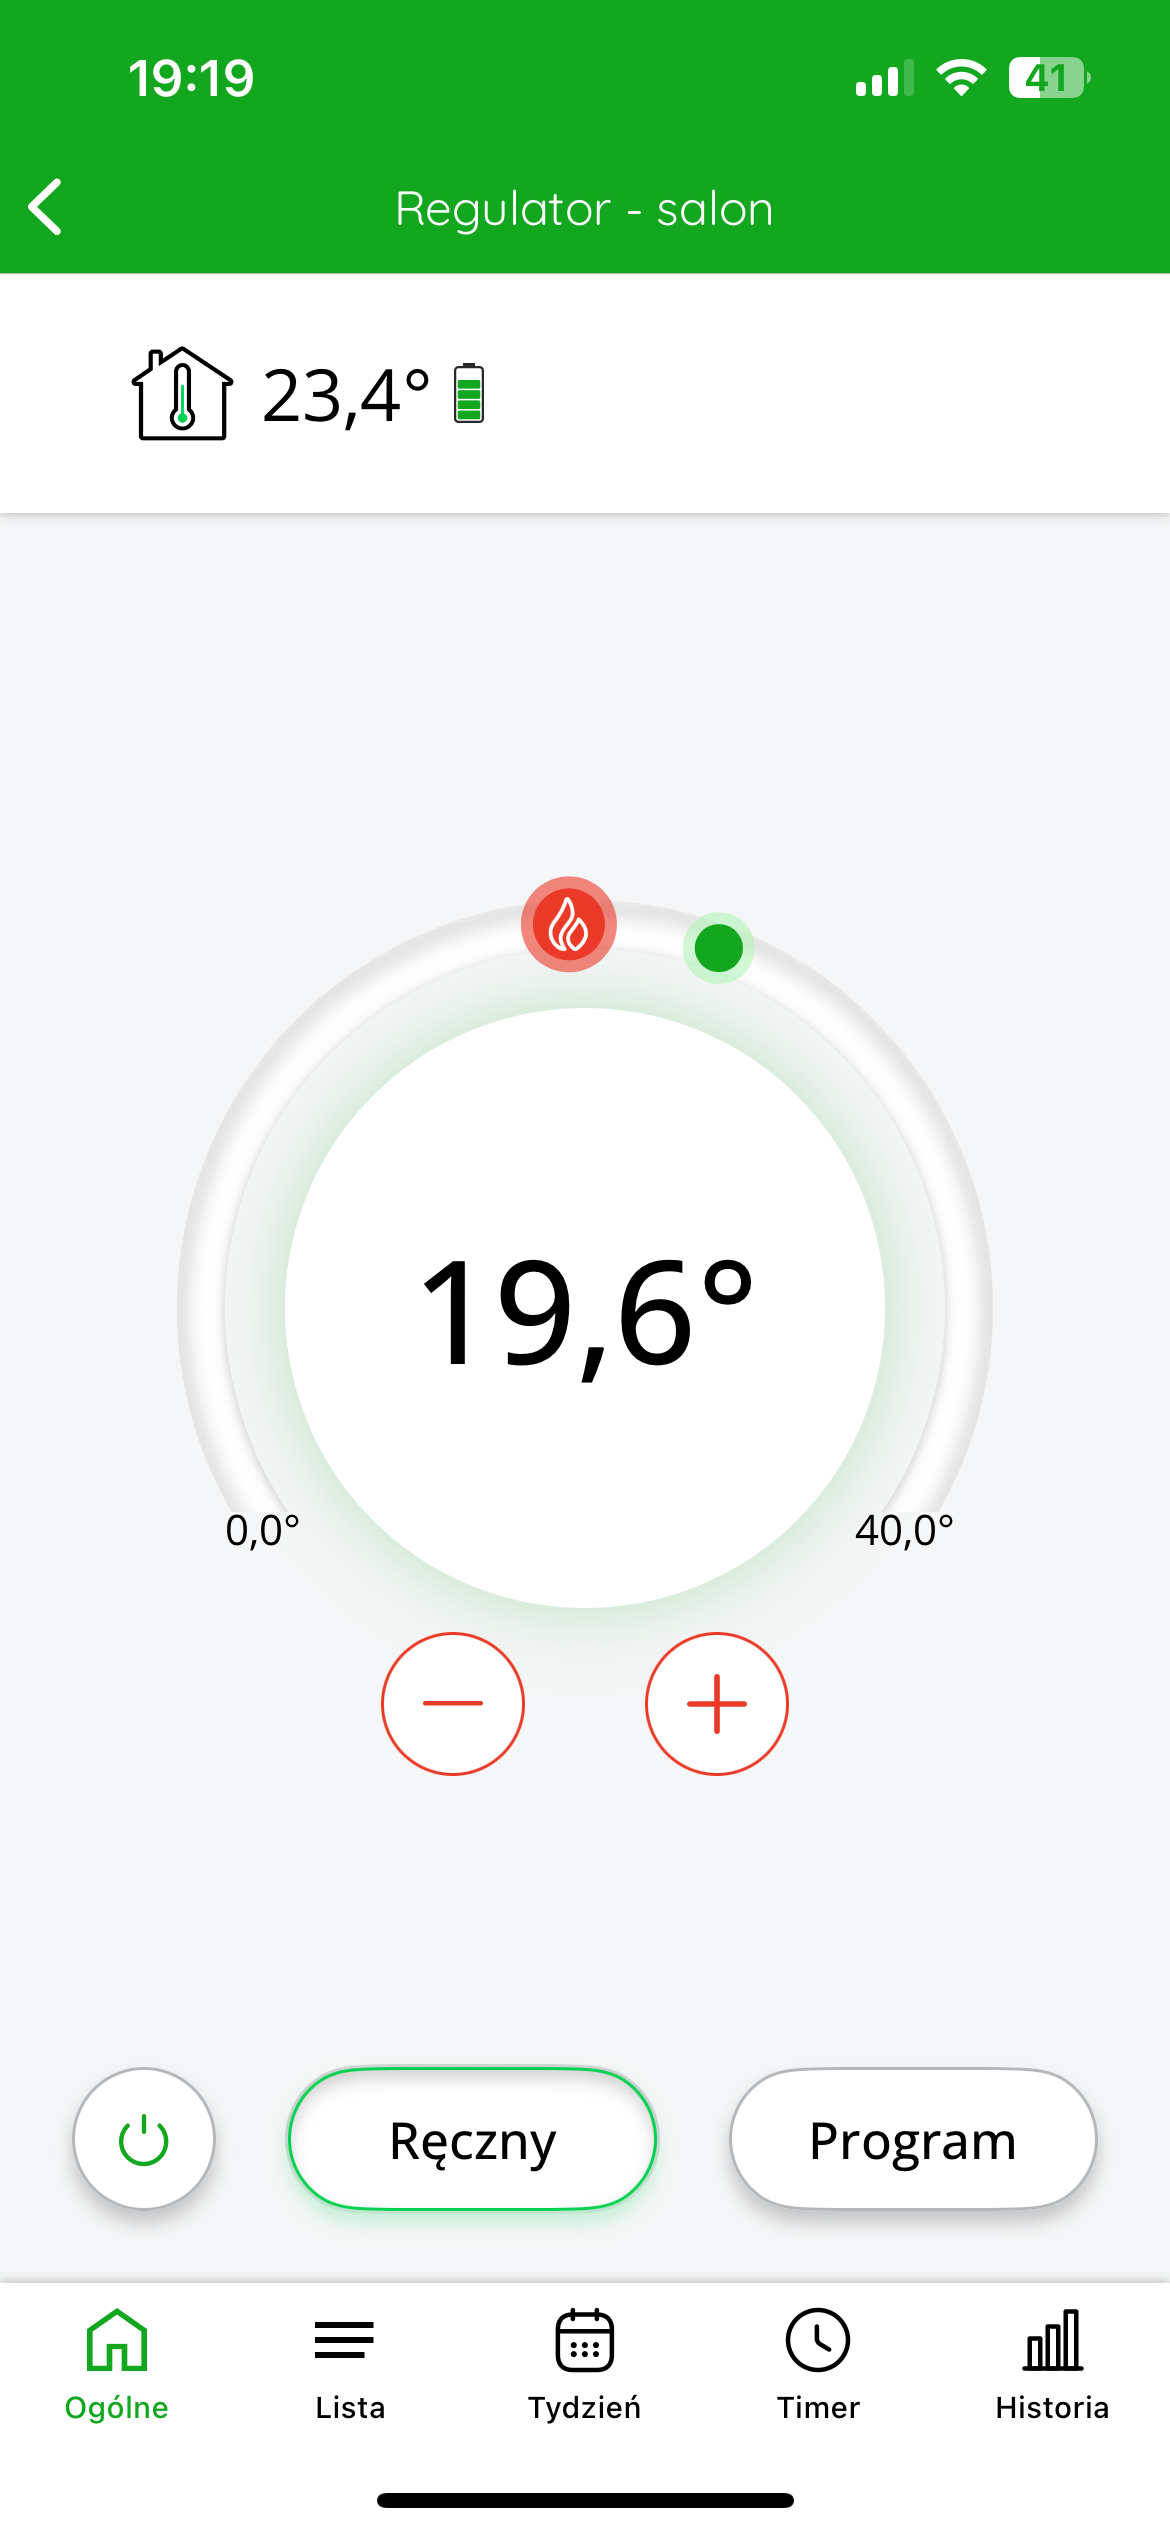
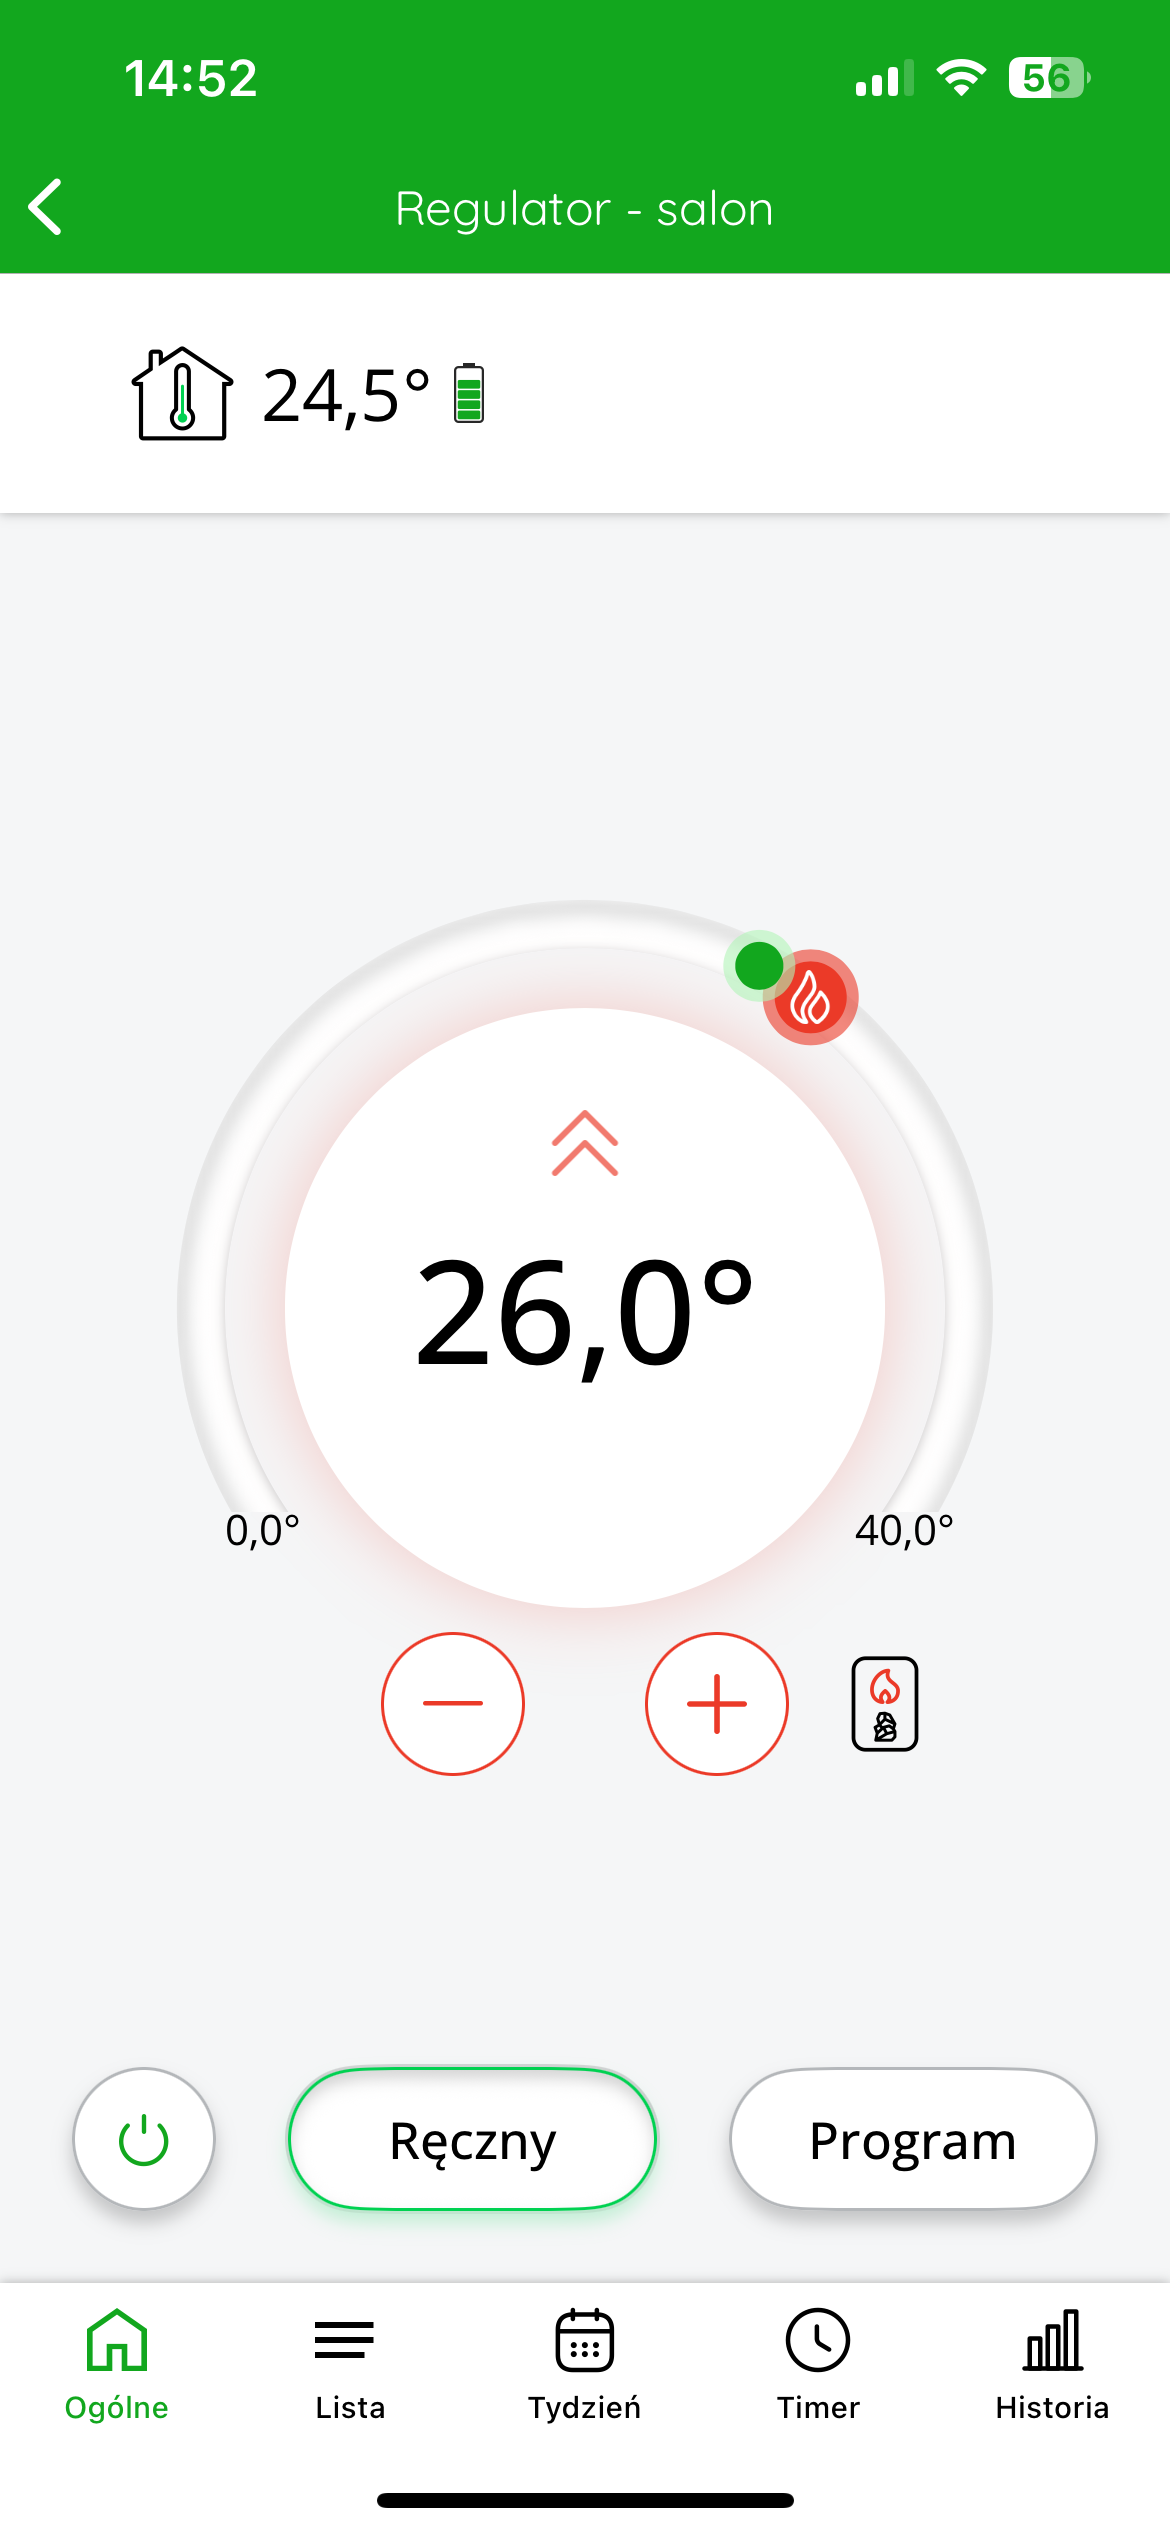
The top left of the display shows the temperature measured The target temperature is displayed in the center of the screen .
You can coarsely adjust the target temperature by moving the red slider. For more precise settings, use the "+" or "-" .
Cooperation of the AURATON Radiator Controller head with the AURATON Temperature Sensor Indoor thermometer in the SUPLA application
Goal: We have radiator heating in our home. We want AURATON Radiator Controller radiator heads to control the radiators based not on temperature measurements from their own sensors, but on assigned AURATON Temperature Sensor Indoor thermometers.
Solution: In the Supla app, select " Supla Cloud " from the Menu and log in. Then, enter the AURATON Box gateway channel. Then, enter the AURATON Radiator Controller thermostat channel (e.g., " Head - living room "Thermometer configuration" field , select the AURATON Temperature Sensor Indoor thermometer assigned to the given head as the "Main thermometer" (e.g., "Thermometer - living room" ). Finally, save everything by pressing the " Save changes" . Proceed similarly for each pair of devices: AURATON Radiator Controller radiator head + AURATON Temperature Sensor Indoor thermometer. If one AURATON Temperature Sensor Indoor thermometer is to measure the temperature to control more than one head in a room, then select the same thermometer as the "Main thermometer" in the thermostat channels of the other controlled heads.
In the application, after entering a given head, we gain the ability to control the target temperature of the room in which the devices are located.
The top left of the display shows the temperature measured The target temperature is displayed in the center of the screen .
You can coarsely adjust the target temperature by moving the red slider. For more precise settings, use the "+" or "-" .
In the figure below on the left : (target) temperature measured temperature : 25°C; valve status: closed – no active heating; ring around the set temperature value : light – symbolizes no flow.
In the figure below on the right : (target) temperature measured temperature : 25°C; valve status: 100% open – heating; ring around the set temperature value : red – indicates that the valve is fully open and heating is active.
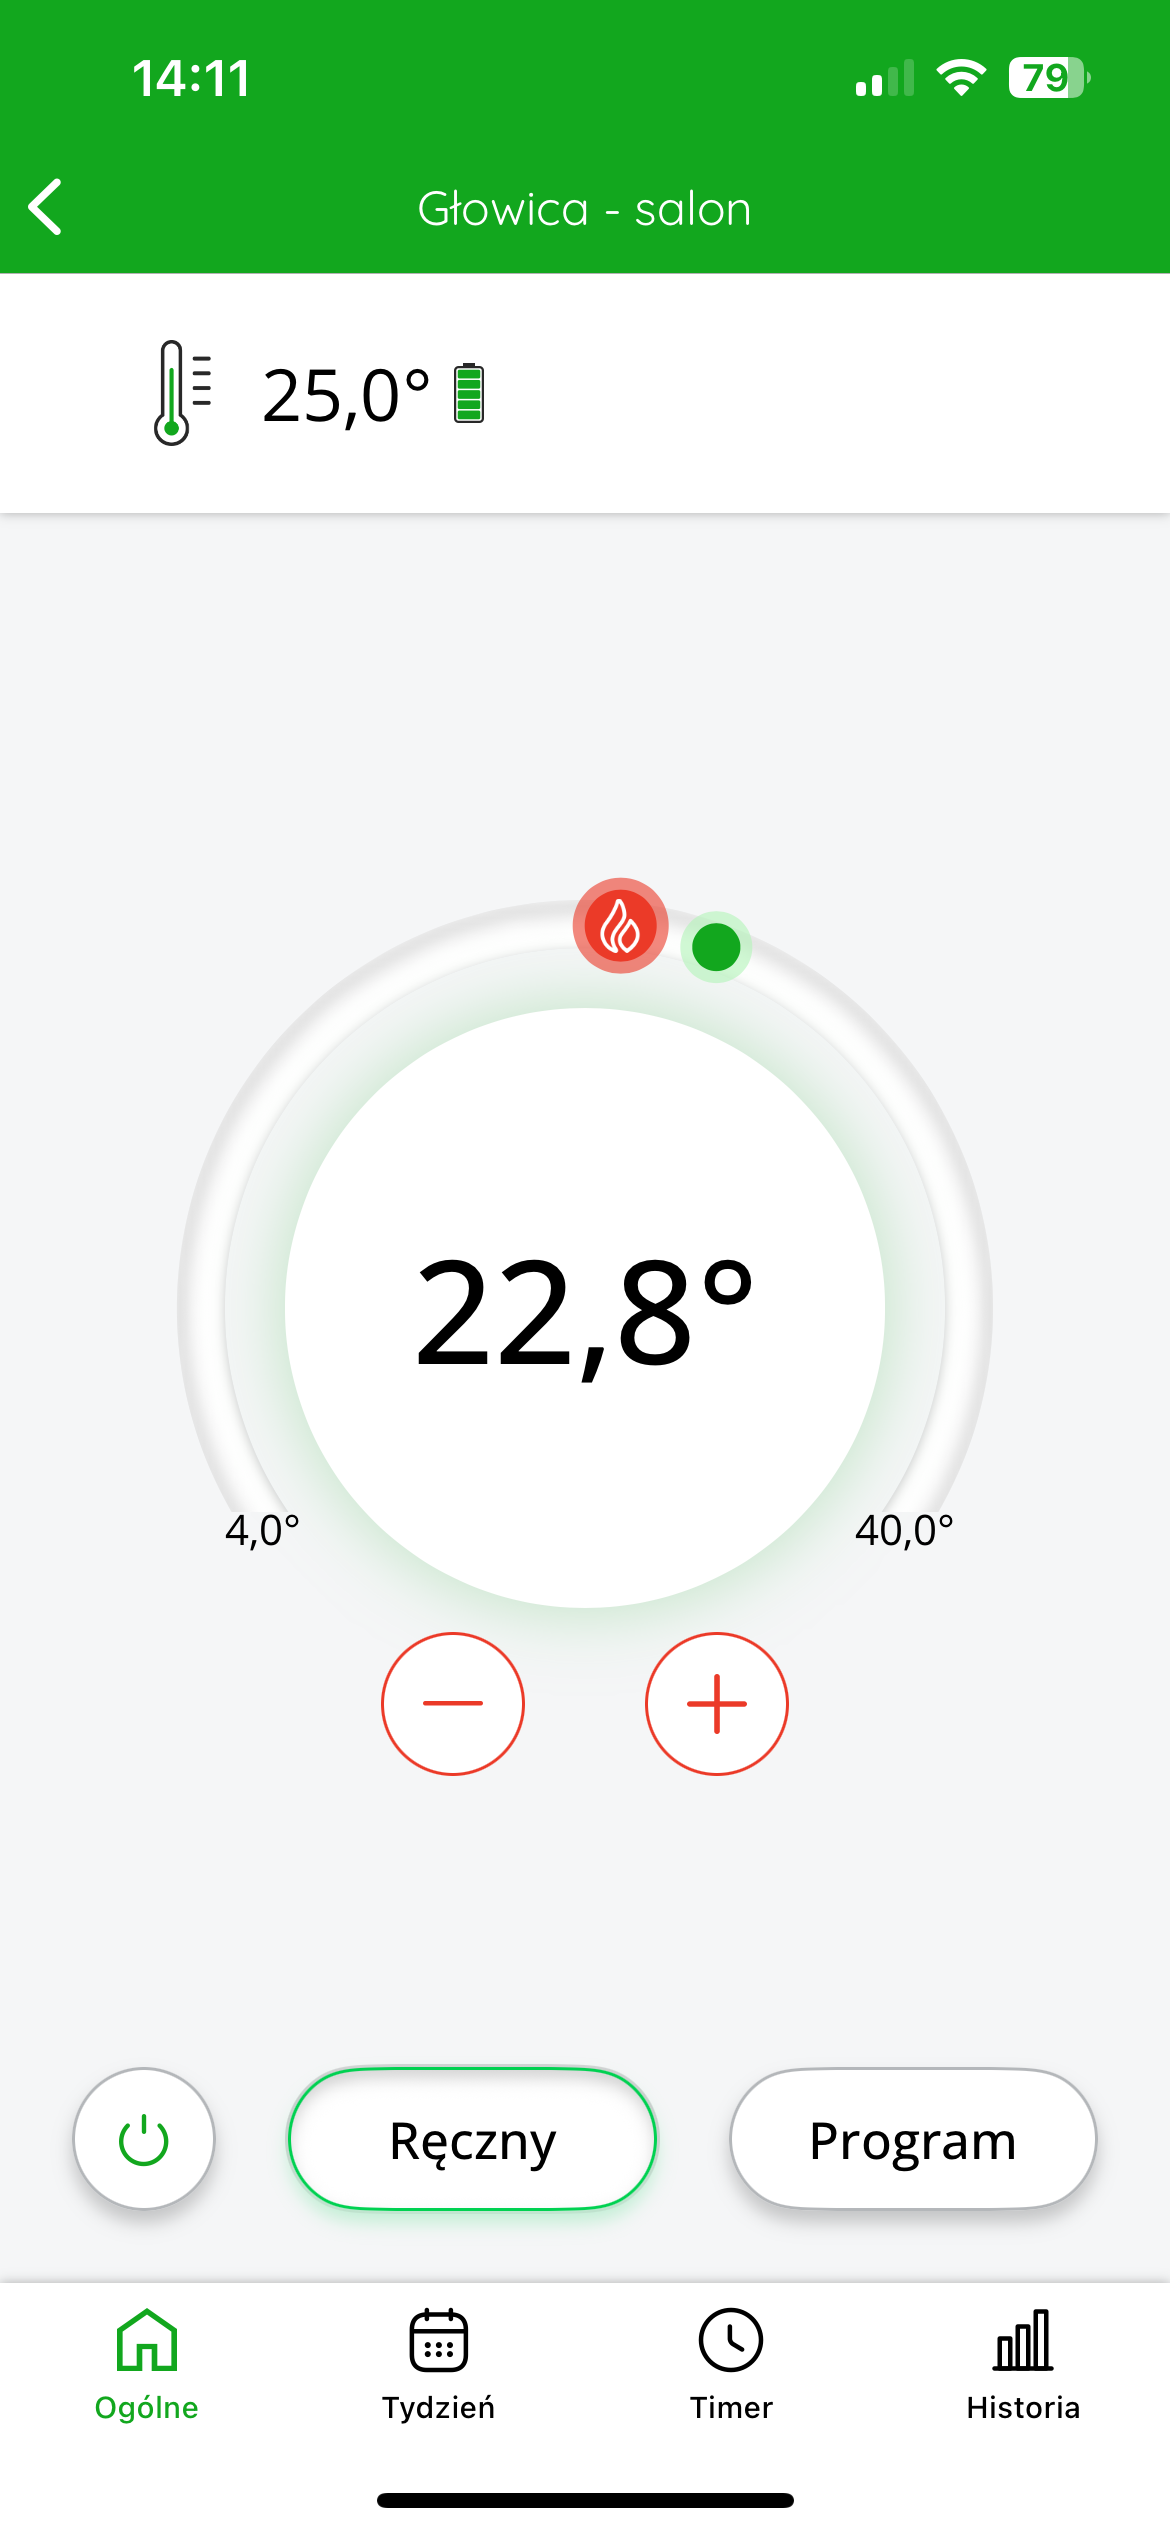
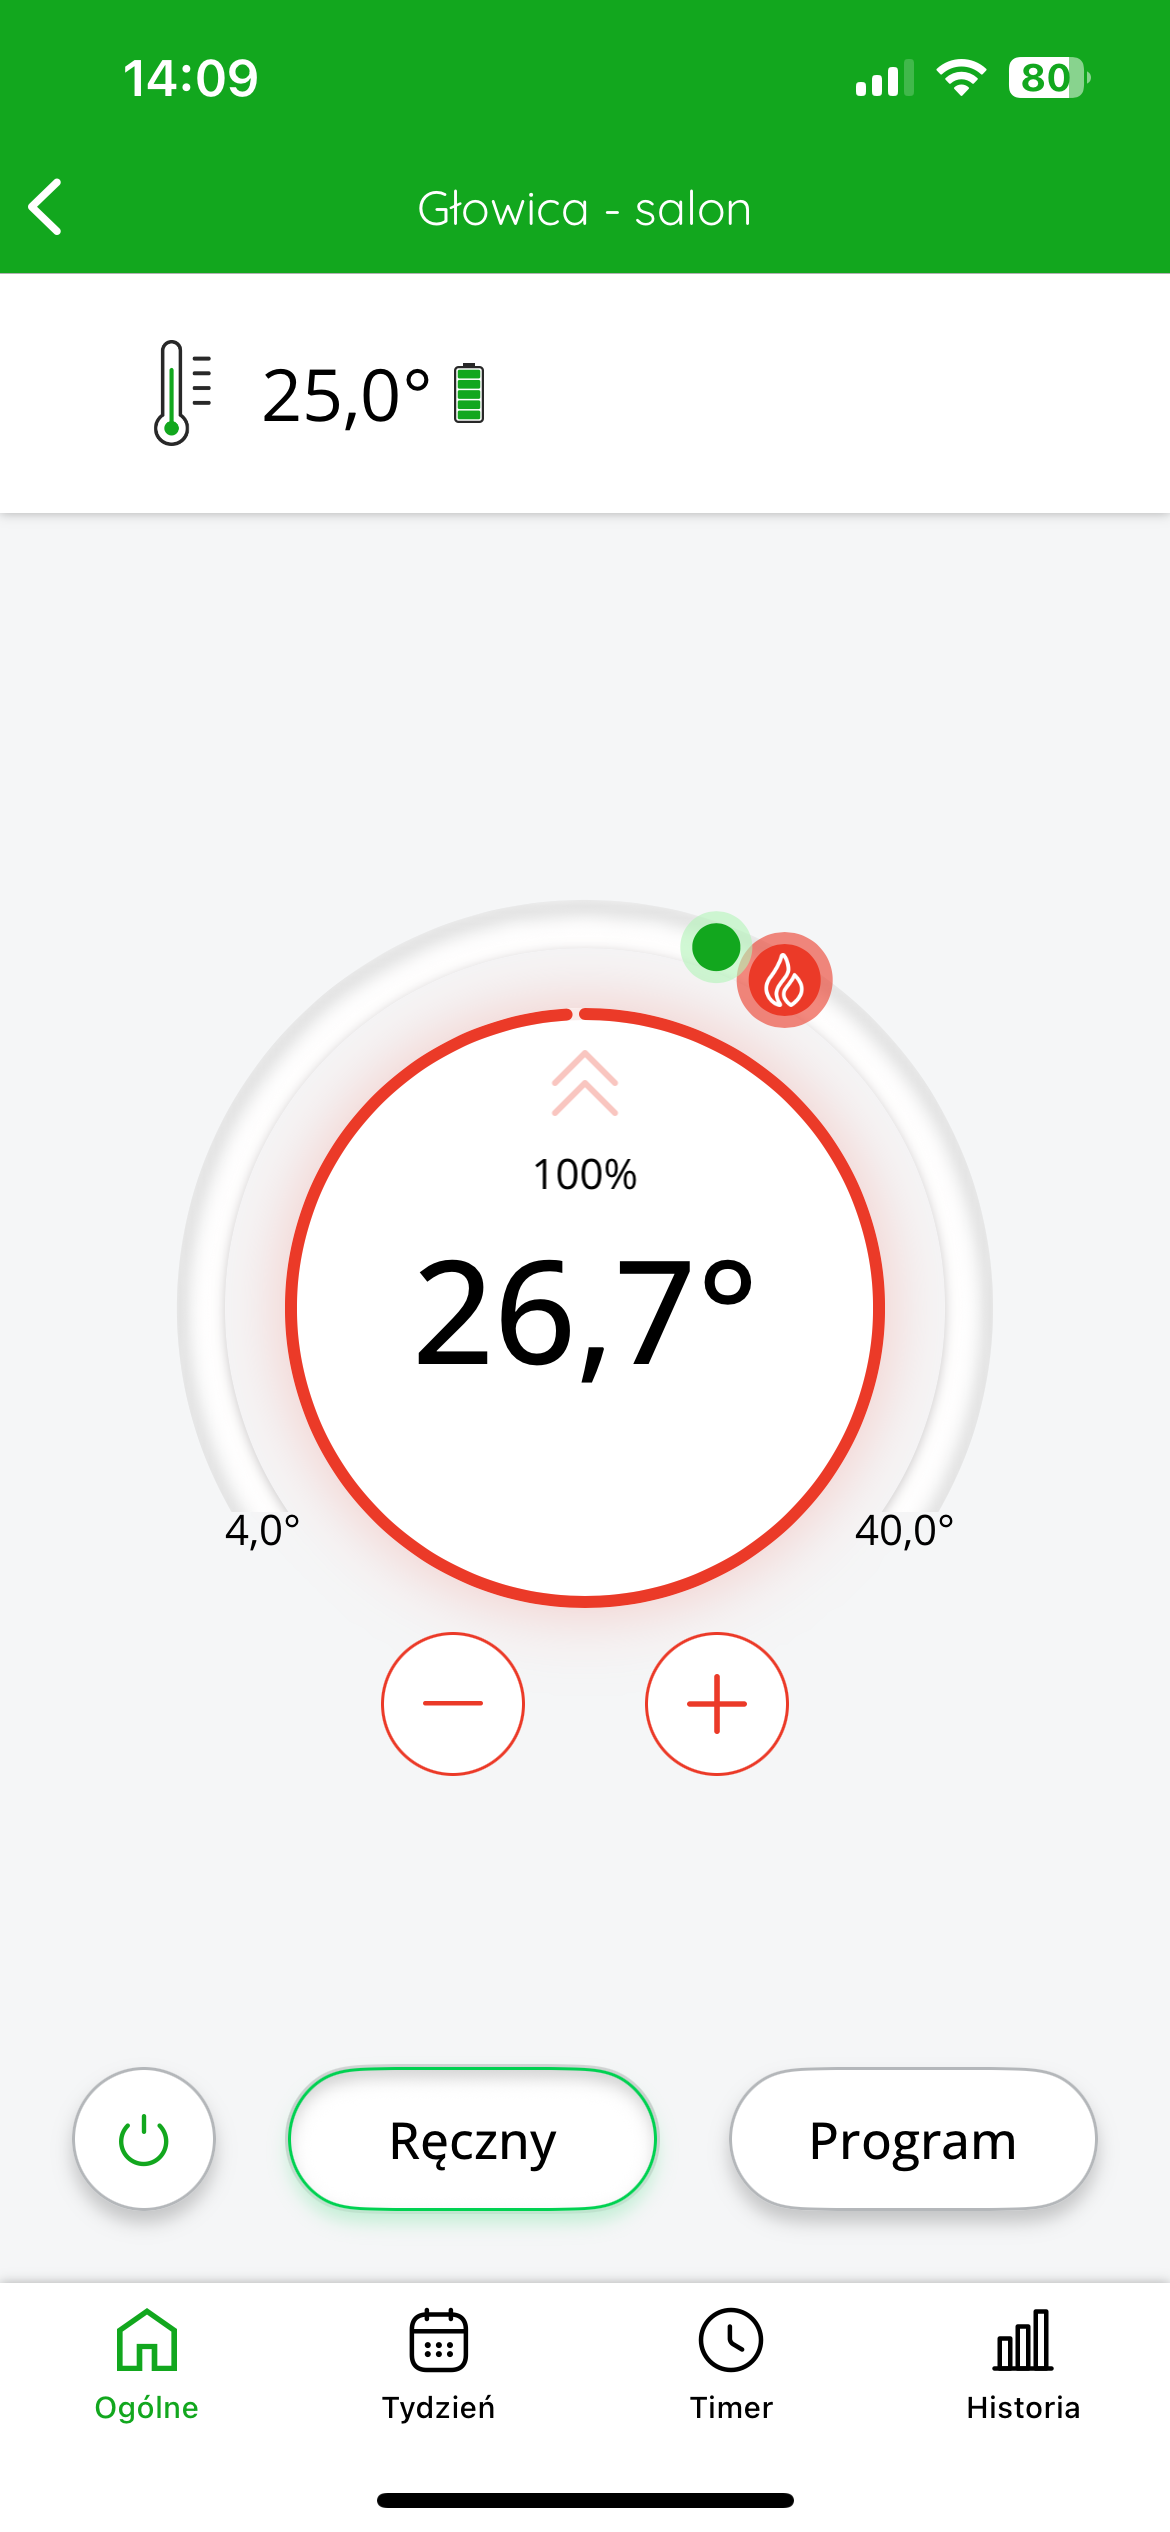
The valve can operate smoothly – meaning it doesn't operate in increments (open/closed), but can set the valve to any value between 0% and 100% , depending on heating demand. This allows for precise heat dispensing, increasing thermal comfort while reducing energy consumption.
Cooperation of the AURATON Radiator Controller head with the AURATON Heater Controller heating device controller in the SUPLA application
If you have a radiator heating system and use the AURATON Heater Controller to switch on the furnace, it is possible to link all installed AURATON Radiator Controller heads with this controller to enable automatic control of the heat source.
To configure cooperation between the radiator heads and the controller, log in to Supla Cloud and go to the AURATON Box gateway channel . Then, enter the radiator head's thermostat channel , for example, "Head – Living Room."
Next, expand the "Behavior" and in the "Heating or cooling source switch" , select the device that is responsible for turning on the furnace - usually it will be "Furnace controller" or "Heater Controller".
After making your selection, click the "Save changes" to confirm your settings.
This operation must be repeated for each AURATON Radiator Controller radiator head that we want to associate with the furnace controller.
From this point on, whenever any of the heads requests heat, the AURATON Heater Controller will start the furnace. The furnace will operate until the set temperature in the given room is reached.
Cooperation of the AURATON Radiator Controller head with the AURATON Floor Heating Controller wireless underfloor heating strip
It is possible to set the relationship so that when a heating command appears for a given radiator head, the system will automatically start the furnace via the furnace control connector in the AURATON Floor Heating Controller strip.
To configure this functionality, you must log in to the SUPLA Cloud .
Then go to the AURATON Box .
The next step is to go to the thermostat of the radiator head, e.g. "Head - living room".
In the "Behavior" , in the "Heat or cooling source switch" select the heater channel of the AURATON Floor Heating Controller strip .
Additionally – if it has not been done before – go to the “Master Thermostat” and select the appropriate AURATON Heat Monitor temperature controller assigned to this head (e.g. “Regulator – living room”).
Then, in the "Main Thermometer" , select the same temperature controller.
Finally, save all changes you have made by clicking the "Save Changes" .
Proceed in the same way with each subsequent AURATON Radiator Controller head if you also want it to control the furnace via the control connector in the AURATON Floor Heating Controller strip.

Other configuration settings in SUPLA Cloud
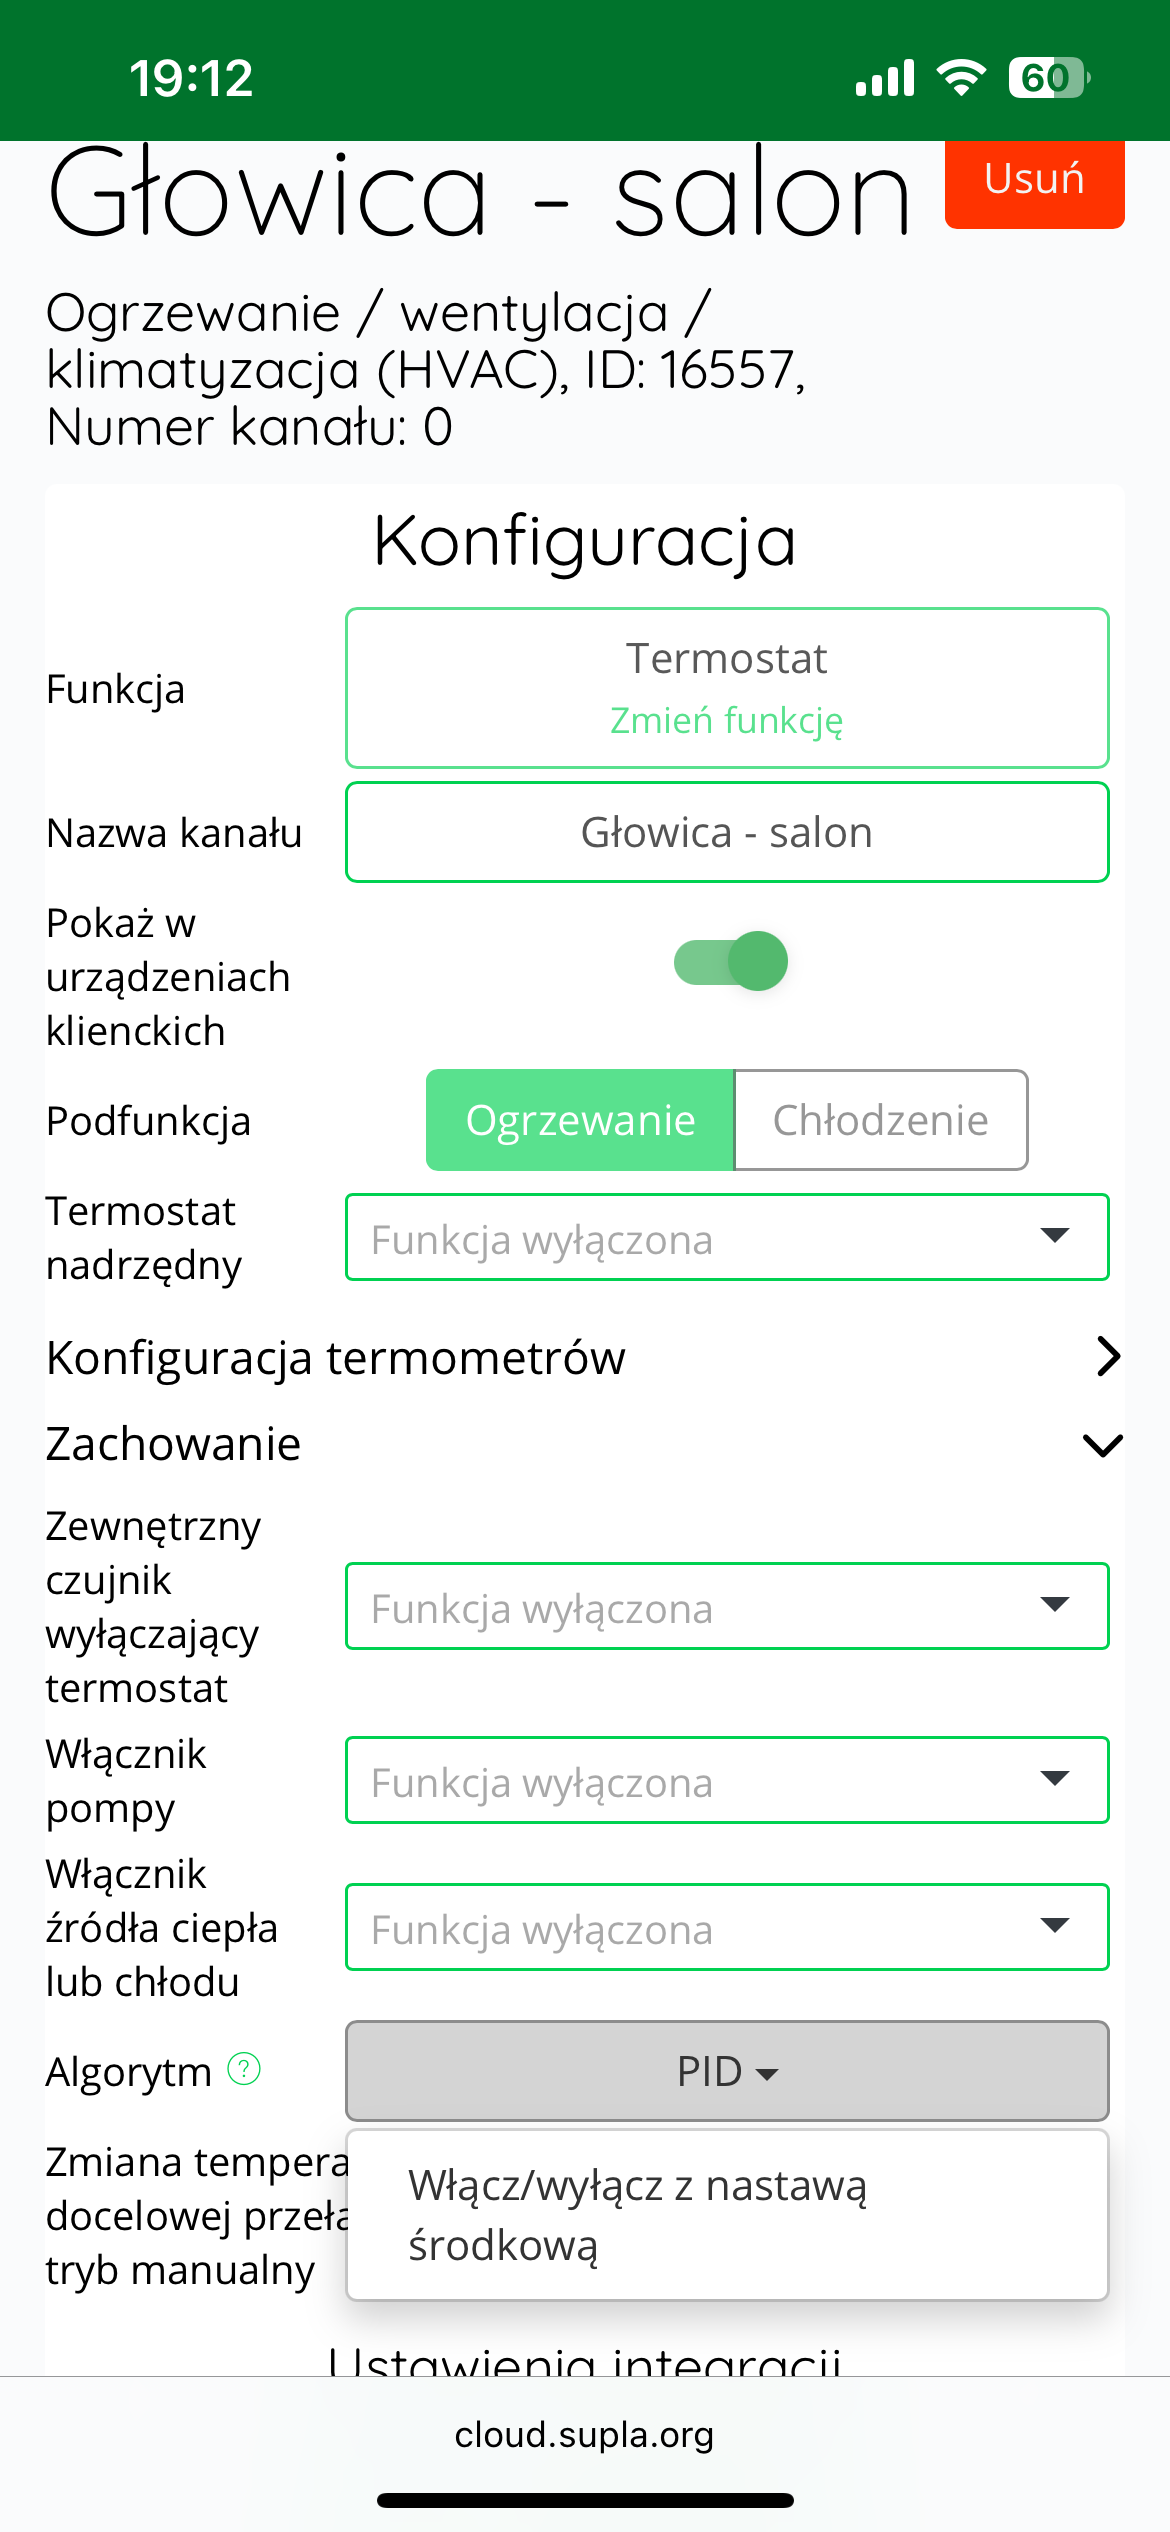
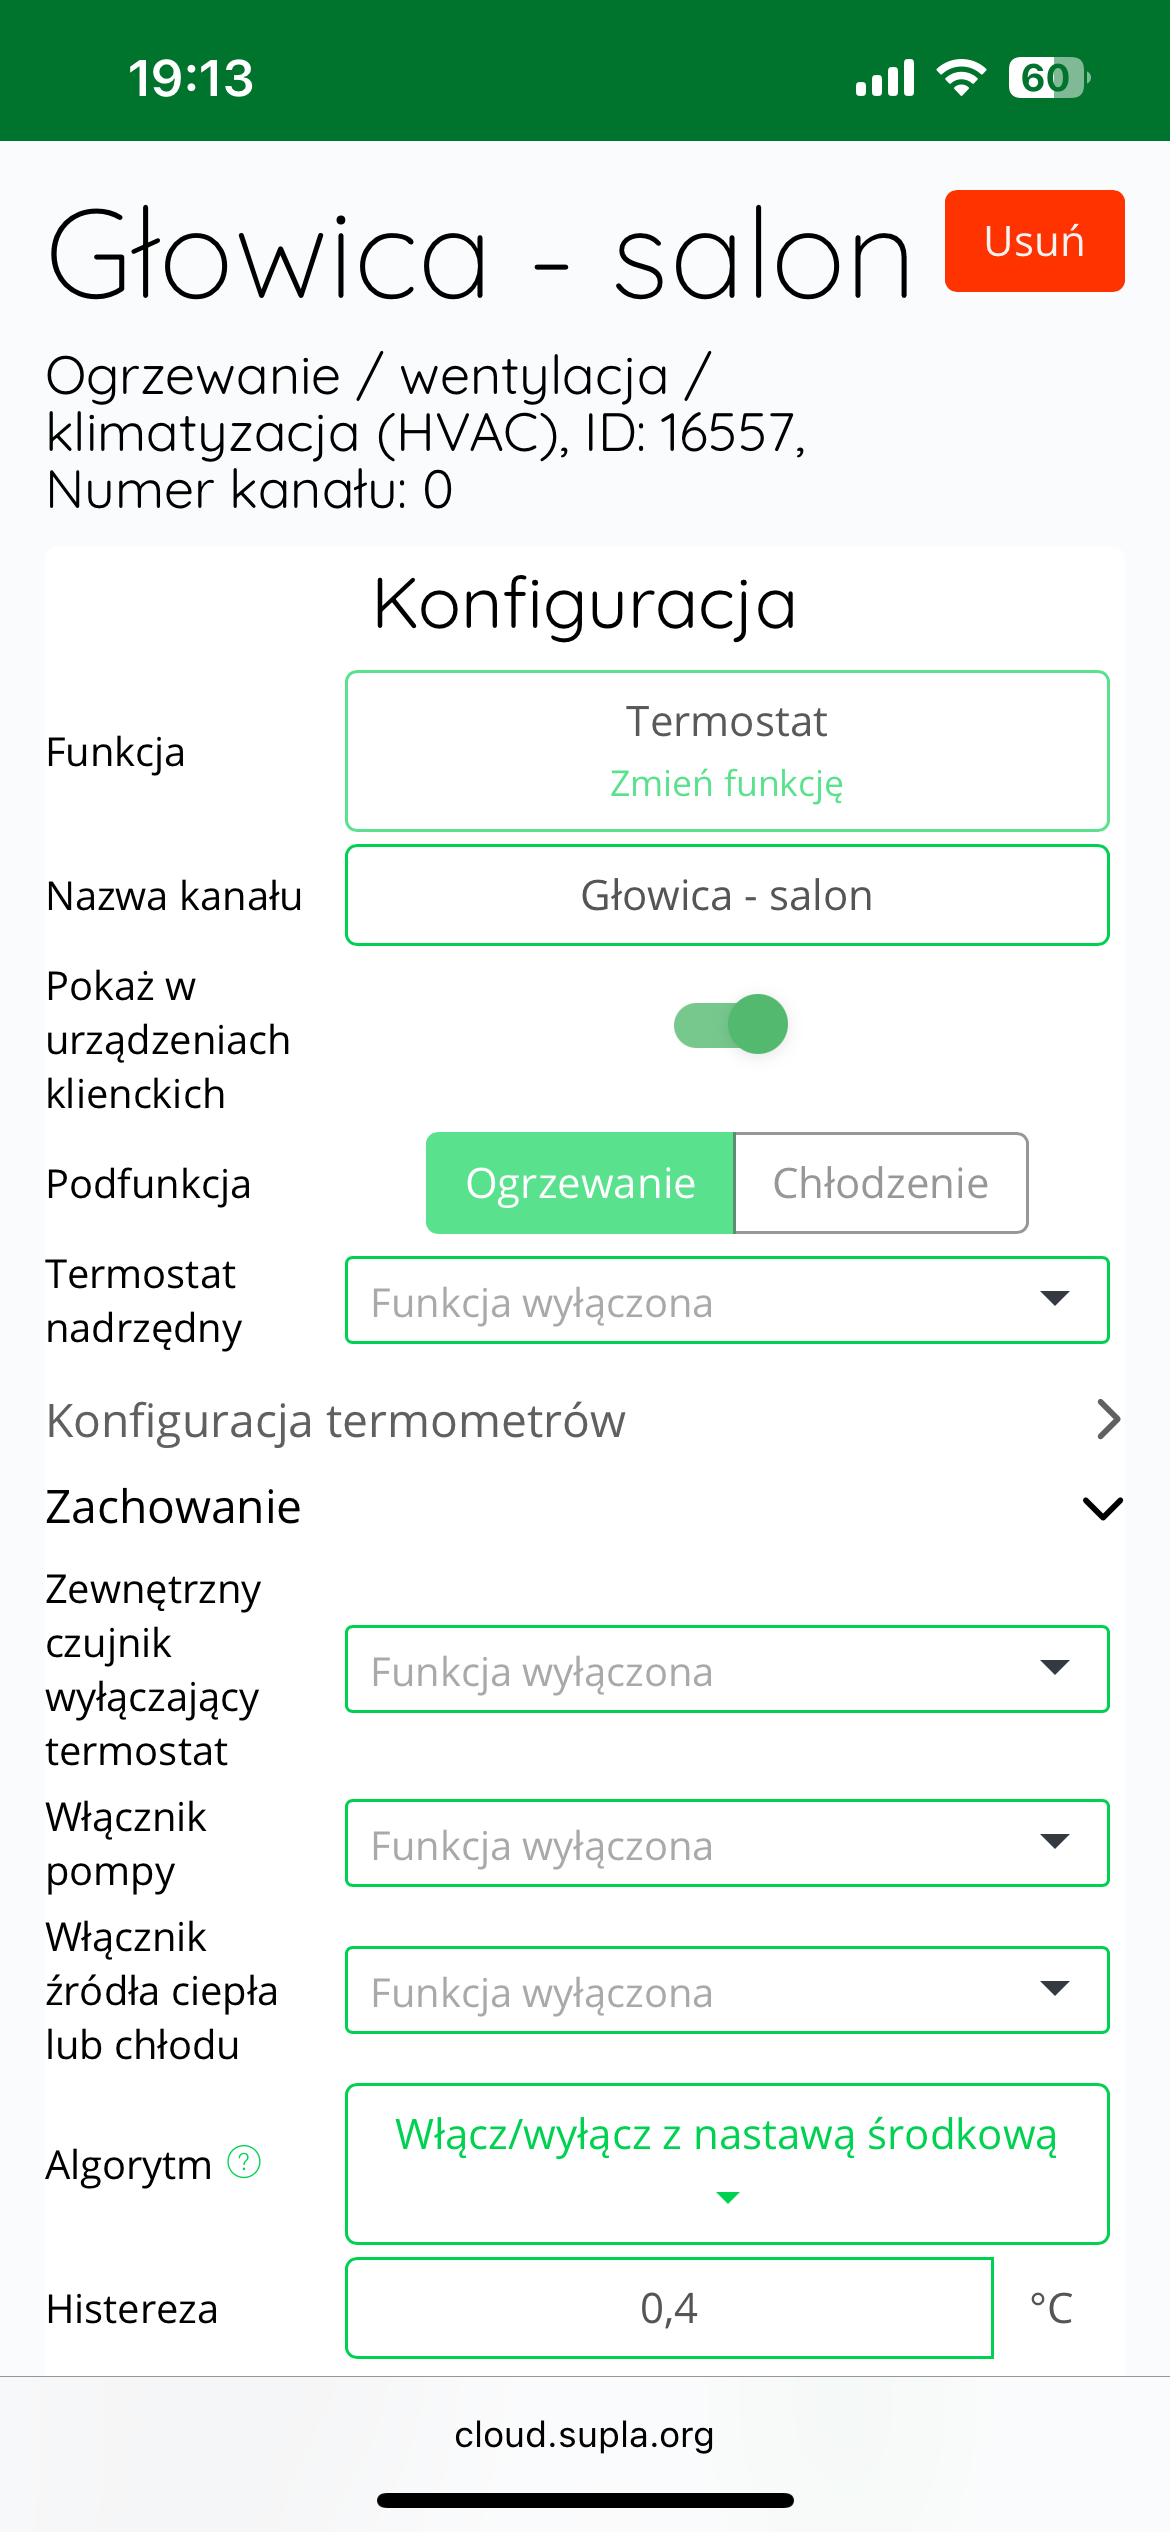
PID algorithm and hysteresis
The AURATON Radiator Controller head operates in PID (Proportional-Integral-Derivative) mode by default.
This advanced algorithm not only responds to the current difference between the setpoint and measured temperature but also learns the room's dynamics and gradually adjusts the valve control method. This helps maintain a stable temperature without dramatic fluctuations – ensuring greater thermal comfort and greater energy efficiency.
In certain situations—for example, in very small rooms, with a non-standard heating system, or when the user prefers a simpler approach— the operating mode can be changed to traditional hysteresis mode . In this mode, the head turns the heat supply on or off when a pre-set temperature threshold is exceeded , which is a simpler but less precise solution.
To change the control algorithm, log in to SUPLA Cloud and go to the AURATON Box gateway . Then, enter the AURATON Radiator Controller thermostat channel (e.g., "Head – living room"). In the next step, expand the "Behavior" . In the "Algorithm" , change the value from "PID" to . "
After making this change, a new field will appear: "Hysteresis ." By default, its value is 0.4°C , which means a deviation of ±0.2°C around the set temperature.
The user can edit the hysteresis value within the range of 0.2°C to 2.0°C (i.e. ±0.1°C to ±1.0°C). After making changes, click the "Save Changes" .
Hysteresis mode can be particularly useful for small rooms, installations with high thermal inertia, and in situations where simplicity of operation is a priority.
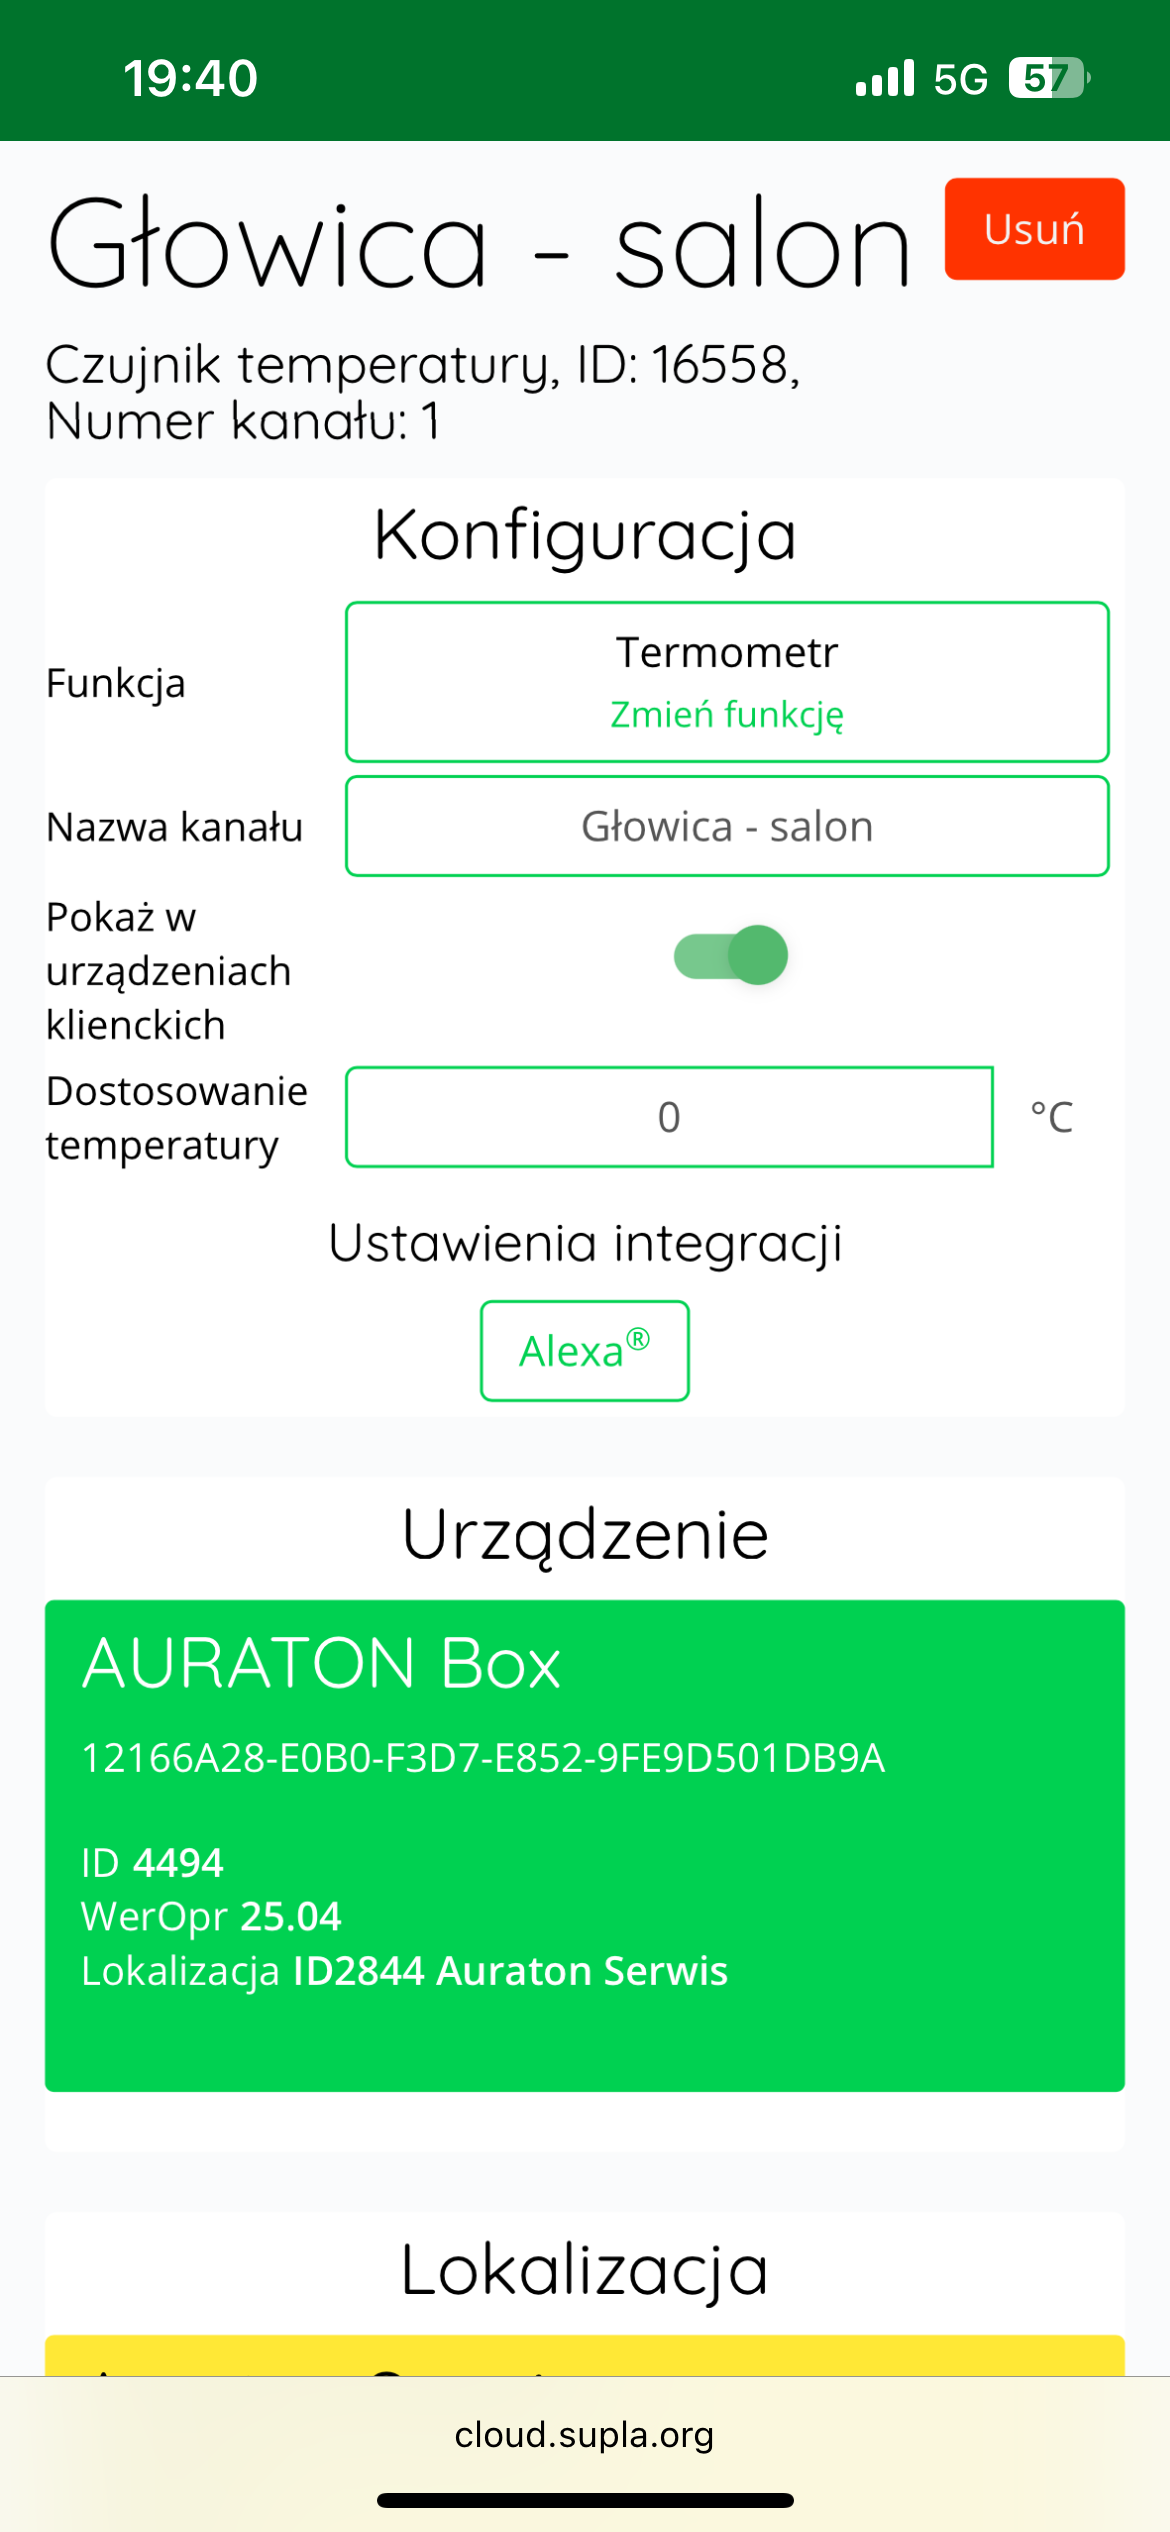
Calibration of temperature readings
If the temperature read by the internal sensor of the AURATON Radiator Controller head differs from the actual temperature in the room, the user can calibrate the temperature readings .
To adjust the reading, log in to SUPLA Cloud and then go to the AURATON Box gateway channel .
The next step is to enter the thermometer channel of the AURATON Radiator Controller head (e.g. "Head - living room").
In the "Temperature Adjustment" , the user can enter a correction value between -3.0°C and +3.0°C , with an accuracy of 0.1°C . A positive value will raise the displayed temperature, while a negative value will lower it.
After making the appropriate correction, click the "Save changes" to confirm the setting.
Technical data
| Operating temperature range (air temperature): | 0 – 45°C |
| Temperature measurement range: | 0 – 45°C |
| Temperature control range: | 0 – 40°C |
| Temperature setting accuracy: | 0.1°C |
| Temperature measurement accuracy: | 0.1°C |
| Default temperature setting: | 21°C |
| Additional function: | FrostGuard |
| Operating status check: | LED diode, sound signal |
| Maximum number of paired devices: | 3 |
| Power supply: | 2x AAA 1.5V alkaline batteries |
| Cooperation with the internet gateway | Auraton Box |
| Degree of protection | IP20 |
| Radio frequency: | 868.150MHz 868.450MHz 869.800MHz |
| Radio signal strength: | 11 dBm |
| Radio receiver category: | 2 |
| Range of action: | in a typical building, with standard wall construction – up to 30 m in open space – up to 300 m |
Disposing of the device
O
Devices are marked with a crossed-out waste bin symbol. In accordance with European Directive 2012/19/EU and the Waste Electrical and Electronic Equipment Act, this marking indicates that this equipment, after its useful life, must not be disposed of with other household waste.
Users are obligated to dispose of it at a collection point for used electrical and electronic equipment.