AURATON 2YA
Operating Manual ver. 20250316
This document contains information regarding the safety, installation, and operation of the AURATON 2YA device.
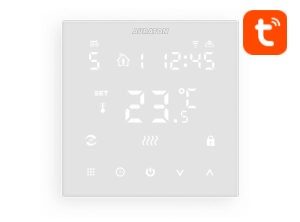
Thermostat (dual-sensor)
AURATON 2YA is a flush-mounted, wired thermostat with an additional external temperature sensor, with Wi-Fi control option, designed to work with a gas or electric heating device.
Funkcions
|
æ æ
|
Two sensors: built-in and external AURATON 2YA allows the use of 2 independent temperature sensors: internal and external. |
 |
Temperature accuracy 0,5 °C Maintains the temperature at the selected level. |
|
Î
|
Child lock The child lock prevents improper operation. |
|
]
|
Data memory Data is saved after a power outage. |
|
õ
|
Holiday mode Allows you to enjoy savings and safety during absence. |
|
é
|
External sensor temperature EXT Ability to check the temperature of the external sensor. |
Description of AURATON 2YA
Wired thermostat
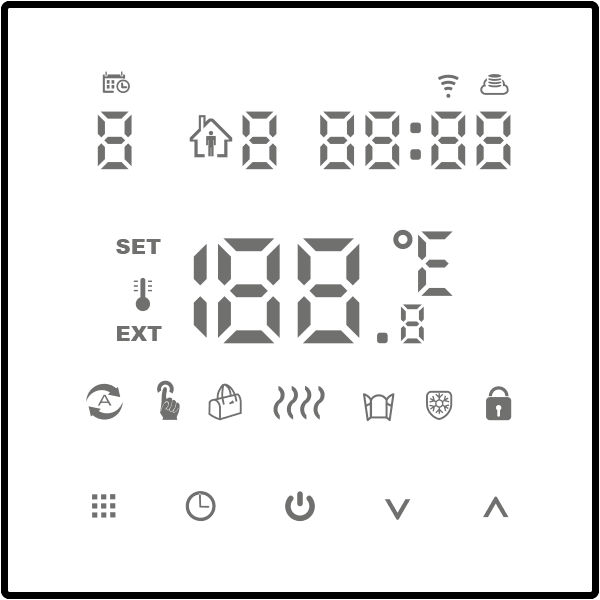
On the front of the thermostat housing there is an LED display and five touch function buttons.
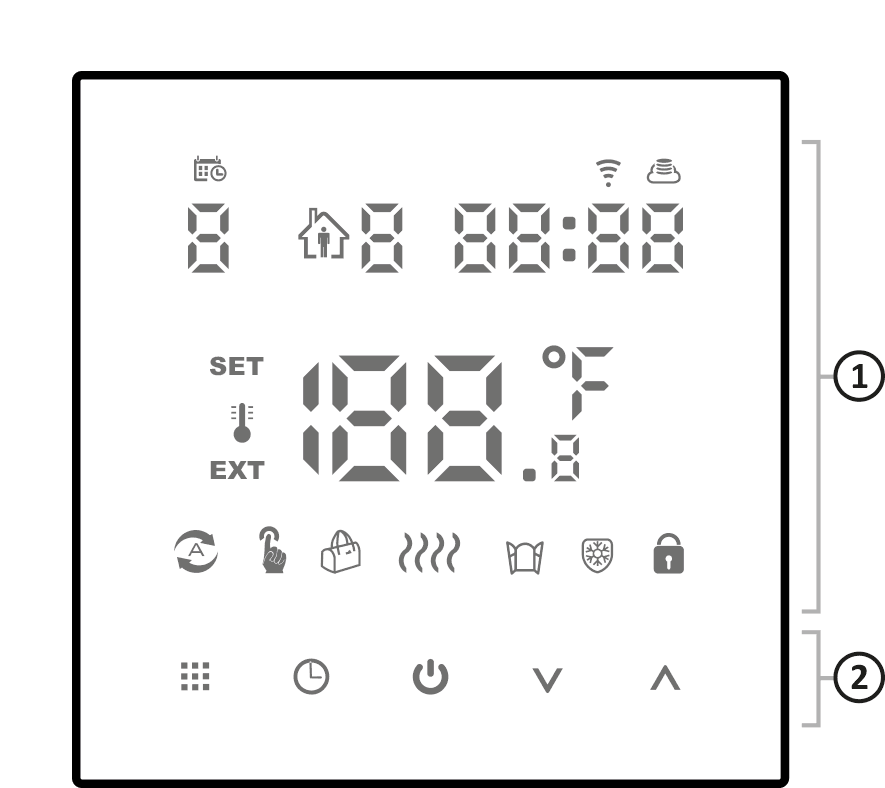
- display
- function buttons
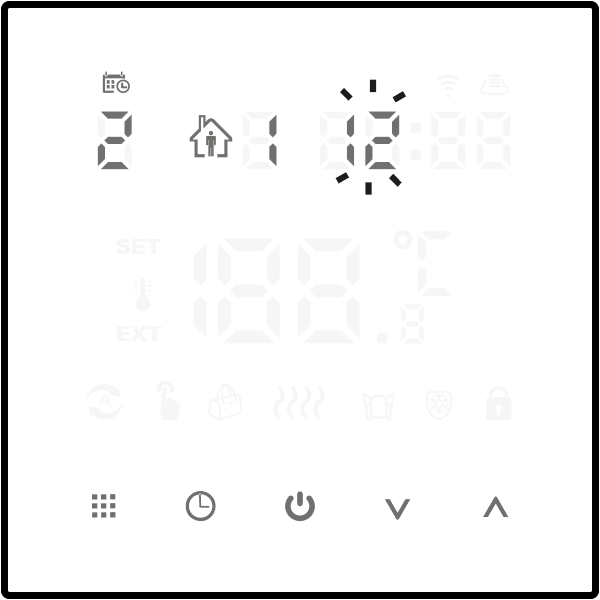
Display
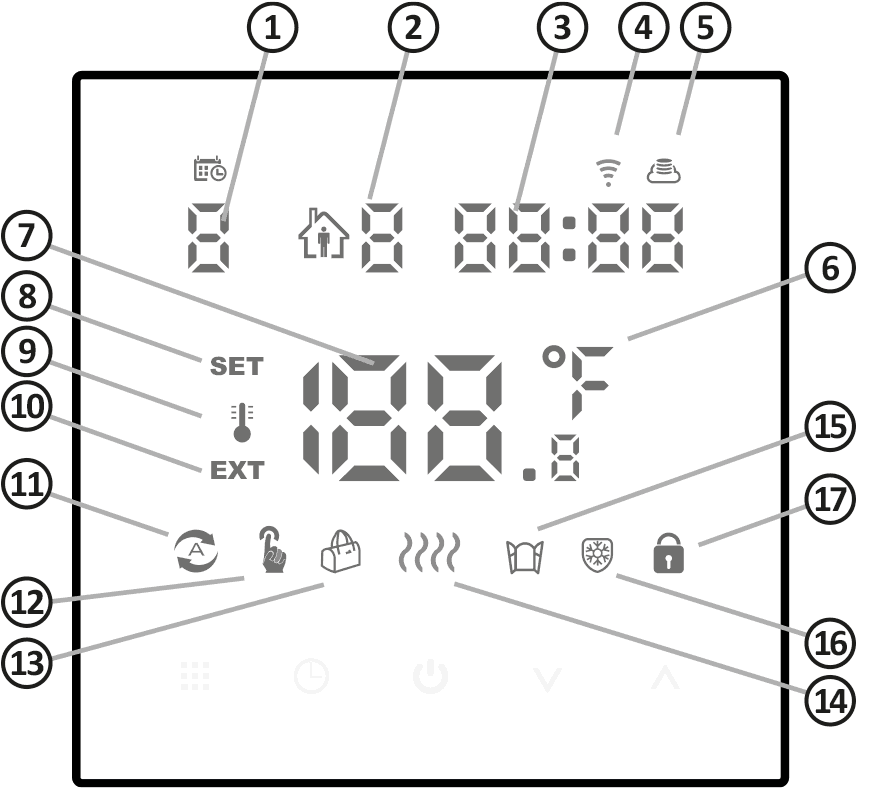
- Day of the week (1-7) – Indicates the current day of the week. Each day has an assigned number
- Work schedule number (programming). – Indicates the number of the currently implemented program (see chapter: (see chapter: “Factory programs” and “Weekly programming”).
- Clock – time is displayed in 24-hour system.
- Wi-Fi connection – indicates Wi-Fi connection.
- Cloud icon – EZ distribution mode
- Temperature unit – Informs about displaying the temperature in degrees Celsius (°C)
- Temperature – In normal operation, AURATON 2YA displays the room temperature in which it is installed or the temperature of the external sensor.
- SET – temperature setting
- Room temperature
- External NTC sensor
- Programming mode (Ü)
- Manual mode (Ö); (Ü + Ö – temporary manual mode)
- Holiday mode indicator (õ) – holiday mode, holidays and temperature can be set to work in countdown mode
- Heating – symbol visible during heating device operation
- Active window function indicator (÷)
- Cooling mode – flashing icon (â) indicates current operation of the cooling device
- Lock (Î) – indicator of the child lock function enabled.
Function buttons
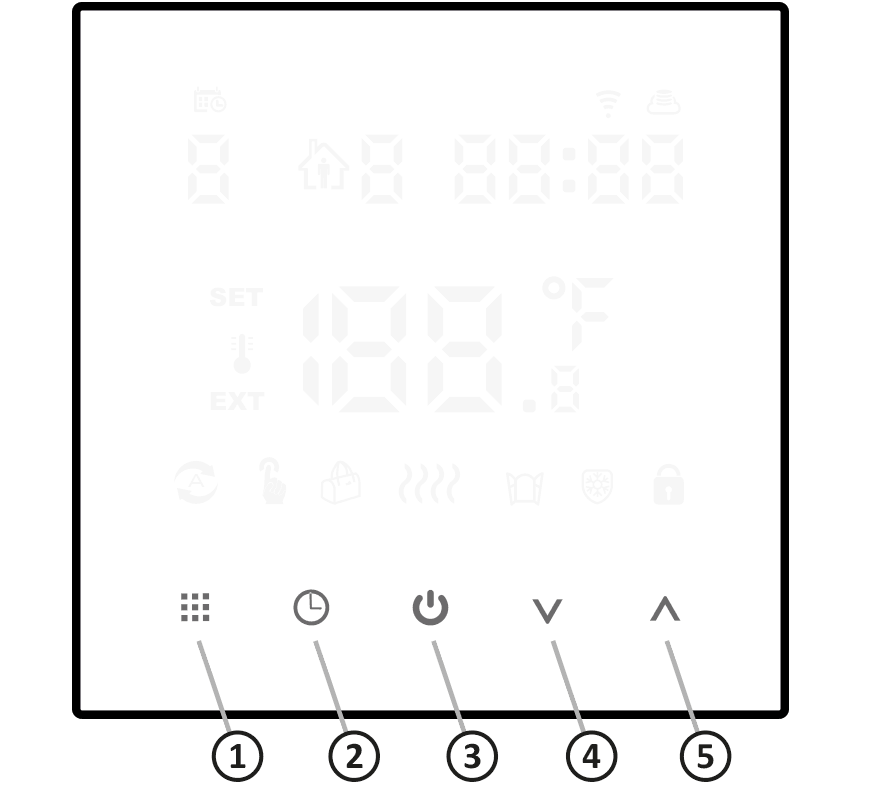
- Menu (ë)
- short press when the thermostat is on switches between manual and automatic operation
- press and hold for approx. 3-5 seconds when the thermostat is on to enter programming settings
- press and hold for approx. 3-5 seconds when the thermostat is off to access advanced option A
- Confirmation button (Ê)
- use it with (ë) to confirm
- to set the clock press briefly to set the time
- holiday mode press and hold the (Ê) button for approx. 3-5 seconds when the thermostat is on. When OFF appears, OFF, press (Á) or (Â), change to ON and press (Ê) to activate the holiday mode
- press and hold for approx. 3-5 seconds when the thermostat is off to access advanced option B
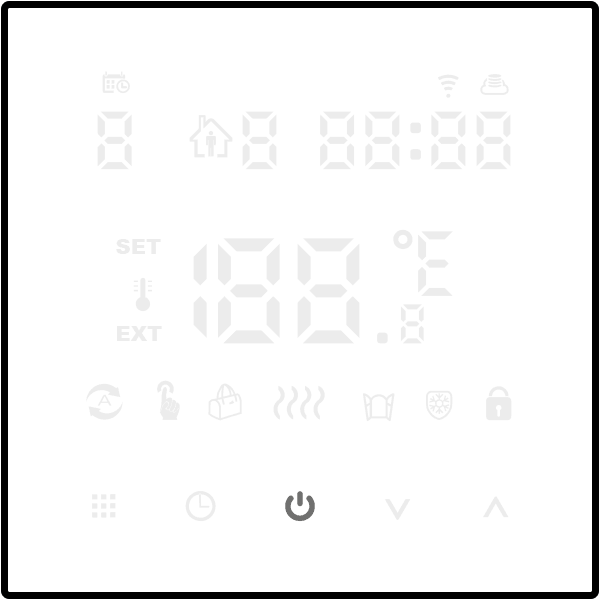
- Thermostat switch (ã) – short press to turn on/off the thermostat
- Decrease button (Á) – long press to lock/unlock
- Increase button (Â)
- long press to check the external sensor temperature (available only for position BN select N3 in advanced option B)
- in the program model, pressing (Á) or (Â) will switch to temporary manual mode.
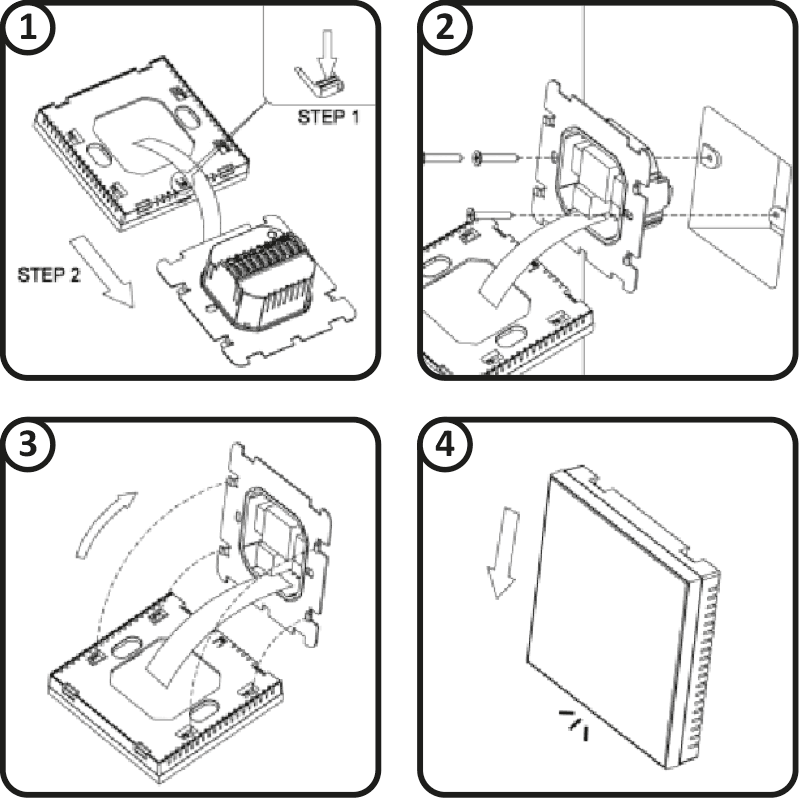
Mounting the AURATON 2YA
weekly, wired thermostat
- Remove the housing as shown below.
- Screw the rear part of the AURATON 2YA housing to a standard Ø 60 mm electrical box using the screws included in the set.
- Put on the housing.
First start-up
After correct connection of the power supply, all segments will appear on the LED display for a second.
The thermostat will then wait for the first start-up or time setting (off mode)
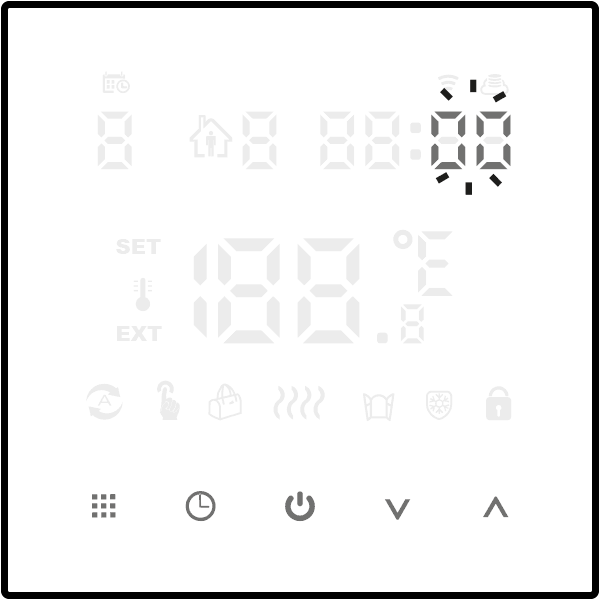
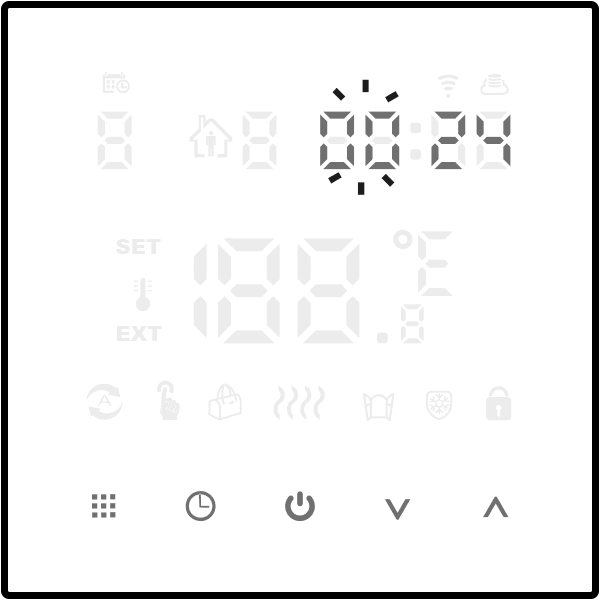
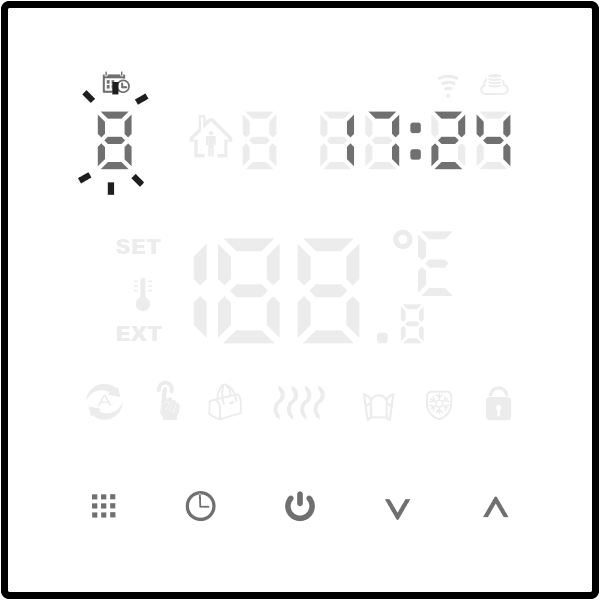
Setting the clock and day of the week
To set the clock, the thermostat must be in the off mode.
- Press and hold (Ê) for 3-5 seconds. The minute segment will start flashing on the display.
- Use the function buttons (ÁÂ) to set the desired minute and confirm with the (Ê) button.
- Use the function buttons (ÁÂ) to set the correct value on the hour segment and confirm again with the (Ê) button.
- A flashing day of the week symbol will appear in the upper left corner of the display. Use the function buttons (ÁÂ) to set the desired day of the week and confirm your choice with the (Ê) button.
When programming any function, not pressing any button for 10 seconds is equivalent to confirming the entered data.
The first press of any function button always displays full information, and only the next call of the button function.
Programming
Before programming in the thermostat menu, one of the three work schedules of the programs must be set.
Setting the work schedule of the thermostat programs: see chapter Advanced settings.
AURATON 2YA allows you to save up to six programs working in three schedules. This allows for extremely accurate planning of the temperature prevailing in the building depending on the time of day.
Schedule 0 (5 + 2 days; factory setting) – allows you to set programs from Monday to Friday and Saturday with Sunday.
Schedule 1 (6 + 1 day) – allows you to set programs from Monday to Saturday and separately Sunday.
Schedule 2 (7 days) – sets six programs for the whole week.
Sample factory programs
| Ä 1 | wake-up | from 6:00 | 20 °C |
| Ä 2 | away from home | from 8:00 | 15 °C |
| Ä 3 | return home | from 11:30 | 15 °C |
| Ä 4 | away from home | od 13:30 | 15 °C |
| Ä 5 | return home | from 17:00 | 22 °C |
| Ä 6 | night | from 22:00 | 15 °C |
To start programming:
The thermostat must be on.
Press and hold the (ë) button for about 5 seconds until the flashing hour segment appears on the display.

Use the (ÁÂ) buttons to select the program start hour, and then go to setting the start minute by pressing the (ë) button again.

Use the (ÁÂ) buttons to select the program start minute, and then go to setting the temperature by pressing the (ë) button.
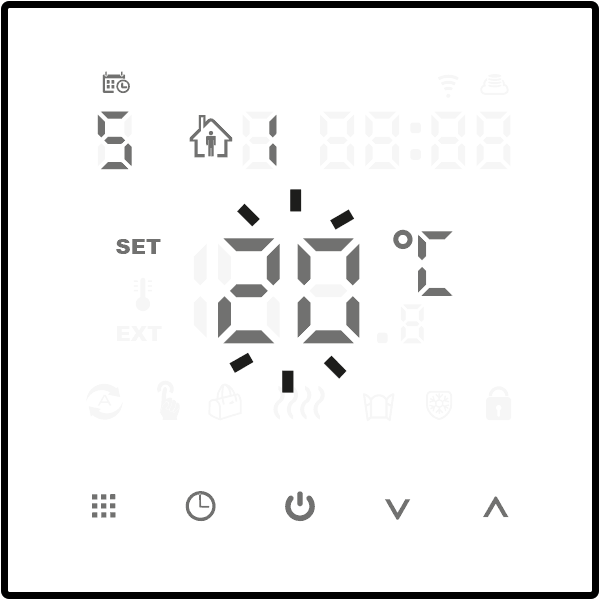
Use the (ÁÂ) buttons to select the program temperature, and then go to setting the next program by pressing the (ë) button.
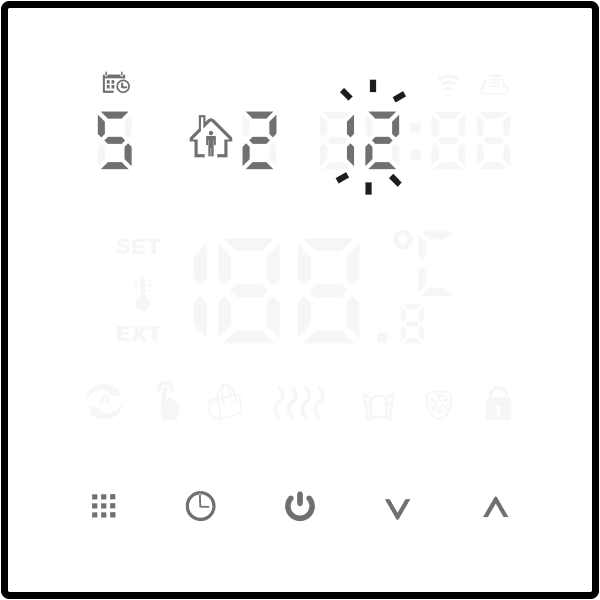
Set subsequent programs up to 6 according to the principle given above.
In this way, we have set the programs from Monday to Friday (5 days). To set 6 subsequent programs for Saturday with Sunday (2 days), proceed in the same way as for weekdays, and the number 2 will be visible on the display, indicating Saturday with Sunday.
After completing the program settings, the thermostat will automatically save the entered settings and start normal operation.
If you set the 2nd work schedule (2:7 days), just set 6 programs that will be implemented every day, throughout the week.
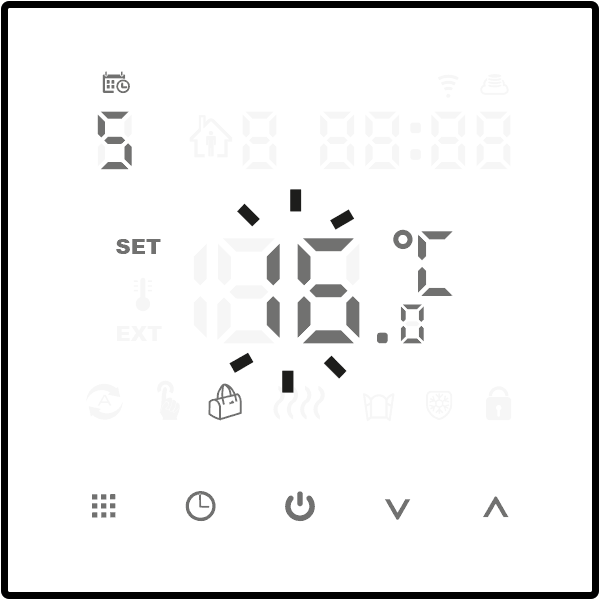
Manual control
Ö
If for some reason you want to interrupt automatic operation at a given moment and change the maintained temperature, you can do it manually.
Use the (ë) button to select the manual mode, which is indicated on the display by the (Ö) symbol. Then, use the (ÁÂ) buttons to select the desired value, which will be automatically saved. To return to the program (automatic operation), use the (ë) button. Then, the (Ü) symbol will be visible on the display.
You can also activate the temporary manual mode, which maintains the manual temperature until the next change in the program.
To activate the temporary manual mode, press the (Á or Â) button in automatic mode, and then use the same buttons to set the desired value.
To cancel this mode, use the (ë) button until the (Ü) symbol is visible on the display.
Holiday mode
õ
If we would like to suspend the operation of the programs for a longer period, we can use the holiday mode. During this option, AURATON 2YA only implements the “holiday temperature”.
The maximum duration of the holiday mode is 30 days.
To activate the holiday mode (thermostat on):
- Press and hold the (Ê) button for about 5 seconds until the flashing OFF message is visible on the display.
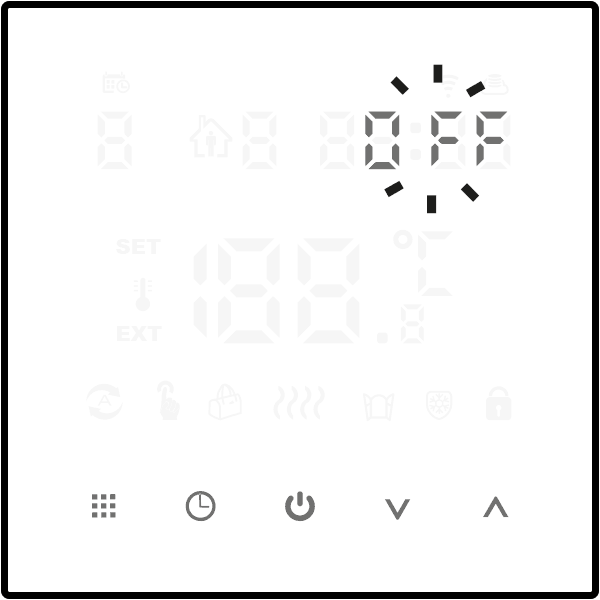
- Use the (ÁÂ) buttons to change to ON, then confirm with the (Ê) button.
- Then, use the (ÁÂ) buttons to select the appropriate number of days and confirm with the (Ê) button.

- Then, use the (ÁÂ) buttons to set the desired temperature.
- Confirm everything with the (Ê) button.
During the holiday mode, the (õ) symbol will be visible on the screen.
A possible faster end to the holiday mode can be achieved by pressing the (Ê) button for about 5 seconds and changing the message to OFF with the (ÁÂ) buttons. Then, confirm your choice with the (Ê) button.
When programming any function, not pressing any button for 10 seconds is equivalent to confirming the entered data.
The optimal comfort temperature is 18 °C – 22 °C.
Advanced function A
With the AURATON 2YA thermostat turned off, a long press of the (ë) button for 3-5 seconds will give access to advanced option A.
Select points A1 to AE by short pressing the (ë) button, and make changes in them using the (ÁÂ) buttons.
We can confirm the settings made with the (ë) button, which results in their saving and the thermostat starting normal operation, or wait about 5 seconds for their automatic saving. In this case, the thermostat will remain off.
Tabela ustawień zaawansowanych A.
| Nr | Opis | Funkcja | Ustawienie fabryczne |
| A1 | Kalibracja wskazań temperatury. | od -9 °C do +9 °C (Wyświetlana jako skorygowana wartość temperatury pokojowej) | -1 |
| A2 | Ustawienie różnicy temperatury roboczej start/stop (histereza) | 0,5-2,5 °C | 1 °C |
| A3 | Ustawienie blokady dla dzieci |
0: blokada częściowa, można użyć tylko przycisk wyłącznika 1: pełna blokada, wszystkie przyciski zablokowane |
0 |
| A4 | Pamięć stanu włączenia/wyłączenia po zaniku zasilania |
0: Po powrocie zasilania pozostaje w stanie przed zanikiem 1: Po powrocie zasilania regulator pozostaje wyłączony 2: Po powrocie zasilania regulator pozostaje włączony |
0 |
| A5 | Jasność w trybie czuwania | Poziomy jasności: od 0 do 4 (0 = wyłaczone) | 3 |
| A6 | Harmonogram pracy programów |
0: 5+2 (od pn do pt + sobota wraz z niedzielą) 1: 6+1 (od pn do sob + niedziela) 2: 7 (cały tydzień) |
0 |
| A7 | Ustawienie zakresu minimalnej temperatury | 1-10 °C | 5 °C |
| A8 | Ustawienie zakresu maksymalnej temperatury | 20-70 °C | 35 °C |
| A9 | Temperatura przeciwzamrożeniowa | Zakres: 1-10 °C. Przy ustawieniu temperatury równej 10 °C, jeśli naciśnięty zostanie przycisk (Â) wyświetli się (ä) i nastąpi anulowanie ochrony przed niska temperaturą | 5 °C |
| AA | Ochrona przed wysoką temperaturą dla czujnika zewnętrznego | Zakres: 20-70 °C. Przy ustawieniu temperatury równej 20 °C, jeśli naciśnięty zostanie przycisk (Á) wyświetli się (ä) i nastąpi anulowanie ochrony przed wysoką temperaturą. | 45 °C |
| AB | Ustawienie różnicy temperatur zabezpieczenia przed wysoką temperaturą | 1-9 °C | 2 °C |
| AC | Funkcja okna wyzwala temperaturę | Zakres: 10-20 °C. Ustawiona temperatura to 10 °C, zmniejsz ją, wyświetli się (ä), a następnie anuluje tę funkcję. | – |
| AD | Czas pracy funkcji okna | 50-60 min. | 15 |
| AF | Przywracanie ustawień fabrycznych | Wyświetlany symbol Ao, przytrzymać przycisk (Ê), następuje reset regulatora | |
| AH | Tryb grzenia/chłodzenia |
0: grzanie 1: chłodzenie |
0 |
| AE | Jasność po wybudzeniu | Poziomy jasności: od 1 do 5 | 4 |
Zaawansowana funkcja B
W stanie wyłączenia regulatora AURATON 2YA, długie naciśnięcie przycisku (Ê) przez 3-5 sekund, spowoduje dostęp do opcji zaawansowanej B
Punkty od BN do Bo należy wybrać poprzez krótkie naciśnięcie przycisku (ë), a zmiany w nich dokonujemy za pomocą przycisków (ÁÂ).
Dokonane nastawy możemy zatwierdzić przyciskiem (ë), co skutkuje ich zapamiętaniem i przystąpieniem regulatora do normalnej pracy lub poczekać około 5 sekund na ich automatyczne zapamiętanie. W tym przypadku regulator pozostanie wyłączony.
Tabela ustawień zaawansowanych B.
| Nr | Opis | Funkcja | Ustawienie fabryczne |
| BN | Opcje sterowania czujnikami |
N1: praca regulatora tylko z czujnikiem wbudowanym N2: praca regulatora tylko z czujnikiem zewnętrzyn. N3: praca regulatora z dwoma czujnikami. W takiej sytuacji wyłączenie ogrzewania nastąpi w przypadku osiągnięcia wymaganej temperatury przez którykolwiek z czujników |
N1 |
| BC | Funkcja odkamieniania |
0: Wyłączenie funkcji odkamieniania 1: Włączenie funkcji odkamieniania |
0 |
| Bo | Wersja oprogramowania | Nie można jej zmienić | 02 |
Należy wybrać prawidłowy sposób działania czujnika wbudowanego i zewnętrznego, w przypadku błędnego wyboru lub uszkodzenia czujnika (awaria), na ekranie wyświetli się „E1” lub „E2”. Regulator AURATON 2YA wyłączy ogrzewanie, dopóki usterka nie zostanie usunięta.
Schemat podłączenia
Podłączenia do pieca gazowego – sterowanie bezpotencjałowe
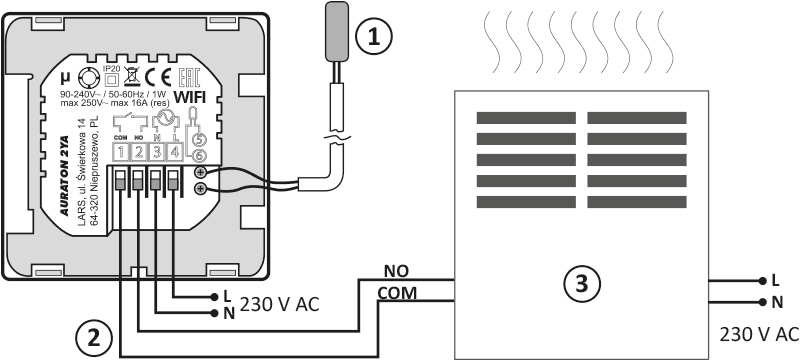
- Zewnętrzny czujnik temperatury
- Sterowanie
- Urządzenie grzewcze, np. piec gazowy
Podłączenia do urządzenia elektrycznego – sterowanie napięciowe
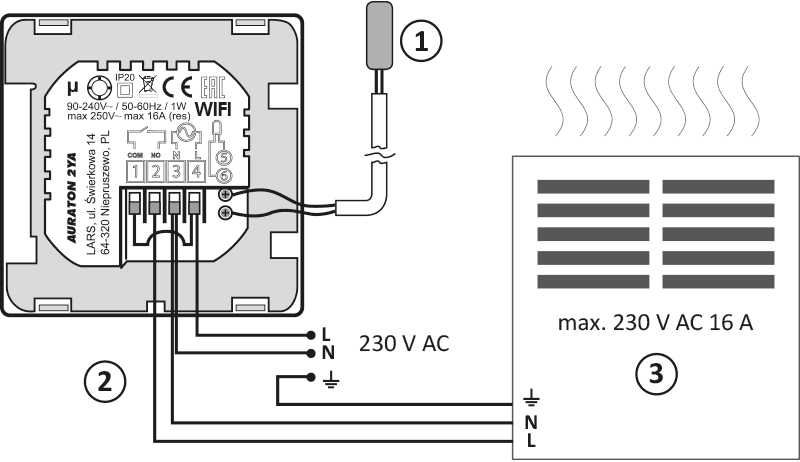
- Zewnętrzny czujnik temperatury
- Sterowanie
- Elektryczne urządzenie grzewcze lub klimatyzacyjne (max. 230 V AC 16 A)
Q
UWAGA:
W trakcie instalowania AURATON 2YA dopływ energii elektrycznej powinien być wyłączony. Zaleca się powierzenie instalacji regulatora specjaliście.
W instalacji stałej budynku musi znajdować się wyłącznik oraz zabezpieczenie nadprądowe.
Czyszczenie i konserwacja
- Zewnętrzną część urządzenia należy czyścić suchą szmatką. Nie korzystaj z rozpuszczalników (takich jak benzen, rozcieńczalnik lub alkohol).
- Nie należy dotykać urządzenia mokrymi rękoma. Może to spowodować porażenie prądem elektrycznym lub poważne uszkodzenie urządzenia.
- Nie narażaj urządzenia na nadmierne działanie dymu lub kurzu.
- Nie dotykaj ekranu ostrym przedmiotem.
- Unikaj kontaktu urządzenia z cieczami lub wilgocią.
Dane techniczne
| Zasilanie: | 90-240 V AC/50-60 Hz/1 W |
| Zakres temperatury pracy: | 0-90 °C |
| Zakres temperatury granicznej: | 1-70 °C |
| Zakres regulacji temperatury: | 1-35 °C |
| Zakres wyświetlania temperatury: | 1-70 °C ±0,5 °C |
| Czujnik sondy: | NTC(10k)1% |
| Cykl pracy: | tygodniowy, programowalny |
| Sygnalizacja stanu pracy: | Wyświetlacz LED |
| Obciążalność przekaźnika: | Maks. 250 V AC, maks. 16 A |
| Ilość poziomów temperatury: | 8 |
| Temperatura minimalna/maksymalna | 1-10 °C/20-70 °C |
| Zakres sterowania temperatury: | 1-70 °C |
| Histereza: | 0,5-2,5 °C |
| Stopień ochrony: | IP20 |
| Wilgotność: | ≤85 % bez kondensacji |
| Kolor: | czarny lub biały |
| Wi-Fi | Tuya Smart, Smart Life |
| Montaż: | podtynkowy |
| Wymiary [mm]: | 86 x 86 x 27 |
Utylizacja urządzenia
O
Urządzenia są oznaczone symbolem przekreślonego kontenera na odpady. Zgodnie z Dyrektywą Europejską 2012/19/UE oraz Ustawą o zużytym sprzęcie elektrycznym i elektronicznym takie oznakowanie informuje, że sprzęt ten, po okresie jego użytkowania nie może być umieszczany łącznie z innymi odpadami pochodzącymi z gospodarstwa domowego.
Użytkownik jest zobowiązany do oddania go w punkcie odbioru zużytego sprzętu elektrycznego i elektronicznego.
Adres i kontakt do producenta:
LARS, ul. Świerkowa 14
64-320 Niepruszewo
www.auraton.pl