
Instruction manual version 20250313
The document contains information on the safety, installation, and use of the AURATON Carina WiFi.
Weekly, multi-functional WiFi socket thermostat
AURATON Carina WiFi is a modern socket thermostat that offers precise temperature control with minute accuracy. Thanks to the Wi-Fi module, the device connects to the home network, allowing remote control using the Tuya Smart and Smart Life applications. The thermostat is an ideal solution for people who want to conveniently manage the temperature in their home, without having to manually adjust the settings.
Characteristics
- Child lock to prevent mishandling.
- Weekly programming modes include: 5+2, 6+1 and 7 days. You can do the programming yourself.
- Vacation mode allows you to save energy during your vacation.
- Temporary manual mode: after setting the temperature in programming mode, the controller temperature will start at the temperature set temporarily, and then return to programming mode.
Icons Description
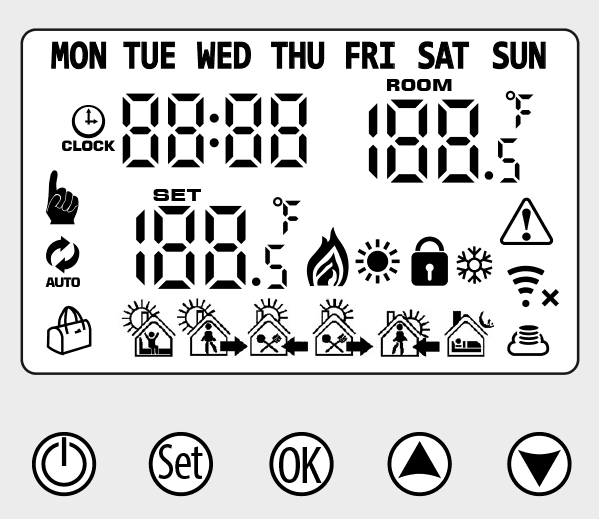
- Ý – Programming mode
- ê – Manual mode
- Ýê – Temporary Manual Mode
- Ú – Heating, icon disappears when heating is turned off
- Û – Cooling, icon disappears when cooling is turned off
- å – Cloud icon: Flashing AP distribution network mode
- åá – Wi-Fi connection, flashing EZ distribution mode
- Î – Child lock
- õ – Vacation mode
- Þ – Wi-Fi Status: Disconnected
- Ù – Clock
| Ñ | Button On Off: short press to turn on off |
| Ò |
|
| Ô |
|
| Ò + Ô | Device on: long press at the same time to enter the Wi-Fi distribution network |
| × |
|
| Õ |
|
Programming
5+2 (factory default), 6+1 and 7 days. 6 temperature changes selectable by the user. In the advanced options, you can choose a different mode.
In the power-on state, press and hold the Ò button for 3-5 seconds to enter the programming mode setting, then short press the button Ò select: hour, minute and time interval and press × and Õ” to adjust the data. After about 10 seconds, the thermostat will automatically save the settings.
 |
|---|
 |
|---|
 |
|---|
 |
|---|
 |
|---|
 |
|---|
The optimal comfort temperature is 18-22 °C.
Advanced settings
Turn off the thermostat, press and hold Ò for 3-5 seconds to enter the advanced setting. From A1 to AC, short press Ò” to select an option and adjust the data by Õ and ×”, short press Ò. After about 10 seconds after the settings are completed, they will be remembered.
| NO | Settings options | Data setting function | Factory setting |
|---|---|---|---|
| A1 | Calibration of the measured temperature | +/-9 °C | -1 |
| A2 | Hysteresis | 0,5-2,5 °C | 1 °C |
| A3 | Lock settings for children | 0: Half lock; 1: Full lock |
0 |
| A4 | Cold protection | 1~10 °C; With temperature setting = 10°C, if the button is pressed, Õ it will display ä, indicating canceling the low temperature protection | 5 |
| A5 | Minimum temperature range setting | 1~10 °C | 5 |
| A6 | Maximum temperature range setting | 20~70 °C | 35 °C |
| A7 | Power-on state memory after power cut | 0: Thermostat status with memory prior to power off 1: Thermostat off after power on 2: 2: Thermostat on after power on |
0: Thermostat status with memory prior to power off |
| A8 | Weekly programming selection | 0:5+2 1:6+1 Matt. 2:7 |
0 |
| A9 | Heating or cooling mode | 0: cooling 1: heating |
1 |
| AA | Window function | 5-25 °C. With temperature setting = 5°C, if the × button is pressed, it will display –, indicating cancellation window functions | — |
| AB | Window function runtime | 5~60 minutes | 15 |
| AC | Factory reset | The „Ao” symbol is displayed, hold down the Ô button until the LCD displays fully and restore parameter A of the advanced option as default |
Installation Guide
- Please read this manual carefully. Failure to follow these instructions may result in damage to the product or a hazardous situation.
- Check the maximum load listed in the manual and product to ensure that the product is suitable for your application.
- The installer must be a trained and experienced service technician.
- Once the installation is complete, follow the instructions.
Technical specifications
| Power supply: | 230V AC, 50 Hz, 1,5 W |
| Working temperature range: | 0 – 50 °C |
| Working cycles: | Weekly |
| Relay load capacity: | max. 16 A (res), max. 6 A (ind) |
| Level of security: | IP 20 |
| Humidity: | ≤85 % non-condensing |
| Suggested installation location: | Electric socket |
| Dimensions [mm]: | 140 x 67 x 40 |
Disposal of the device
O
The devices are marked with the crossed-out wheeled bin. According to European Directive 2012/19/EU and the Waste Electrical and Electronic Equipment Act, this kind of marking indicates that the equipment, after its operational life must not be disposed of together with other waste from households.
The user shall return it to a collection point for electrical and electronic waste.
Contact and address of the manufacturer:
LARS, ul. Świerkowa 14
64-320 Niepruszewo
www.auraton.pl


