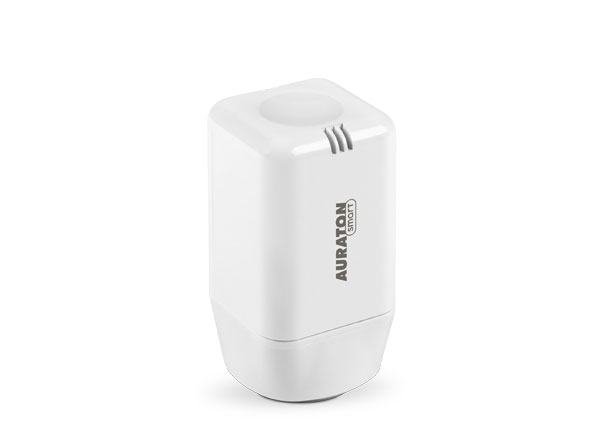
User’s Manual ver. 1.3
The document presents collected information on safety, assembly and use of Auraton Radiator Controller.
Basic information
Auraton Radiator Controller (thermostatic head), together with Auraton Heat Monitor form a programmable, electronic room thermostat. The thermostatic head is designed for mounting on M30x1.5 radiator inserts and (by using a special adapter) on Danfoss RA-N valve (the adapter included). The thermostatic head communicates wirelessly with Auraton Heat Monitor to get information about the current room temperature and the temperature set. In one room, you can control 3 radiators with Auraton Radiator Controllers, but they all should be paired with the same Auraton Heat Monitor.
Optional components of the system
Auraton Radiator Controller is designed to work with Auraton Heat Monitor and Auraton Pulse web central unit, which allows you to control the operating parameters using the application installed on your phone or tablet.
Description of the thermostatic head
The thermostatic head is mounted directly on the radiator or underfloor heating manifold.
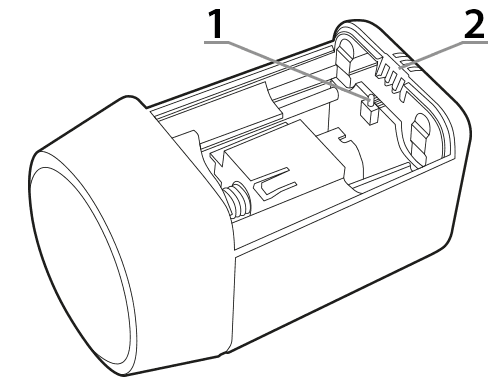
- – Battery cover closing, pairing and reset button.
- – LED indicator.
Installation of the thermostatic head
Radiator with M30x1.5″ insert
To mount the Auraton Radiator Controller thermostatic head on a radiator with the most popular insert on the market (M30x1.5) proceed as follows:
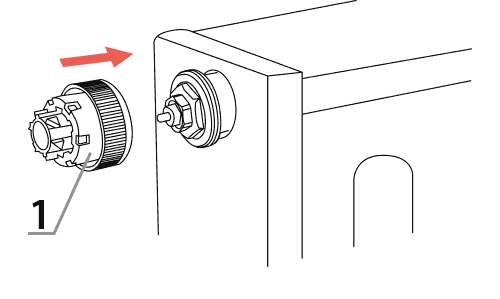
- Screw tightly reduction A (1) onto the insert. The reduction is provided as a set with the thermostatic head.
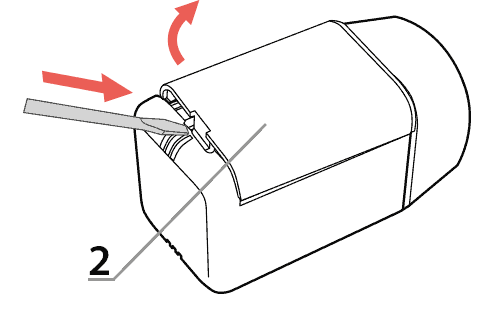
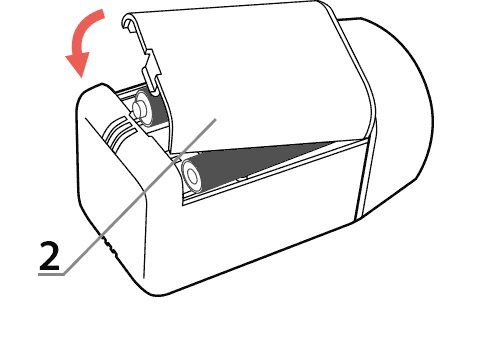
- Remove the battery cover (2) of the head using a flat head screwdriver.
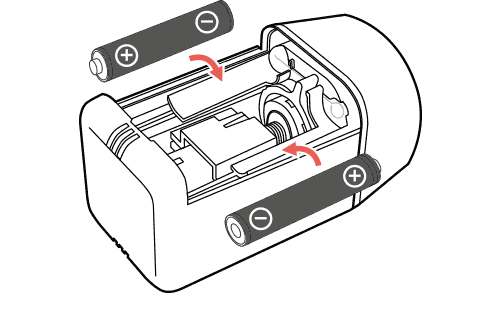
- Install two AAA batteries in the thermostatic head, paying attention to their polarity. Spindle of the thermostatic head moves to the extreme open position, which is necessary to mount the head on the reduction.
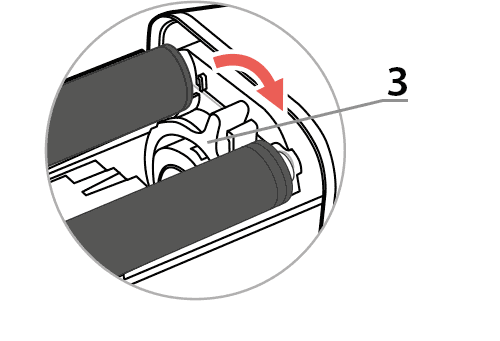
- Turn the securing ring (3) into “unlocked” position.
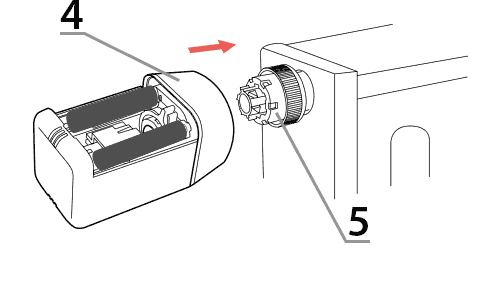
- Slip a head (4) on A reduction in (5) until the end.
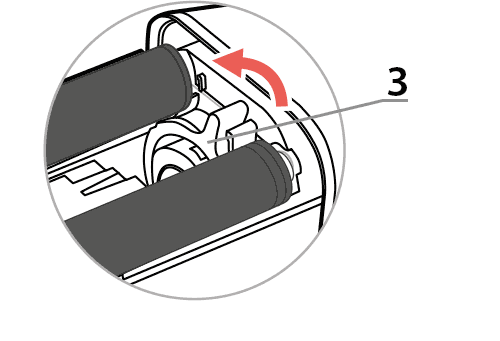
- Turn the securing ring (3) into “locked” position.
- Perform the pairing procedure with Auraton Heat Monitor or Auraton Pulse, if not performed earlier.
- Close the battery cover (2) of the thermostatic head.
Danfoss radiator with RA-N insert
In order to mount the Auraton Radiator Controller on a radiator with Danfoss RA-N insert, proceed as follows:
- Insert two halves of B reduction (1) onto the Danfoss insert.
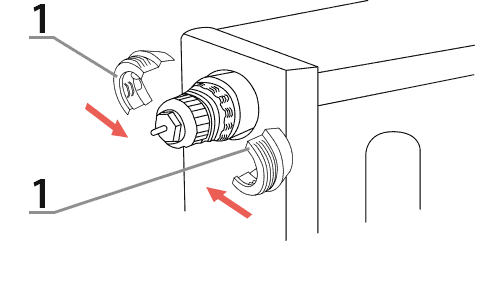
- Screw tightly reduction A (2) onto the installed reduction B (1)
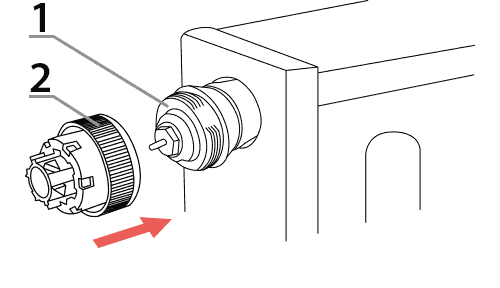
- Perform steps 2 – 8 of chapter Radiator with M30x1.5″ insert
Installation guidelines
Auraton Heat Monitor should be installed in a room, where the thermostatic head is installed on a radiator. It should not be installed near the radiator, next to the doors or in direct sunlight. The thermostatic head should be mounted on the radiator insert, maximally 20 cm from the heater. In almost all cases, this condition is met; manufacturers integrate inserts with the radiators. If the thermostatic head is too far from the radiator (the radiator does not heat it directly), then the temperature control will be less dynamic. Greater room temperature fluctuations may occur. However, it is allowed to mount Auraton Radiator Controller on inserts at the bottom of the radiator (e.g. popular bathroom ‘ladders’).
Pairing the devices
To ensure proper operation of Auraton Radiator Controller, it is required to pair it with Auraton Heat Monitor or Auraton Pulse web central unit. Activated pairing mode is indicated on the thermostatic head by blinking red LED. To one Heat Monitor you can pair maximum three Radiator Controllers. To perform the pairing process proceed as follows:
- Remove the battery cover (preferably using a flat screwdriver).
- Wait until the motor ends its move.
- Press 3 times (quickly) the black button closing the battery cover, located on the PCB.
- Activate pairing mode of the other device to be paired (examples described below).
- Wait for three beeps that confirms the successful pairing of devices.
- Close the battery cover (if already installed on the radiator).
If the first pairing fails, do a factory reset, move closer to the Auraton Pulse and perform the pairing again.
Activation of pairing – Auraton Heat Monitor
On Auraton Heat Monitor press simultaneously buttons b d or c d for 3 seconds until the transmission symbol ( W ) lights up on the display. Heat Auraton Monitor waits 30 seconds for pairing. After this time, it automatically returns to normal operation.
Activation of the pairing function – Auraton Pulse Central Unit
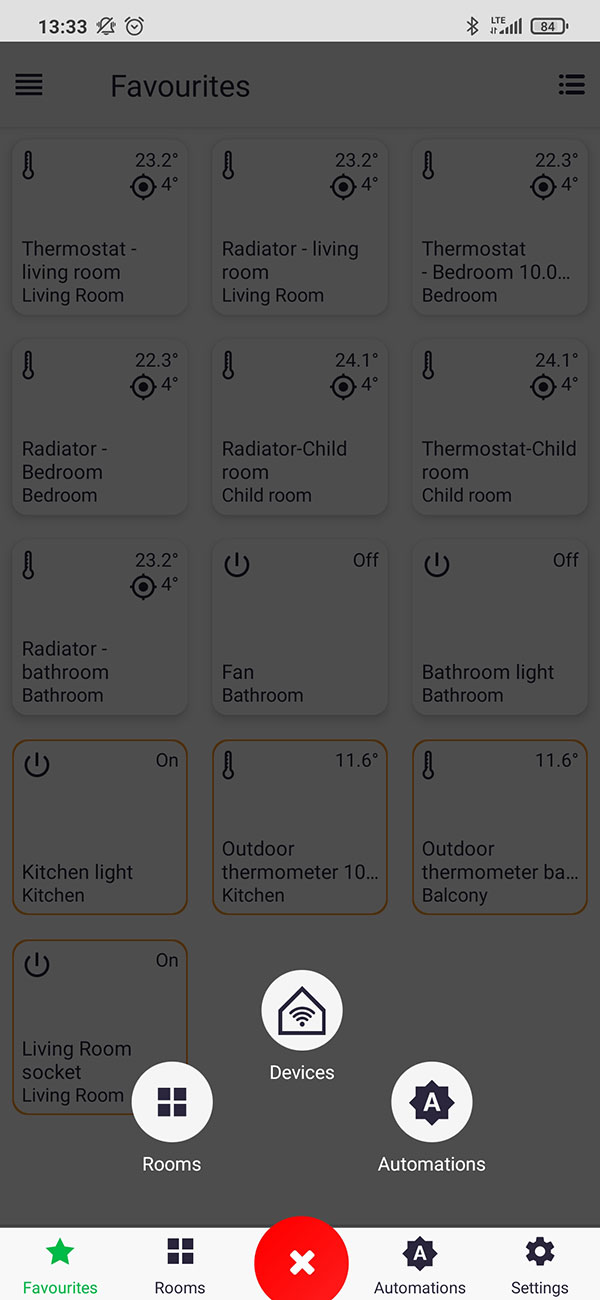
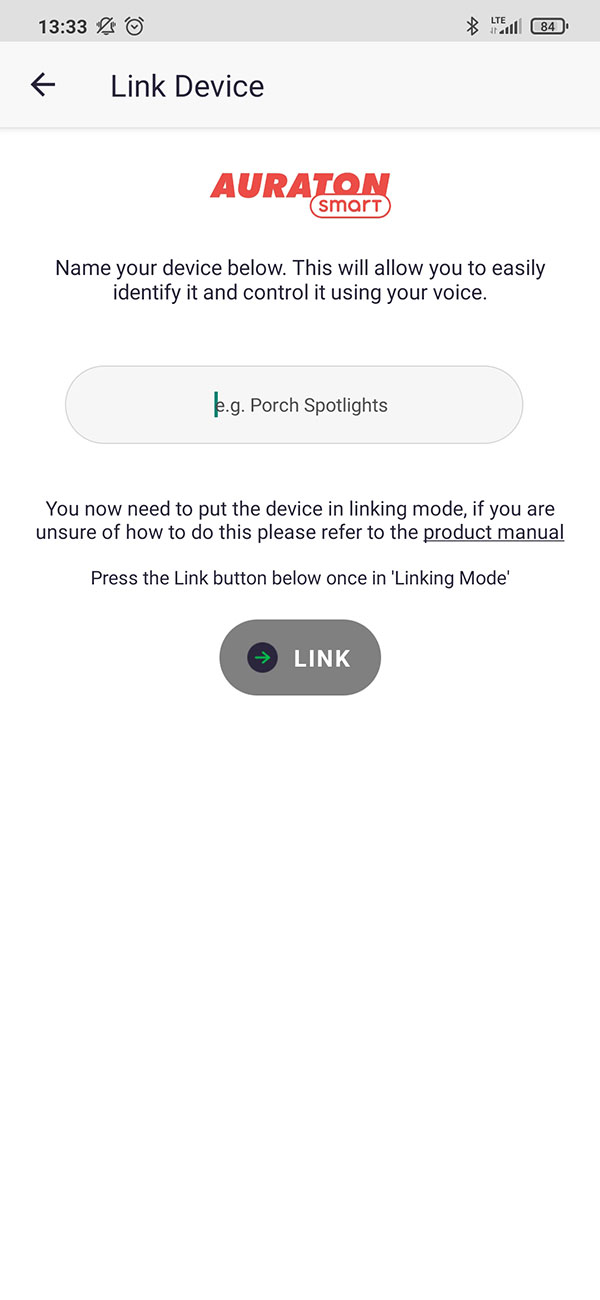
In Auraton Pulse, the pairing function is activated via Auraton Smart App. After it is enabled, press green ‘+’ button located on the centre of the screen. On the next screen, press the home icon marked as “Devices”. On the next screen, enter the name of the device that is added. After entering the name, press the “Add” button. After successful pairing, the device may be placed in any previously added room and added to ‘favourites’.
Restoring factory settings
Restoring factory settings means deleting all configuration data from Auraton Radiator Controller, including all paired devices. The procedure is as follows:
- Remove the battery cover of the thermostatic head.
- Remove one battery.
- Press the battery cover closing button (located on the PCB between the batteries).
- Holding the button pressed, insert the battery.
- After three beeps, release the button.
Functions of the device
Principles of heating function
Radiator Auraton controller smoothly controls heating based on own temperature measurement (less precise control) or using external temperature sensor, e.g. Heat Monitor (more precise control). Based on the measured external temperature (recommended option), the algorithm determines the percentage value of valve opening e.g. on the radiator, to ensure that the temperature in the room reaches the set value (taking into account certain thermal inertia).
Valve descaling function
In order to prevent scaling in the radiator valve, Radiator Controller regularly opens it. After opening, accumulated deposit is washed out, and the thermostatic head may work properly. This function is activated once every two weeks. Additionally, an operational mode is provided, in which after every change of the target temperature the valve is partially opened to flush fine sludge particles that may have been accumulated.
Restoring previous firmware
The aim of this function is to restore previous firmware in case of improper operation of the device after the update. The whole operation can take up to one minute, during which the unit must remain powered. Always the previous version of the firmware is loaded. When the firmware has been changed earlier from version 1.6 to 1.5, then the previous version is 1.6.
- Remove the battery cover of the head, preferably using a flat screwdriver.
- Remove one battery.
- Press the battery cover closing button (located on the PCB between the batteries).
- Holding the button pressed, insert the batteries.
- When you hear a triple beep, do not release the button until the next sound information (four beeps), then release the button.
Signalling after activation of the thermostatic head
After inserting the battery, the thermostatic head indicates its readiness to work by a sound signal and LED. There are two possible scenarios:
- A single beep – indicates that the thermostatic head is paired with other device. Then, you can only install the head on the radiator insert and close the battery cover. After approx. 30 seconds the head starts the temperature control.
- Three Beeps – the head is not paired with any device yet. The head will stabilize its internal temperature at the level of 20 degrees. It is not recommended to operate the head in this mode, due to the difference between the temperature of the head operating on the radiator and the room temperature. In addition, Radiator Controller working without paired Auraton Heat Monitor consume more power, discharging batteries faster.
Signalling the calibration errors
After mounting on the radiator and closing the battery cover, the thermostatic head performs the calibration of mechanical system. If an error occurs during calibration, it is signalled by sound signal (beep) – 1sec. every 1s. In case of a calibration error, check the following:
-
- Is reduction A is properly screwed onto the radiator insert?
- Is reduction B (for Danfoss inserts) is properly fastened on the insert? Is reduction A properly screwed into the reduction B?
- Is securing ring set properly in position “secured”?
- Are installed batteries discharged?
Battery life, and low battery indication
Declared operational time with one set of AAA alkaline batteries is one year. The temperature control is not affected by discharged battery. The thermostatic head indicates a low battery level by flashing LED – twice every 8 seconds. Additionally, when the battery runs really low, the thermostatic head begins beep – two beeps every 8 minutes. To disable the sound signal for one day, press any button on Auraton Heat Monitor paired with this thermostatic head, or lift the flap on the head for 2s. and re-install it.
Device operational modes
The set, including Auraton Heat Monitor with Auraton Radiator Controller, may operate in two modes:
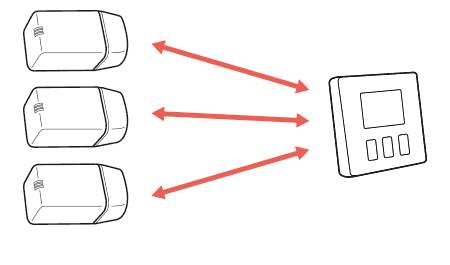
Mode I (local):
In this mode, the monitor and the controller (head) may work independently without the need to use Auraton Pulse central unit. It is sufficient when Auraton Heat Monitor is properly paired with Auraton Radiator Controller. One Auraton Heat Monitor may be paired with 3 thermostatic heads.
Mode II (remote):
In the remote mode, you can use Auraton Pulse web central unit, which provides the access to the entire system remotely from locations outside the home.
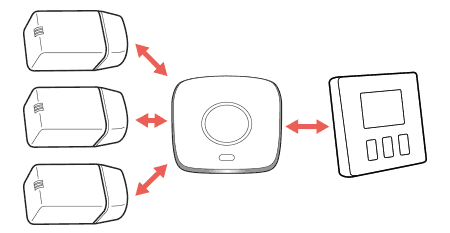
This allows you to remotely control heating, check battery levels, receive notifications about events, create schedules and more.
For proper remote control, you need access to the Internet both for the central panel and for the phone or tablet with the app (Android, iOS).
When using Mode II (remote), it is recommended to pair the Radiator Controller with the Heat Monitor. Thanks to pairing the devices first, the set will work properly even in the event of a power outage. Up to 3 devices can be added to one Heat Monitor.
Operation with Auraton Pulse central unit
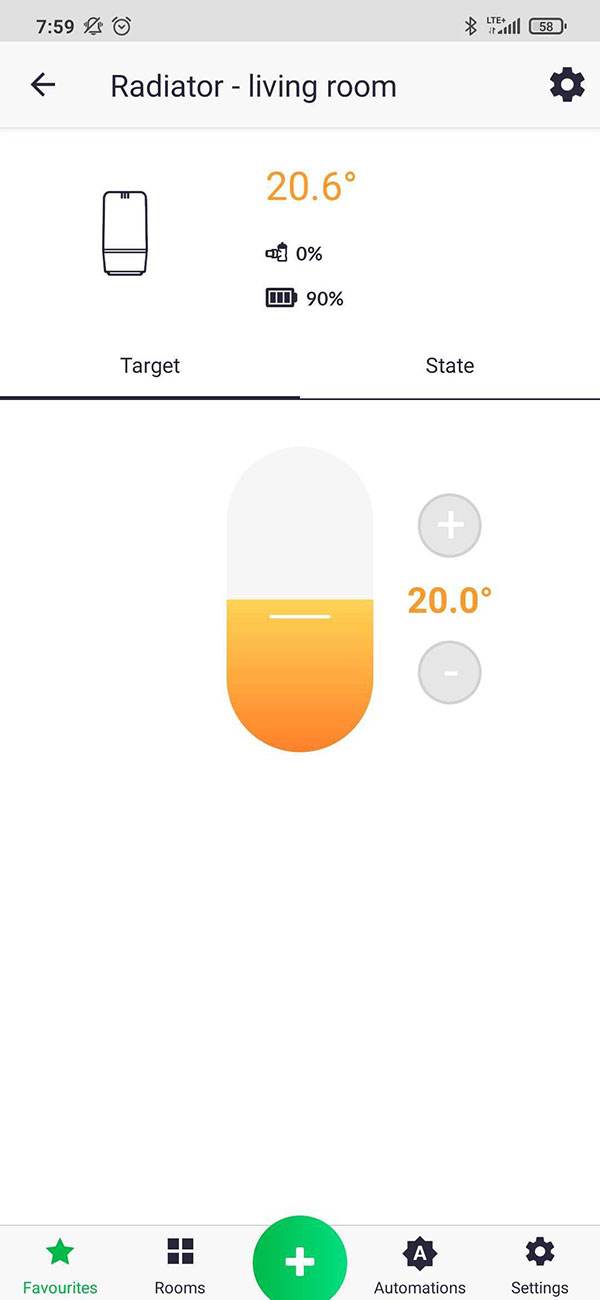
Radiator Controller thermostatic head is paired with Auraton Pulse central unit and with other devices (as defined in the paragraph on pairing devices) and the only difference is that the pairing mode on the central unit is activated through the app by pressing green ‘+’ button at the bottom of the screen, which is followed by clicking the icon marked as “Devices”. Details are described in the user manual of the app. The picture below shows the screen for controlling the thermostatic head, where the following parameters are displayed: current temperature, target temperature, battery status (%), radiator valve opening (%), device status (ON/OFF), position from 0 to 5 (read-only parameter showing the valve opening in relation to traditional mechanical thermostatic head). These last two parameters can be changed in separate tabs, entered by pressing icons marked as “Status” or “Position”.
Radiator Controller thermostatic head is primarily intended to operate with Heat Monitor controller and with Heater Controller – a thermostatic boiler switch. The application provides the user with easy way to pair the head with thermostat creating two functions of “Group” type. One Group should include the current temperature, while the second Group the target temperature, to transfer each change in any device to other devices. If system is installed in a house, where the boiler is activated by Auraton Heater Controller, it is possible to link all mounted thermostatic heads with the boiler using the “Heating” function. This function activates the boiler, when the valve opening in any radiator with installed thermostatic head is higher than 0 %.
Technical specifications
| Operating temperature range: | 0 – 45 °C |
| Temperature measurement range: | 0 – 45 °C |
| Temperature control range: | 0 – 40 °C |
| Accuracy of temperature settings: | 0.1 °C |
| Accuracy of temperature measurement: | 0.1 °C |
| Default temperature: | 21 °C |
| Additional function: | FrostGuard |
| Checking the operational status: | LED, sound signalling |
| Power supply: | 2 x alkaline battery 1.5 V AAA |
| Compatible with Internet getaway | Auraton Pulse |
| Protection rating | IP20 |
| Radio frequency: | 868.150 MHz 868.450 MHz 869.800 MHz |
| Radio signal strength: | 11 dBm |
| Category of the radio receiver: | 2 |
| Operating range: | in a typical house, with standard wall structures – up to 30 m outdoors – up to 300 m |
Disposal of the device
O
The devices are marked with the crossed-out wheeled bin. According to European Directive 2012/19/EU and the Waste Electrical and Electronic Equipment Act, this kind of marking indicates that the equipment, after its operational life must not be disposed of together with other waste from households.
The user shall return it to a collection point for electrical and electronic waste.
